So you've got a database full of useful data, and now something else needs to get at it. Maybe it's a mobile app. Maybe it's a JavaScript front-end that refuses to do full page reloads.
Or maybe a client emailed asking for "an API endpoint" and you nodded along like you knew exactly what they meant. We've all been there.
That's what we're building today: a REST API written in plain PHP that talks to a MySQL database. No Laravel, no Symfony, no Composer packages to fight with. Just PHP and the tools you already have on your machine.
By the end, you'll have a working API that can list products, grab a single product, create new ones, update them, and delete them - all through clean URLs and the proper HTTP methods. We'll also bolt on an API key so random strangers can't poke at your data.
I'll explain the reasoning behind each piece, not just paste code at you. Right, let's build something.
To build a REST API in PHP, route every request through a single index.php front controller, read the HTTP method and resource from the URL, map GET, POST, PUT and DELETE to database reads and writes with PDO prepared statements, and return JSON with the correct HTTP status code. Require a valid API key on every request to keep it secure.
Want the finished code? The free download is at the end of this tutorial.
Contents
- What Is a REST API, Really?
- What You'll Need
- Setting Up the Database
- How the API Will Be Organized
- Connecting to the Database
- The Product Class
- The Front Controller: Routing and Responses
- Walking Through the Endpoints
- HTTP Status Codes That Matter
- Locking It Down with an API Key
- Testing Your API
- Frequently Asked Questions
1. What Is a REST API, Really?
Let's clear this up before we write a single line of code, because the jargon scares people off for no reason.
A REST API is a set of rules for letting two programs talk to each other over HTTP - the same protocol your browser already uses. You ask for a "thing" using a URL, and the server hands back data, usually as JSON.
That "thing" is called a resource. In our case, the resource is a product.
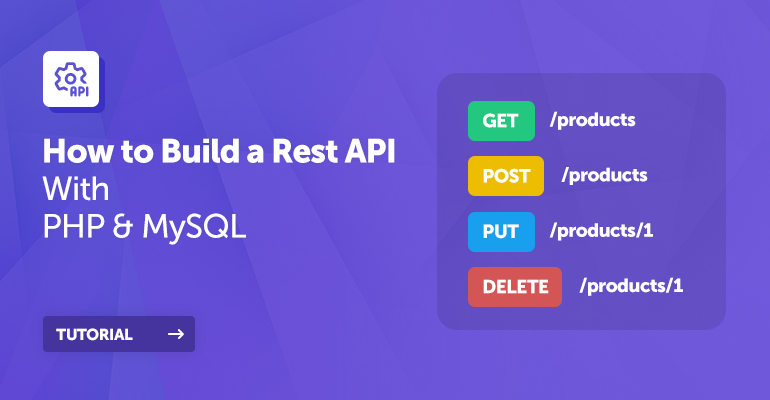
The clever part of REST is that you don't invent new words for every action. You reuse the HTTP methods that already exist, and each one lines up neatly with a database operation:
- GET - read data ("show me the products")
- POST - create something new ("add this product")
- PUT - update something that already exists ("change product 5")
- DELETE - remove it ("get rid of product 5")
If you've heard of CRUD (Create, Read, Update, Delete), congratulations, you already understand the whole idea. REST is basically CRUD wearing an HTTP costume.
There's a great reference on the HTTP request methods over at MDN if you ever want to dig deeper.
One more thing worth knowing: REST is stateless. The server doesn't remember you between requests. Every request has to carry everything it needs - including, as we'll see later, the API key that proves you're allowed to be there.
2. What You'll Need
Nothing exotic. If you've ever run a PHP script locally, you're already set up:
- PHP 7.4 or newer (8.1+ is ideal, and the code below runs happily on it)
- MySQL or MariaDB
- A web server with URL rewriting - Apache through XAMPP, MAMP, or similar works perfectly
- Something to test with: your browser for GET requests, and Postman or curl for the rest
I'll assume you can write basic PHP and have seen a SQL query before. If prepared statements and PDO are new to you, our CRUD application with PHP, PDO and MySQL tutorial is a gentle place to start, and it pairs nicely with this one.
3. Setting Up the Database
Every API needs something to serve. Ours will serve products, so let's create a table to hold them. Open phpMyAdmin (or whatever database tool you like) and run this:
CREATE DATABASE IF NOT EXISTS rest_api CHARACTER SET utf8mb4 COLLATE utf8mb4_unicode_ci;

USE rest_api;

CREATE TABLE products (
    id INT AUTO_INCREMENT PRIMARY KEY,
    name VARCHAR(150) NOT NULL,
    description TEXT,
    price DECIMAL(10,2) NOT NULL DEFAULT 0.00,
    stock INT NOT NULL DEFAULT 0,
    created_at TIMESTAMP DEFAULT CURRENT_TIMESTAMP
) ENGINE=InnoDB DEFAULT CHARSET=utf8mb4;

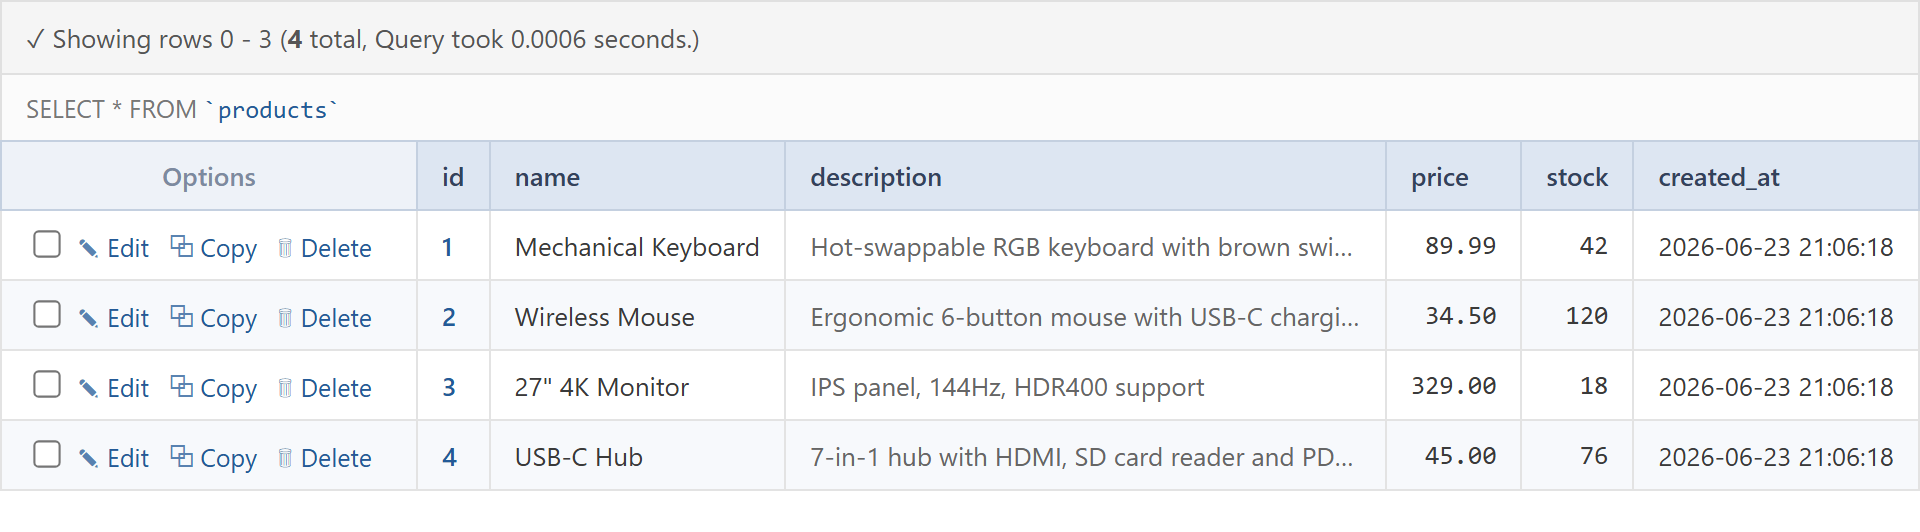
INSERT INTO products (name, description, price, stock) VALUES
('Mechanical Keyboard', 'Hot-swappable RGB keyboard with brown switches', 89.99, 42),
('Wireless Mouse', 'Ergonomic 6-button mouse with USB-C charging', 34.50, 120),
('27" 4K Monitor', 'IPS panel, 144Hz, HDR400 support', 329.00, 18),
('USB-C Hub', '7-in-1 hub with HDMI, SD card reader and PD passthrough', 45.00, 76);
That gives us a products table with four rows to play with. A quick note on the column types: I used DECIMAL for the price instead of FLOAT because money and floating-point numbers do not get along.
Trust me on that one - you'll eventually end up with prices like 89.98999999, and nobody wants that. And utf8mb4 means a customer can put an emoji in a product name without breaking your database.
Once you've run it, your table should look something like this:
4. How the API Will Be Organized
Before we start typing, here's the plan. Create a folder called api in your web root and we'll drop these files inside it:
config.php- database credentials and the API keyDatabase.php- opens the connectionProduct.php- all the queries for the products tableindex.php- the front controller that catches every request.htaccess- sends every request to index.php
The whole API runs through that single index.php file. That pattern is called a front controller, and it's how most modern frameworks work under the hood. One door in, one place to handle everything.
Here are the endpoints we're going to end up with. Keep this table handy - it's basically the contract your API promises to keep:
| Method | Endpoint | What it does |
| GET | /api/products | Return every product |
| GET | /api/products/5 | Return the product with id 5 |
| POST | /api/products | Create a new product |
| PUT | /api/products/5 | Update product 5 |
| DELETE | /api/products/5 | Delete product 5 |
Notice the URL never says "create" or "delete". The method does the talking. That's the REST way.
One small habit worth stealing from the big APIs: if you expect yours to grow, prefix the URLs with a version, like /api/v1/products. When you eventually need breaking changes, you can ship /v2/ without pulling the rug out from under existing clients.
5. Connecting to the Database
Let's start with the boring-but-important stuff. First, config.php, which holds the bits you'll want to change per server:
<?php
// Database connection settings
define('DB_HOST', 'localhost');
define('DB_NAME', 'rest_api');
define('DB_USER', 'root');
define('DB_PASS', '');

// The secret key clients must send with every request
define('API_KEY', 'a1B2c3D4e5F6g7H8');
?>
Swap in your own database credentials, and please change that API key to something long and random before this ever goes near a live server. We'll come back to why that matters.
Next, Database.php. This connects to MySQL using PDO and hands back the connection. I'm using a tiny static method so we only ever open one connection per request:
<?php
class Database {

    private static $pdo = null;

    // Open one PDO connection and reuse it for the whole request
    public static function connect() {
        if (self::$pdo === null) {
            $dsn = 'mysql:host=' . DB_HOST . ';dbname=' . DB_NAME . ';charset=utf8mb4';
            self::$pdo = new PDO($dsn, DB_USER, DB_PASS, [
                PDO::ATTR_ERRMODE            => PDO::ERRMODE_EXCEPTION,
                PDO::ATTR_DEFAULT_FETCH_MODE => PDO::FETCH_ASSOC,
                PDO::ATTR_EMULATE_PREPARES   => false
            ]);
        }
        return self::$pdo;
    }
}
?>
Those three PDO options earn their keep. ERRMODE_EXCEPTION makes PDO throw an exception when a query fails instead of failing silently - far easier to debug.
FETCH_ASSOC gives us clean associative arrays, which turn into JSON nicely. And turning off EMULATE_PREPARES means we get real prepared statements from the database, which is better for security.
Why PDO and not mysqli?PDO works with a dozen different databases and has a cleaner API for prepared statements. If you'd rather use mysqli, the logic is identical - only the syntax changes. Either one keeps you safe from SQL injection as long as you use prepared statements, which we do.
6. The Product Class
Now the fun part. Instead of scattering SQL all over index.php, we'll keep every products query in one place. Create Product.php:
<?php
class Product {

    private $db;

    public function __construct($pdo) {
        $this->db = $pdo;
    }

    // Return every product
    public function getAll() {
        return $this->db->query('SELECT * FROM products ORDER BY id ASC')->fetchAll();
    }

    // Return a single product, or false if the id does not exist
    public function getOne($id) {
        $stmt = $this->db->prepare('SELECT * FROM products WHERE id = ?');
        $stmt->execute([$id]);
        return $stmt->fetch();
    }

    // Insert a new product and return its id
    public function create($data) {
        $stmt = $this->db->prepare(
            'INSERT INTO products (name, description, price, stock) VALUES (?, ?, ?, ?)'
        );
        $stmt->execute([
            $data['name'],
            $data['description'] ?? '',
            $data['price'] ?? 0,
            $data['stock'] ?? 0
        ]);
        return (int) $this->db->lastInsertId();
    }

    // Update an existing product, return the number of affected rows
    public function update($id, $data) {
        $stmt = $this->db->prepare(
            'UPDATE products SET name = ?, description = ?, price = ?, stock = ? WHERE id = ?'
        );
        $stmt->execute([
            $data['name'],
            $data['description'] ?? '',
            $data['price'] ?? 0,
            $data['stock'] ?? 0,
            $id
        ]);
        return $stmt->rowCount();
    }

    // Delete a product, return the number of affected rows
    public function delete($id) {
        $stmt = $this->db->prepare('DELETE FROM products WHERE id = ?');
        $stmt->execute([$id]);
        return $stmt->rowCount();
    }
}
?>
See those question marks in the queries? Those are placeholders for a prepared statement. The actual values travel to the database separately from the SQL, so they can never be mistaken for a command.
Even if someone types '; DROP TABLE products; -- into a field, it's stored as plain text. This one habit shuts the door on SQL injection - and it's the step a worrying number of PHP API tutorials still skip. Never glue user input straight into a query string.
The ?? '' bits are PHP's null coalescing operator. They say "use this value, or fall back to a default if it wasn't sent." Handy for optional fields like the description.
7. The Front Controller: Routing and Responses
This is the heart of the whole thing. Before we look at the PHP, we need Apache to funnel every request into index.php. Create a .htaccess file in your api folder:
RewriteEngine On

# Send every request that isn't a real file or folder to index.php
RewriteCond %{REQUEST_FILENAME} !-f
RewriteCond %{REQUEST_FILENAME} !-d
RewriteRule ^(.*)$ index.php?endpoint=$1 [QSA,L]
In English: if someone asks for a file that actually exists (an image, say), serve it. Otherwise, hand the whole path to index.php in a query variable called endpoint.
So a request to /api/products/5 arrives as endpoint=products/5. That's how we'll know what the client wants.
Now the main event. Here's the complete index.php:
<?php
require 'config.php';
require 'Database.php';
require 'Product.php';

// Every response we send back is JSON
header('Content-Type: application/json; charset=utf-8');

// Small helper so we always reply with a status code and JSON body
function respond($status, $data) {
    http_response_code($status);
    echo json_encode($data, JSON_PRETTY_PRINT | JSON_UNESCAPED_SLASHES);
    exit;
}

// 1. Check the API key before doing anything else
$headers = array_change_key_case(getallheaders(), CASE_LOWER);
$clientKey = $headers['x-api-key'] ?? '';
if (!hash_equals(API_KEY, $clientKey)) {
    respond(401, ['error' => 'Unauthorized. A valid API key is required.']);
}

// 2. Figure out the resource and id from the URL
$endpoint = isset($_GET['endpoint']) ? trim($_GET['endpoint'], '/') : '';
$parts    = explode('/', $endpoint);
$resource = $parts[0] ?? '';
$id       = isset($parts[1]) ? (int) $parts[1] : null;
$method   = $_SERVER['REQUEST_METHOD'];

// 3. We only serve the "products" resource in this tutorial
if ($resource !== 'products') {
    respond(404, ['error' => 'Resource not found.']);
}

// 4. Connect to the database and grab the request body (for POST/PUT)
try {
    $product = new Product(Database::connect());
} catch (PDOException $e) {
    respond(500, ['error' => 'Database connection failed.']);
}
$input = json_decode(file_get_contents('php://input'), true) ?? [];

// 5. Route the request to the right action
switch ($method) {

    case 'GET':
        if ($id) {
            $row = $product->getOne($id);
            $row ? respond(200, $row) : respond(404, ['error' => 'Product not found.']);
        }
        respond(200, $product->getAll());
        break;

    case 'POST':
        if (empty($input['name'])) {
            respond(422, ['error' => 'The "name" field is required.']);
        }
        $newId = $product->create($input);
        respond(201, ['message' => 'Product created.', 'id' => $newId]);
        break;

    case 'PUT':
        if (!$id) {
            respond(400, ['error' => 'A product id is required.']);
        }
        if (!$product->getOne($id)) {
            respond(404, ['error' => 'Product not found.']);
        }
        if (empty($input['name'])) {
            respond(422, ['error' => 'The "name" field is required.']);
        }
        $product->update($id, $input);
        respond(200, ['message' => 'Product updated.']);
        break;

    case 'DELETE':
        if (!$id) {
            respond(400, ['error' => 'A product id is required.']);
        }
        $product->delete($id)
            ? respond(200, ['message' => 'Product deleted.'])
            : respond(404, ['error' => 'Product not found.']);
        break;

    default:
        respond(405, ['error' => 'Method not allowed.']);
}
?>
It looks like a lot, but it reads top to bottom like a checklist. Let me walk you through the five numbered steps.
Step 1 checks the API key before we touch anything else. We read the request headers, grab the one called X-API-Key, and compare it against our secret. No key, or the wrong key, and the request dies right there with a 401.
Why hash_equals() instead of a plain ==? Because it compares the strings in constant time, which protects against a sneaky class of timing attacks. Same result, safer comparison.
Step 2 takes that endpoint value from the URL and splits it on the slash. The first piece is the resource (products), the second is the id, if there is one. We also grab the HTTP method - GET, POST, and so on.
Step 3 is a sanity check. If someone asks for /api/orders, we don't have that, so we bail out with a 404.
Step 4 opens the database connection, wrapped in a try/catch so a dead database returns a clean 500 rather than a scary stack trace. It also reads the raw request body.
That php://input line matters: when a client sends JSON, it does not show up in $_POST. You have to read the raw input stream and decode it yourself. More on that in the FAQ.
Step 5 is the router. Based on the method, it calls the right method on our Product class and sends back the right status code. That switch statement is the API.
8. Walking Through the Endpoints
The router already handles all four methods, but let's slow down and look at what each one actually does, because the differences are where people trip up.
8.1. GET - Reading Data
GET is the friendliest one because you can test it right in your browser. Ask for /api/products and you get the whole list; ask for /api/products/1 and you get a single product.
If the id doesn't exist, you get a 404 with a helpful message instead of an empty response. Here's what a single product looks like (you'll need a way to send the API key header - more on that in the testing section):
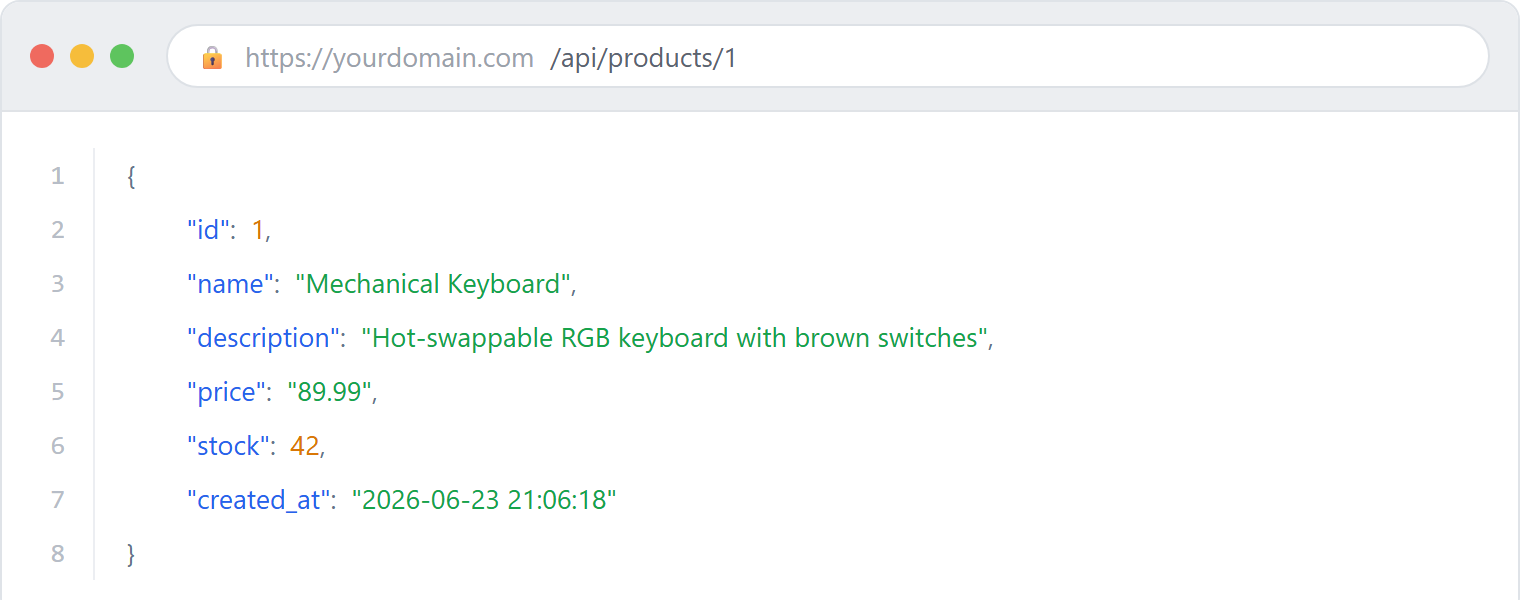
Clean, readable JSON. That JSON_PRETTY_PRINT flag in our respond() helper adds the indentation. In production you might drop it to save a few bytes, but while you're building, it's a lifesaver.
8.2. POST - Creating Data
POST creates a brand new product. The client sends a JSON body, we check that a name was provided (the only field we insist on), insert the row, and reply with a 201 Created status plus the id of the new record.
That 201 is a small but professional detail. Plenty of APIs just return 200 for everything. Returning 201 tells the client "I made something new, and here's its id" without them having to guess.
If the name is missing, we don't insert garbage - we send back a 422 Unprocessable Entity and explain what went wrong. Validating input is your job, not the database's.
8.3. PUT - Updating Data
PUT updates an existing product, so it needs an id in the URL. Notice the order of the checks in the router: we make sure an id was given, then confirm the product exists, then validate the data. Only then do we run the update.
Failing fast with the right status code (400, 404, or 422) is what separates an API that's pleasant to work with from one that makes people want to throw their laptop.
PUT vs PATCHPUT is meant to replace the whole resource, which is why our update sets every column. If you only want to change one field at a time, the HTTP method designed for that is PATCH. Adding a PATCH case to the switch is a nice exercise once you've got the basics working.
8.4. DELETE - Removing Data
DELETE is the simplest of the bunch. It needs an id, it removes the row, and it reports back. We use rowCount() to check whether anything was actually deleted - if zero rows changed, the product wasn't there, so we return a 404.
Trying to delete something that doesn't exist shouldn't quietly succeed.
9. HTTP Status Codes That Matter
Status codes are how your API speaks without words. The number in the response tells the client what happened before they even read the body. Here's a quick reference for the ones you'll actually use:
| Code | Meaning | When we send it |
200 | OK | A GET, PUT or DELETE worked |
201 | Created | A POST created a new product |
400 | Bad Request | The request was malformed (e.g. no id) |
401 | Unauthorized | The API key was missing or wrong |
404 | Not Found | That product or resource doesn't exist |
405 | Method Not Allowed | An unsupported method like PATCH |
422 | Unprocessable Entity | Validation failed (e.g. missing name) |
500 | Server Error | Something blew up on our end |
You don't need to memorize the whole list of HTTP codes. Get comfortable with the eight above and you'll cover ninety-odd percent of real-world cases.
10. Locking It Down with an API Key
Our API already refuses any request without the right key, thanks to that check at the top of index.php. The client has to send a header like this with every request:
X-API-Key: a1B2c3D4e5F6g7H8This is the simplest form of API authentication, and honestly it's fine for plenty of internal tools and small projects. But before you ship anything serious, a few words of caution:
- Always use HTTPS. An API key sent over plain HTTP can be read by anyone snooping on the network. HTTPS encrypts it. This is non-negotiable for a live API.
- Keep keys out of your code. Hard-coding the key in
config.phpis fine for learning, but on a real server you'd load it from an environment variable so it never lands in your Git history. - Give each client their own key. Store keys in a database table, one per client, so you can revoke a single key without breaking everyone else.
- Think about rate limiting. Nothing here stops someone from hammering your API thousands of times a second. For public APIs, you'll want to cap how many requests a key can make in a given window.
If your project needs proper user logins rather than a shared key, look into token-based auth like JWT. Our guide on building a secure login system with PHP and MySQL covers the password-handling side of that story.
11. Testing Your API
GET requests are easy to test in a browser, but the browser can't easily send POST, PUT, or DELETE - or custom headers like our API key. For that, you've got two solid options.
The first is curl, the command-line tool that's already on most systems. Here's how you'd hit every endpoint:
# Get all products
curl -H "X-API-Key: a1B2c3D4e5F6g7H8" http://localhost/api/products

# Get a single product
curl -H "X-API-Key: a1B2c3D4e5F6g7H8" http://localhost/api/products/1

# Create a product
curl -X POST http://localhost/api/products \
  -H "X-API-Key: a1B2c3D4e5F6g7H8" \
  -H "Content-Type: application/json" \
  -d '{"name":"Laptop Stand","description":"Adjustable aluminium stand","price":29.99,"stock":60}'

# Update product 5
curl -X PUT http://localhost/api/products/5 \
  -H "X-API-Key: a1B2c3D4e5F6g7H8" \
  -H "Content-Type: application/json" \
  -d '{"name":"Laptop Stand Pro","price":34.99,"stock":55}'

# Delete product 5
curl -X DELETE http://localhost/api/products/5 \
  -H "X-API-Key: a1B2c3D4e5F6g7H8"
The second option, and the one I reach for when I want to see things clearly, is Postman. You pick the method from a dropdown, paste the URL, drop your key into the Headers tab, and type your JSON in the Body tab.
Hit Send, and the response, status code, and timing all show up in a tidy panel:
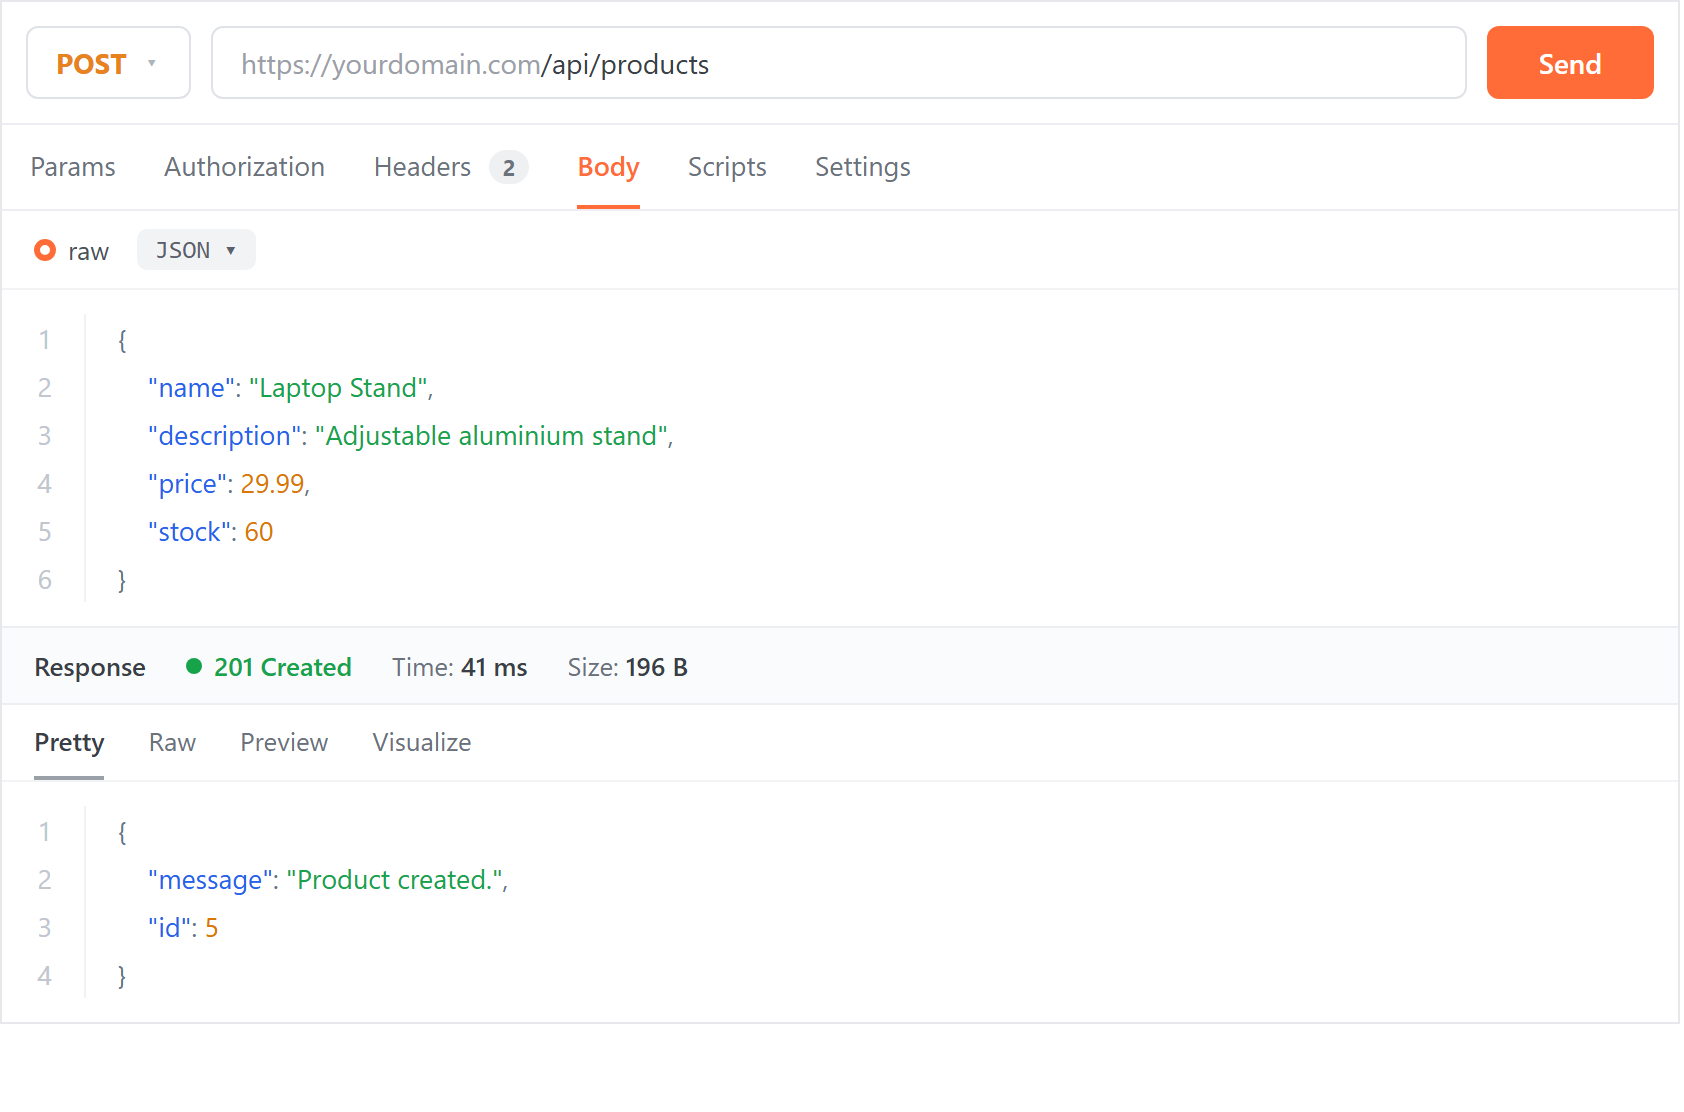
See that green 201 Created at the top of the response? That's our API doing exactly what it should. Try sending the same request without the API key header and you'll get a 401 instead - proof that the lock works.
Frequently Asked Questions
Can PHP be used to build a REST API?
Absolutely. PHP speaks HTTP natively, decodes JSON in one line, and runs on practically every web host on the planet. Some of the biggest APIs on the web run on PHP - the WordPress REST API alone serves millions of sites. Frameworks like Laravel or Slim add conveniences, but as this tutorial shows, plain PHP is more than capable.
What is the difference between an API and a REST API?
API is the umbrella term for any interface that lets two programs talk to each other. A REST API is one specific style of API: it runs over HTTP, organizes data into resources with URLs, and uses the standard methods (GET, POST, PUT, DELETE). Every REST API is an API, but not every API is REST - some use styles like SOAP or GraphQL instead.
What is the difference between a REST API and a RESTful API?
Practically nothing. "REST API" is the general term, and "RESTful" just means an API that follows REST conventions - using HTTP methods properly, organizing data around resources, and staying stateless. People use the two phrases interchangeably, so don't lose sleep over it.
Can I build a PHP REST API with mysqli instead of PDO?
Absolutely. The structure stays exactly the same - a front controller, a router, and a class for your queries. You'd just swap the PDO calls for their mysqli equivalents. PDO tends to be the more popular choice because it works across different databases, but mysqli is perfectly capable.
Why doesn't my JSON data show up in $_POST?
Because $_POST only gets populated for form-encoded data. When a client sends a raw JSON body, PHP doesn't parse it for you. You have to read it yourself with file_get_contents('php://input') and then run it through json_decode(), which is exactly what we do in index.php.
When should I use PUT and when should I use POST?
Use POST to create something new when you don't yet know its id - the server assigns one. Use PUT to update a resource that already exists at a known URL, like /api/products/5. A simple rule of thumb: POST adds, PUT changes.
Is an API key enough to secure my REST API?
For a hobby project or an internal tool, a single API key sent over HTTPS is reasonable. For anything public or sensitive, you'll want more: per-client keys stored in the database, rate limiting, and possibly token-based authentication such as JWT. And always serve your API over HTTPS so the key can't be intercepted.
How do I let a JavaScript front-end call my PHP API from another domain?
You'll run into CORS, the browser's cross-origin security policy. The short version: add a header like header('Access-Control-Allow-Origin: *') near the top of index.php (or, better, restrict it to your own domain). For requests with custom headers you'll also need to handle the browser's preflight OPTIONS request.
Conclusion
And that's a complete, working REST API in plain PHP - no framework required. You set up a database table, wrapped your queries in a clean Product class, and funneled every request through a single front controller.
You handled all four CRUD operations with the correct HTTP methods and status codes, and put a lock on the front door with an API key. That's more than a fair share of production code ships with, frankly.
The best way to make this stick is to extend it. Add a second resource, like categories or orders. Add pagination to the GET list so you're not dumping ten thousand rows at once. Or add a PATCH handler for partial updates.
Better yet, wire this API up to a JavaScript front-end and watch your data flow without a single page reload. That's the moment it really clicks.
If this guide helped you out, share it with someone who's stuck on the same problem, and drop a comment below if you hit a snag. Happy coding.
You have the complete tutorial code above, free to use. Here is what a membership adds if you want more than this one project.
What you just built
The complete code from this tutorial
No account needed
- The complete working project, with a setup guide
- Free for personal and commercial use
- No attribution required
- Packages are sold one at a time
- Ads on the page
CodeShack Pro
Every package and premium tool, for less than one costs
Billed yearly at $96. Save $48 against monthly.
- All 16 packages, worth $360 bought one at a time
- Every premium tool on the site
- No ads on any page of the site
- Members-only tools and articles
- Everything we add while you are a member
- Cancel from your account in one click