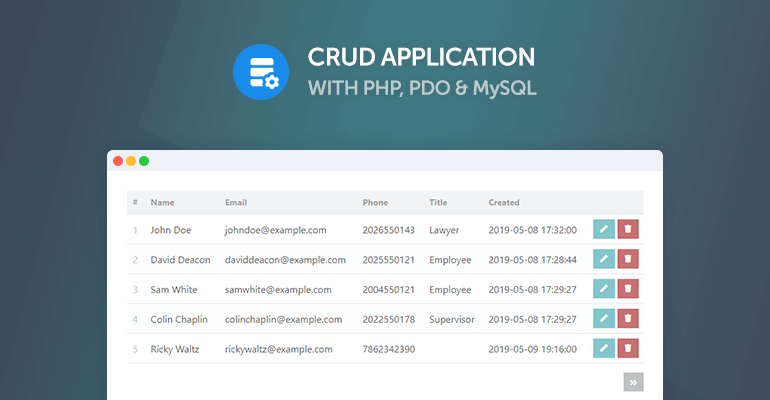
In this tutorial, we'll be developing a complete Create, Read, Update, and Delete application with PHP, PDO, and MySQL. We'll be creating the app completely from scratch. No additional frameworks are required.
A CRUD app is often used in conjunction with a database, interacting with records in a table and populating them in an HTML table element. We'll be using MySQL as our database management system in our app.
For this tutorial, we'll create a MySQL database with a contacts table, which will consist of a variety of different columns (name, email, phone, etc.).
The Advanced package includes additional features and a download link to the source code.
Contents
1. Getting Started
Before we jump into programming our CRUD app, we need to install our web server and set up our app.
1.1. What You Will Learn in this Tutorial
- Create MySQL Records — Insert new records into the Contacts table.
- Read MySQL Records — Reading MySQL records and populating them in an HTML table.
- Update MySQL Records — Update existing MySQL records in the Contacts table.
- Delete MySQL Records — Confirm and delete records from the Contacts table.
- Implementing GET and POST Requests — Send data to our app from an HTML form and URL parameters.
- Prepared Statements — Secure our SQL statements with prepared statements.
1.2. Requirements
- Web Server — I recommend you download and install XAMPP on your local computer system, this server package includes MySQL, PHP, phpMyAdmin, and the PDO extension.
- PHP — I recommend you use the latest version of PHP, but older versions should work just fine (skip if you installed XAMPP).
- PDO Extension — Should be enabled by default if you're using XAMPP, but if it's not you'll need to enable/install it.
1.3. File Structure & Setup
Navigate to C:\xampp\htdocs (XAMPP) and create the below directories and files.
File Structure
\-- phpcrud
|-- index.php
|-- create.php
|-- read.php
|-- update.php
|-- delete.php
|-- functions.php
|-- style.css
What each file will contain:
- index.php — Home page for our CRUD app.
- create.php — Create new records with an HTML form and send data to the server with a POST request.
- read.php — Display records from our database table and navigate with pagination.
- update.php — Update existing records with an HTML form and send data to the server with a POST request.
- delete.php — Confirm and delete records by ID (GET request to get the ID).
- functions.php — Basic templating functions and MySQL connection function (so we don't have to repeat code in every file).
- style.css — The stylesheet for our app, which will change the appearance of our app.
2. Creating the Database and setting-up Tables
The MySQL database we'll use to store contacts and retrieve them with PHP. If you're using XAMPP, follow the below instructions.
- Navigate to http://localhost/phpmyadmin/
- Click Databases at the top
- Under Create database input phpcrud and select utf8_general_ci as the collation
- Click Create
- Select the newly created database
- Click the SQL tab and execute the below SQL:
CREATE TABLE IF NOT EXISTS `contacts` (
`id` int(11) NOT NULL AUTO_INCREMENT,
`name` varchar(255) NOT NULL,
`email` varchar(255) NOT NULL,
`phone` varchar(255) NOT NULL,
`title` varchar(255) NOT NULL,
`created` datetime NOT NULL DEFAULT CURRENT_TIMESTAMP,
PRIMARY KEY (`id`)
) ENGINE=InnoDB AUTO_INCREMENT=13 DEFAULT CHARSET=utf8;
INSERT INTO `contacts` (`id`, `name`, `email`, `phone`, `title`, `created`) VALUES
(1, 'John Doe', 'johndoe@example.com', '2026550143', 'Lawyer', '2019-05-08 17:32:00'),
(2, 'David Deacon', 'daviddeacon@example.com', '2025550121', 'Employee', '2019-05-08 17:28:44'),
(3, 'Sam White', 'samwhite@example.com', '2004550121', 'Employee', '2019-05-08 17:29:27'),
(4, 'Colin Chaplin', 'colinchaplin@example.com', '2022550178', 'Supervisor', '2019-05-08 17:29:27'),
(5, 'Ricky Waltz', 'rickywaltz@example.com', '7862342390', '', '2019-05-09 19:16:00'),
(6, 'Arnold Hall', 'arnoldhall@example.com', '5089573579', 'Manager', '2019-05-09 19:17:00'),
(7, 'Toni Adams', 'alvah1981@example.com', '2603668738', '', '2019-05-09 19:19:00'),
(8, 'Donald Perry', 'donald1983@example.com', '7019007916', 'Employee', '2019-05-09 19:20:00'),
(9, 'Joe McKinney', 'nadia.doole0@example.com', '6153353674', 'Employee', '2019-05-09 19:20:00'),
(10, 'Angela Horst', 'angela1977@example.com', '3094234980', 'Assistant', '2019-05-09 19:21:00'),
(11, 'James Jameson', 'james1965@example.com', '4002349823', 'Assistant', '2019-05-09 19:32:00'),
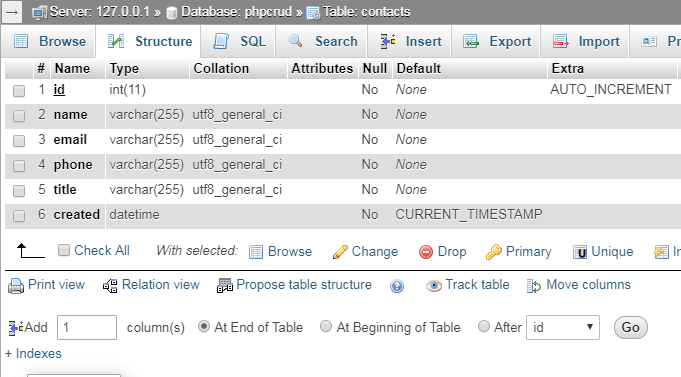
(12, 'Daniel Deacon', 'danieldeacon@example.com', '5003423549', 'Manager', '2019-05-09 19:33:00');The above SQL will create the table: contacts, which we'll be using in our app, and included in the SQL is sample data — this data will be used for testing purposes to make sure everything is working as it should, you can delete it later on.
There are six columns in the contacts table (id, name, email, phone, title, and created). The title column is basically the role of each contact. You can change this to anything you want. The sample data will use work roles as an example (Employee, Manager, etc.).
In phpMyAdmin, the database should look like the following:
3. Creating the Stylesheet (CSS3)
The stylesheet will change the appearance of our app, edit the style.css file and add the following code:
* {
  	box-sizing: border-box;
  	font-family: -apple-system, BlinkMacSystemFont, "segoe ui", roboto, oxygen, ubuntu, cantarell, "fira sans", "droid sans", "helvetica neue", Arial, sans-serif;
  	font-size: 16px;
  	-webkit-font-smoothing: antialiased;
  	-moz-osx-font-smoothing: grayscale;
}
body {
  	background-color: #FFFFFF;
  	margin: 0;
}
.navtop {
  	background-color: #3f69a8;
  	height: 60px;
  	width: 100%;
  	border: 0;
}
.navtop div {
  	display: flex;
  	margin: 0 auto;
  	width: 1000px;
  	height: 100%;
}
.navtop div h1, .navtop div a {
  	display: inline-flex;
  	align-items: center;
}
.navtop div h1 {
  	flex: 1;
  	font-size: 24px;
  	padding: 0;
  	margin: 0;
  	color: #ecf0f6;
  	font-weight: normal;
}
.navtop div a {
  	padding: 0 20px;
  	text-decoration: none;
  	color: #c5d2e5;
  	font-weight: bold;
}
.navtop div a i {
  	padding: 2px 8px 0 0;
}
.navtop div a:hover {
  	color: #ecf0f6;
}
.content {
  	width: 1000px;
  	margin: 0 auto;
}
.content h2 {
  	margin: 0;
  	padding: 25px 0;
  	font-size: 22px;
  	border-bottom: 1px solid #ebebeb;
  	color: #666666;
}
.read .create-contact {
  	display: inline-block;
  	text-decoration: none;
  	background-color: #38b673;
  	font-weight: bold;
  	font-size: 14px;
  	color: #FFFFFF;
  	padding: 10px 15px;
  	margin: 15px 0;
}
.read .create-contact:hover {
  	background-color: #32a367;
}
.read .pagination {
  	display: flex;
  	justify-content: flex-end;
}
.read .pagination a {
  	display: inline-block;
  	text-decoration: none;
  	background-color: #a5a7a9;
  	font-weight: bold;
  	color: #FFFFFF;
  	padding: 5px 10px;
  	margin: 15px 0 15px 5px;
}
.read .pagination a:hover {
  	background-color: #999b9d;
}
.read table {
  	width: 100%;
  	padding-top: 30px;
  	border-collapse: collapse;
}
.read table thead {
  	background-color: #ebeef1;
  	border-bottom: 1px solid #d3dae0;
}
.read table thead td {
  	padding: 10px;
  	font-weight: bold;
  	color: #767779;
  	font-size: 14px;
}
.read table tbody tr {
  	border-bottom: 1px solid #d3dae0;
}
.read table tbody tr:nth-child(even) {
  	background-color: #fbfcfc;
}
.read table tbody tr:hover {
  	background-color: #376ab7;
}
.read table tbody tr:hover td {
  	color: #FFFFFF;
}
.read table tbody tr:hover td:nth-child(1) {
  	color: #FFFFFF;
}
.read table tbody tr td {
  	padding: 10px;
}
.read table tbody tr td:nth-child(1) {
  	color: #a5a7a9;
}
.read table tbody tr td.actions {
  	padding: 8px;
  	text-align: right;
}
.read table tbody tr td.actions .edit, .read table tbody tr td.actions .trash {
  	display: inline-flex;
  	text-align: right;
  	text-decoration: none;
  	color: #FFFFFF;
  	padding: 10px 12px;
}
.read table tbody tr td.actions .trash {
  	background-color: #b73737;
}
.read table tbody tr td.actions .trash:hover {
  	background-color: #a33131;
}
.read table tbody tr td.actions .edit {
  	background-color: #37afb7;
}
.read table tbody tr td.actions .edit:hover {
  	background-color: #319ca3;
}
.update form {
  	padding: 15px 0;
  	display: flex;
  	flex-flow: wrap;
}
.update form label {
  	display: inline-flex;
  	width: 400px;
  	padding: 10px 0;
  	margin-right: 25px;
}
.update form input {
  	padding: 10px;
  	width: 400px;
  	margin-right: 25px;
  	margin-bottom: 15px;
  	border: 1px solid #cccccc;
}
.update form input[type="submit"] {
  	display: block;
  	background-color: #38b673;
  	border: 0;
  	font-weight: bold;
  	font-size: 14px;
  	color: #FFFFFF;
  	cursor: pointer;
  	width: 200px;
	margin-top: 15px;
}
.update form input[type="submit"]:hover {
  	background-color: #32a367;
}
.delete .yesno {
  	display: flex;
}
.delete .yesno a {
  	display: inline-block;
  	text-decoration: none;
  	background-color: #38b673;
  	font-weight: bold;
  	color: #FFFFFF;
  	padding: 10px 15px;
  	margin: 15px 10px 15px 0;
}
.delete .yesno a:hover {
  	background-color: #32a367;
}
Feel free to customize the stylesheet. This is what I've put together to make the CRUD app more appealing.
4. Creating the CRUD App
We can finally start to code the CRUD app with PHP. Before we start, ensure you've completed the previous steps and have the MySQL database ready. Otherwise, without the database, our app will be redundant.
4.1. Creating the Functions
This file will contain functions that we can execute in all our PHP files. This is so we don't have to write the same code in every PHP file. The shorter the code, the better, right? We'll create three functions — one function will connect to the database, and the other two will be the templates for the header and footer that will appear on every page we create and will contain the HTML layout.
Edit the functions.php file and add the following code:
<?php
function pdo_connect_mysql() {
    $DATABASE_HOST = 'localhost';
    $DATABASE_USER = 'root';
    $DATABASE_PASS = '';
    $DATABASE_NAME = 'phpcrud';
    try {
    	return new PDO('mysql:host=' . $DATABASE_HOST . ';dbname=' . $DATABASE_NAME . ';charset=utf8', $DATABASE_USER, $DATABASE_PASS);
    } catch (PDOException $exception) {
    	// If there is an error with the connection, stop the script and display the error.
    	exit('Failed to connect to database!');
    }
}
function template_header($title) {
echo <<<EOT
<!DOCTYPE html>
<html>
	<head>
		<meta charset="utf-8">
		<title>$title</title>
		<link href="style.css" rel="stylesheet" type="text/css">
		<link rel="stylesheet" href="https://use.fontawesome.com/releases/v5.7.1/css/all.css">
	</head>
	<body>
    <nav class="navtop">
    	<div>
    		<h1>Website Title</h1>
            <a href="index.php"><i class="fas fa-home"></i>Home</a>
    		<a href="read.php"><i class="fas fa-address-book"></i>Contacts</a>
    	</div>
    </nav>
EOT;
}
function template_footer() {
echo <<<EOT
    </body>
</html>
EOT;
}
?>
Make sure to change the MySQL connection details to reflect your details. We're utilizing the PDO interface to connect to our MySQL database. PDO will make it easier for us to interact with our MySQL database and secure our queries.
Also, indenting the template code may cause parsing errors.
4.2. Creating the Home Page
When you navigate to http://localhost/phpcrud/ it will serve the index.php file, this page will be our home page.
Edit the index.php file and add the following code:
<?php
include 'functions.php';
// Your PHP code here.

// Home Page template below.
?>

<?=template_header('Home')?>

<div class="content">
	<h2>Home</h2>
	<p>Welcome to the home page!</p>
</div>

<?=template_footer()?>
This will create a basic home page. We can use this page to navigate to the other pages. As you can see, we include the functions.php file and execute the template functions that we created. Remember that these functions will add the header and footer code to our home page.
And now if we navigate to http://localhost/phpcrud/ we'll see the following:
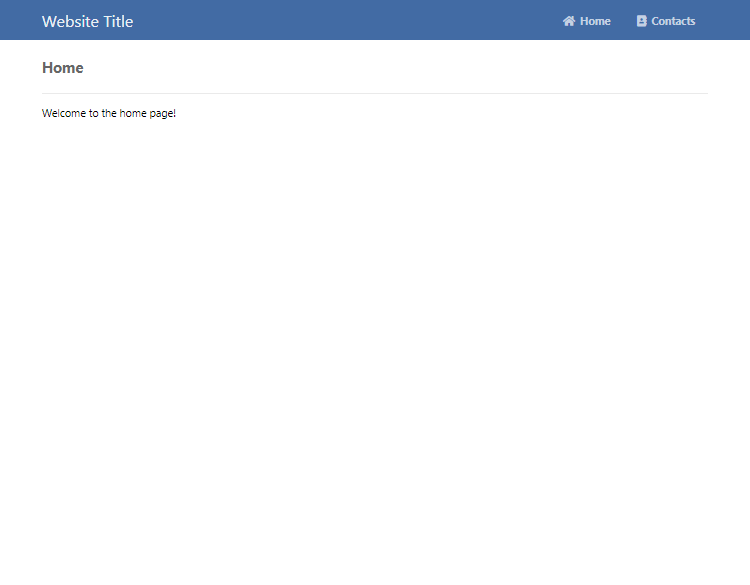
That's basically it for the home page. Feel free to add your own content, as this page is basically a portal to our other pages that we'll create in the next section.
4.3. Creating the Read Page
In this section, we'll develop the read page that'll be responsible for populating records from our contacts table in an HTML table.
Edit the read.php file and add the following code:
<?php
include 'functions.php';
// Connect to MySQL database
$pdo = pdo_connect_mysql();
// Get the page via GET request (URL param: page), if non exists default the page to 1
$page = isset($_GET['page']) && is_numeric($_GET['page']) ? (int)$_GET['page'] : 1;
// Number of records to show on each page
$records_per_page = 5;
Once again, we include the functions file, but this time we connect to our MySQL database by executing the function: pdo_connect_mysql. If the connection is successful, we can use the $pdo variable to execute queries.
We also create two more variables — the $page variable will determine the page that the user is currently on, the $records_per_page will be used to limit the number of records to display on each page, for example, if we limit the number of records to 5 and we have 10 records in our contacts table, then there will only be 2 pages and 5 records on each page. The user can seamlessly navigate between pages using the next and previous buttons.
Add the following code to the read.php file:
// Prepare the SQL statement and get records from our contacts table, LIMIT will determine the page
$stmt = $pdo->prepare('SELECT * FROM contacts ORDER BY id LIMIT :current_page, :record_per_page');
$stmt->bindValue(':current_page', ($page-1)*$records_per_page, PDO::PARAM_INT);
$stmt->bindValue(':record_per_page', $records_per_page, PDO::PARAM_INT);
$stmt->execute();
// Fetch the records so we can display them in our template.
$contacts = $stmt->fetchAll(PDO::FETCH_ASSOC);
The above code will select records from the contacts table. This will be determined by the current page the user is on, the records will be ordered by the id column, we can easily change the order by column if we wanted to, for example, if we change it to created then it will sort the records by the create date instead.
Security Tip Utilizing prepared PDO statements will prevent SQL injection and therefore protect the database from exposure to suspicious users.
Add the following code to the read.php file:
// Get the total number of contacts, this is so we can determine whether there should be a next and previous button
$num_contacts = $pdo->query('SELECT COUNT(*) FROM contacts')->fetchColumn();
?>
The above SQL query will get the total number of records in the contacts table. We don't need to use a prepared statement here because the query doesn't include user input variables.
Add the following code to the read.php file:
<?=template_header('Read')?>

<div class="content read">
	<h2>Read Contacts</h2>
	<a href="create.php" class="create-contact">Create Contact</a>
	<table>
        <thead>
            <tr>
                <td>#</td>
                <td>Name</td>
                <td>Email</td>
                <td>Phone</td>
                <td>Title</td>
                <td>Created</td>
                <td></td>
            </tr>
        </thead>
        <tbody>
            <?php foreach ($contacts as $contact): ?>
            <tr>
                <td><?=$contact['id']?></td>
                <td><?=$contact['name']?></td>
                <td><?=$contact['email']?></td>
                <td><?=$contact['phone']?></td>
                <td><?=$contact['title']?></td>
                <td><?=$contact['created']?></td>
                <td class="actions">
                    <a href="update.php?id=<?=$contact['id']?>" class="edit"><i class="fas fa-pen fa-xs"></i></a>
                    <a href="delete.php?id=<?=$contact['id']?>" class="trash"><i class="fas fa-trash fa-xs"></i></a>
                </td>
            </tr>
            <?php endforeach; ?>
        </tbody>
    </table>
	<div class="pagination">
		<?php if ($page > 1): ?>
		<a href="read.php?page=<?=$page-1?>"><i class="fas fa-angle-double-left fa-sm"></i></a>
		<?php endif; ?>
		<?php if ($page*$records_per_page < $num_contacts): ?>
		<a href="read.php?page=<?=$page+1?>"><i class="fas fa-angle-double-right fa-sm"></i></a>
		<?php endif; ?>
	</div>
</div>

<?=template_footer()?>
This is the template for the read page, which iterates the contacts array and adds them to the HTML table. We'll be able to read the records in a table format when we navigate to the read page.
Pagination is added so we can navigate between pages on the read page (page 1, page 2, etc.).
For the icons we're using Font Awesome, make sure that it's included in the header template function, or the icons will not appear.
And now if we navigate to http://localhost/phpcrud/read.php, we'll see the following:
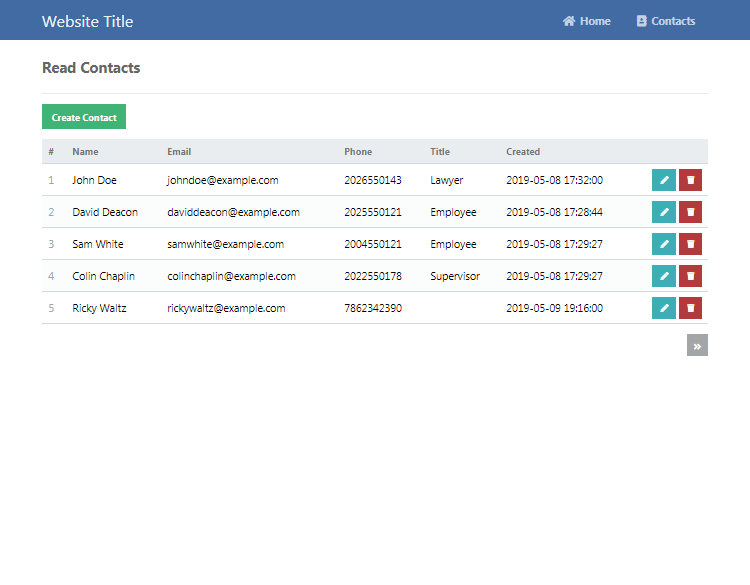
So now we know how to display records from our MySQL database, take note that the buttons that appear in the table (create, edit, and delete) will not work. That's because we haven't created those pages yet.
You can also click the Contacts link in the header bar, which will subsequently navigate to the read page.
4.4. Creating the Create Page
The create page will be used to create new records and insert them into our Contacts table.
Edit the create.php file and add:
<?php
include 'functions.php';
$pdo = pdo_connect_mysql();
$msg = '';
// Check if POST data is not empty
if (!empty($_POST)) {
    // Post data not empty insert a new record
    // Set-up the variables that are going to be inserted, we must check if the POST variables exist if not we can default them to blank
    $id = isset($_POST['id']) && !empty($_POST['id']) && $_POST['id'] != 'auto' ? $_POST['id'] : NULL;
    // Check if POST variable "name" exists, if not default the value to blank, basically the same for all variables
    $name = isset($_POST['name']) ? $_POST['name'] : '';
    $email = isset($_POST['email']) ? $_POST['email'] : '';
    $phone = isset($_POST['phone']) ? $_POST['phone'] : '';
    $title = isset($_POST['title']) ? $_POST['title'] : '';
    $created = isset($_POST['created']) ? $_POST['created'] : date('Y-m-d H:i:s');
    // Insert new record into the contacts table
    $stmt = $pdo->prepare('INSERT INTO contacts VALUES (?, ?, ?, ?, ?, ?)');
    $stmt->execute([$id, $name, $email, $phone, $title, $created]);
    // Output message
    $msg = 'Created Successfully!';
}
?>
The above code will check if the POST array (form data) is not empty. If it's not, then it basically means the user has filled out the form and clicked the submit button, which will then insert a new record into our Contacts table.
Add after:
<?=template_header('Create')?>
<div class="content update">
<h2>Create Contact</h2>
<form action="create.php" method="post">
<label for="id">ID</label>
<label for="name">Name</label>
<input type="text" name="id" placeholder="26" value="auto" id="id">
<input type="text" name="name" placeholder="John Doe" id="name">
<label for="email">Email</label>
<label for="phone">Phone</label>
<input type="text" name="email" placeholder="johndoe@example.com" id="email">
<input type="text" name="phone" placeholder="2025550143" id="phone">
<label for="title">Title</label>
<label for="created">Created</label>
<input type="text" name="title" placeholder="Employee" id="title">
<input type="datetime-local" name="created" value="<?=date('Y-m-d\TH:i')?>" id="created">
<input type="submit" value="Create">
</form>
<?php if ($msg): ?>
<p><?=$msg?></p>
<?php endif; ?>
</div>
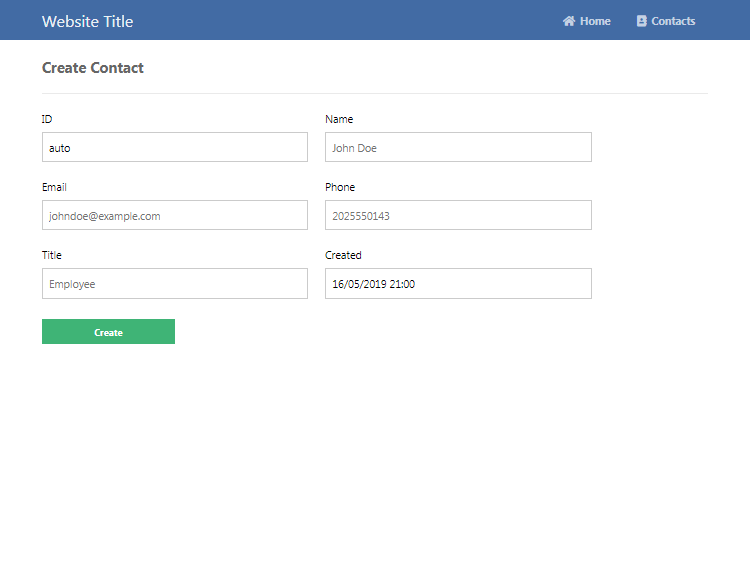
<?=template_footer()?>This is the template for our create page. As you can see, we have created a form and named each input field accordingly. The name of the input field is how we'll retrieve the POST variable in our PHP code. For example, if we name an input field "zip_code", we can get the value of that input field with $_POST['zip_code'] in PHP (assuming that the form's method is set to post).
Finally, if we navigate to http://localhost/phpcrud/create.php or click the Create button on the read page, we'll see the following:
4.5. Creating the Update Page
The update page will be used to update records in our Contacts table. This page is similar to the create page, but instead of inserting a new record into the database, we'll be updating existing records. We'll be able to get the record ID with a GET request.
Edit the update.php file and add:
<?php
include 'functions.php';
$pdo = pdo_connect_mysql();
$msg = '';
// Check if the contact id exists, for example update.php?id=1 will get the contact with the id of 1
if (isset($_GET['id'])) {
    if (!empty($_POST)) {
        // This part is similar to the create.php, but instead we update a record and not insert
        $id = isset($_POST['id']) ? $_POST['id'] : NULL;
        $name = isset($_POST['name']) ? $_POST['name'] : '';
        $email = isset($_POST['email']) ? $_POST['email'] : '';
        $phone = isset($_POST['phone']) ? $_POST['phone'] : '';
        $title = isset($_POST['title']) ? $_POST['title'] : '';
        $created = isset($_POST['created']) ? $_POST['created'] : date('Y-m-d H:i:s');
        // Update the record
        $stmt = $pdo->prepare('UPDATE contacts SET id = ?, name = ?, email = ?, phone = ?, title = ?, created = ? WHERE id = ?');
        $stmt->execute([$id, $name, $email, $phone, $title, $created, $_GET['id']]);
        $msg = 'Updated Successfully!';
    }
    // Get the contact from the contacts table
    $stmt = $pdo->prepare('SELECT * FROM contacts WHERE id = ?');
    $stmt->execute([$_GET['id']]);
    $contact = $stmt->fetch(PDO::FETCH_ASSOC);
    if (!$contact) {
        exit('Contact doesn\'t exist with that ID!');
    }
} else {
    exit('No ID specified!');
}
?>
The above code will check for the contact ID, which will be a parameter in the URL, for example, http://localhost/phpcrud/update.php?id=1 will get the contact with the ID of 1, and then we can handle the request with the GET method and execute a MySQL query that will get the contact by the specified ID.
Add after:
<?=template_header('Read')?>
<div class="content update">
<h2>Update Contact #<?=$contact['id']?></h2>
<form action="update.php?id=<?=$contact['id']?>" method="post">
<label for="id">ID</label>
<label for="name">Name</label>
<input type="text" name="id" placeholder="1" value="<?=$contact['id']?>" id="id">
<input type="text" name="name" placeholder="John Doe" value="<?=$contact['name']?>" id="name">
<label for="email">Email</label>
<label for="phone">Phone</label>
<input type="text" name="email" placeholder="johndoe@example.com" value="<?=$contact['email']?>" id="email">
<input type="text" name="phone" placeholder="2025550143" value="<?=$contact['phone']?>" id="phone">
<label for="title">Title</label>
<label for="created">Created</label>
<input type="text" name="title" placeholder="Employee" value="<?=$contact['title']?>" id="title">
<input type="datetime-local" name="created" value="<?=date('Y-m-d\TH:i', strtotime($contact['created']))?>" id="created">
<input type="submit" value="Update">
</form>
<?php if ($msg): ?>
<p><?=$msg?></p>
<?php endif; ?>
</div>
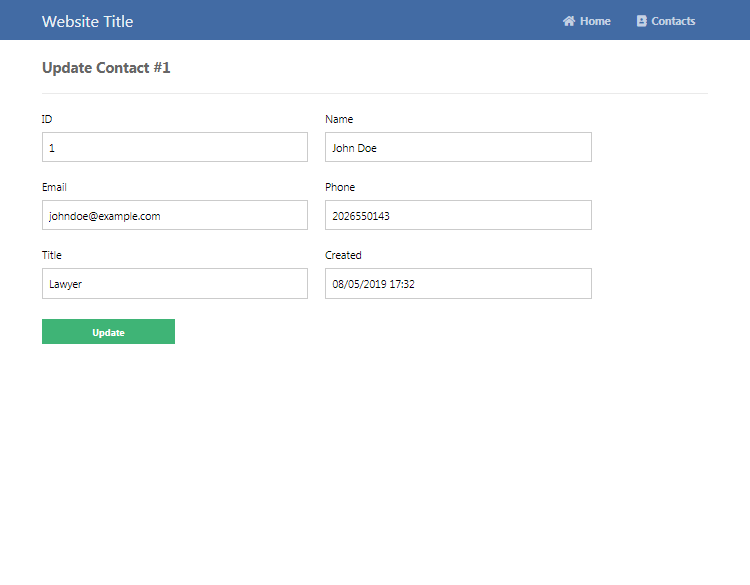
<?=template_footer()?>This is the template for the update page. The input values are already specified with the contact columns. The MySQL query we implemented previously will retrieve those values.
On the read page (Contacts), we should be able to click the update icon next to a record and update it. We should see something like this:
4.6. Creating the Delete Page
The delete page will be used to delete records from the Contacts table. Before a user can delete a record, they will need to confirm it, as it will prevent accidental deletion.
Edit the delete.php file and add:
<?php
include 'functions.php';
$pdo = pdo_connect_mysql();
$msg = '';
// Check that the contact ID exists
if (isset($_GET['id'])) {
    // Select the record that is going to be deleted
    $stmt = $pdo->prepare('SELECT * FROM contacts WHERE id = ?');
    $stmt->execute([$_GET['id']]);
    $contact = $stmt->fetch(PDO::FETCH_ASSOC);
    if (!$contact) {
        exit('Contact doesn\'t exist with that ID!');
    }
    // Make sure the user confirms beore deletion
    if (isset($_GET['confirm'])) {
        if ($_GET['confirm'] == 'yes') {
            // User clicked the "Yes" button, delete record
            $stmt = $pdo->prepare('DELETE FROM contacts WHERE id = ?');
            $stmt->execute([$_GET['id']]);
            $msg = 'You have deleted the contact!';
        } else {
            // User clicked the "No" button, redirect them back to the read page
            header('Location: read.php');
            exit;
        }
    }
} else {
    exit('No ID specified!');
}
?>
To delete a record, the code will check if the GET request variable "id" exists. If it does, then check if the record exists in the Contacts table and prompt the user whether they would like to delete the contact or not. A simple GET request will determine which button the user clicked (Yes or No).
Add after:
<?=template_header('Delete')?>
<div class="content delete">
<h2>Delete Contact #<?=$contact['id']?></h2>
<?php if ($msg): ?>
<p><?=$msg?></p>
<?php else: ?>
<p>Are you sure you want to delete contact #<?=$contact['id']?>?</p>
<div class="yesno">
<a href="delete.php?id=<?=$contact['id']?>&confirm=yes">Yes</a>
<a href="delete.php?id=<?=$contact['id']?>&confirm=no">No</a>
</div>
<?php endif; ?>
</div>
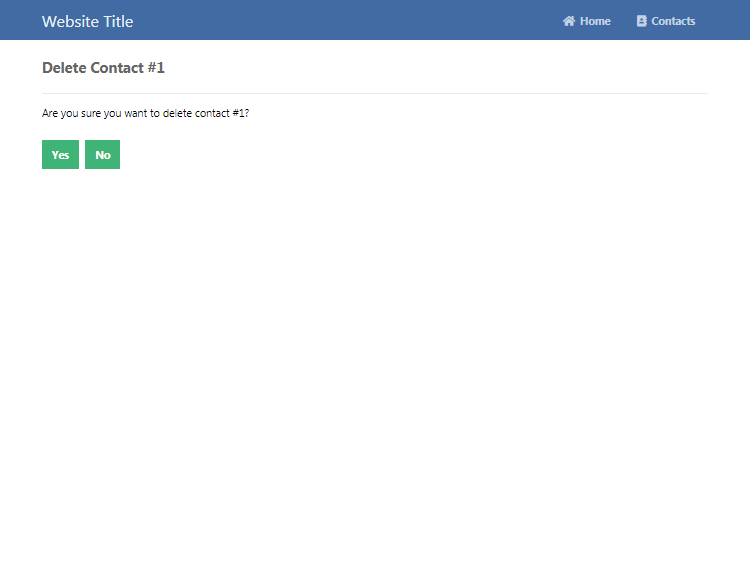
<?=template_footer()?>The above code is the template for the delete page, which includes the Yes and No buttons (delete confirmation) and the output message. The Yes and No buttons will initiate a new GET request that will confirm the user's choice.
On the read page (Contacts), click the delete button on one of the records, and we should see something like the following:
Please understand that if you uploaded the code to a production server, anyone with access could interact with your database (delete, update, and edit records) and therefore I highly advise you integrate it with a secure login system.
Conclusion
Congratulations! You have successfully created a basic CRUD app with PHP and MySQL. What next? Consider adding your own columns to the Contacts table and to the code.
If you've enjoyed this tutorial, don't forget to share using the social links below and check out our many more tutorials on our website.
Enjoy coding!
If you would like to support us, consider the advanced crud application below. It will greatly help us create more tutorials and keep our website up and running. The advanced package includes improved code and more features.
* Advanced package also includes the tutorial source and basic package.
* Instant download after payment.
To learn more about the advanced package, please visit the Advanced CRUD Application page.