 Download the full source codeComplete working project · Setup guide included · Free for commercial use
Free ZIP
Download the full source codeComplete working project · Setup guide included · Free for commercial use
Free ZIP
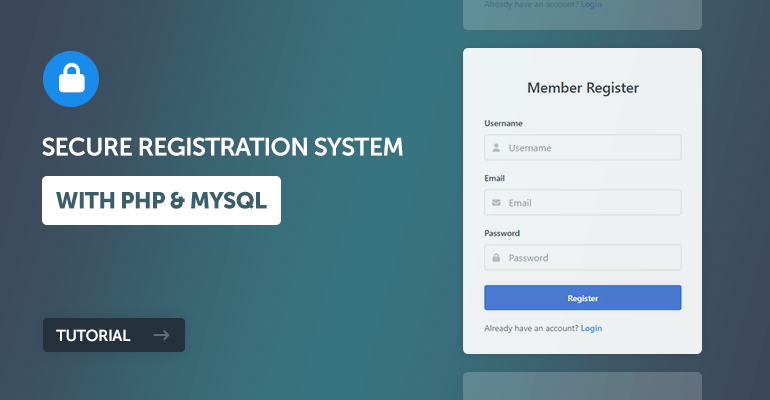
A login system is only half the story - without a registration form, you'd be creating every account by hand in phpMyAdmin. Here we'll build a secure registration system with PHP and MySQL that lets visitors sign up on their own: a form that validates their details, hashes the password with PHP's built-in functions, checks for duplicate usernames, and inserts the account with prepared statements. We'll finish with optional email verification.
It's the follow-up to our Secure Login System and plugs into the same database, though you can follow it standalone. Plain PHP, no frameworks, running on any modern version including PHP 8. Prefer a finished product? The Advanced Package adds email activation, remember me, an admin panel, and PDO and MVC versions.
To build a secure registration system in PHP, validate the submitted username, email and password, confirm the account does not already exist, hash the password with password_hash(), and insert the new row with a prepared statement so the query is safe from SQL injection. Never store the password as plain text.
Contents
- Getting Started
- How the Registration System Works
- Creating the Registration Form with HTML and CSS
- Setting Up the MySQL Database
- Registering Users with PHP and MySQL
- Validating the Registration Form Data
- Adding Email Verification (Account Activation)
- Making Your Registration System More Secure
- Common Problems and How to Fix Them
- Frequently Asked Questions
1. Getting Started
If you followed the login tutorial, your environment is already set up, so jump ahead to the file structure and create the two new files. If you're starting fresh, here's what you need.
1.1. Requirements
- A local web server with PHP and MySQL. If you don't have one, download and install XAMPP. It bundles Apache, PHP, MySQL (MariaDB), and phpMyAdmin in one installer, so there's nothing to configure by hand.
- Any recent PHP version works; the code in this tutorial runs on PHP 7.4 through PHP 8.4 with the
mysqliextension enabled (it is by default in XAMPP).
1.2. What You Will Learn in this Tutorial
- Form Design - Build a signup form with HTML and CSS that sends the username, email, and password to the server.
- Password Hashing - Store passwords the right way with
password_hash(), so a database leak doesn't expose them. - Prepared Statements - Insert new records into MySQL safely and shut the door on SQL injection.
- Server-Side Validation - Check that the email is real, the username is clean, and the password meets a minimum length before anything touches the database.
- Account Activation - Optionally require users to confirm their email address with a unique activation link.
1.3. File Structure & Setup
Start the web server and create the files we'll be working with.
- Open XAMPP Control Panel
- Next to the Apache module click Start
- Next to the MySQL module click Start
- Navigate to XAMPP's installation directory (C:\xampp)
- Open the htdocs directory
- Create the following directories and files:
File Structure
\-- phplogin
|-- register.php
|-- register-process.php
|-- style.css
|-- activate.php (optional)
Here's what each file is for:
- register.php - The signup form, built with HTML and CSS, where visitors enter their username, email, and password.
- register-process.php - The server-side half: it validates the submitted data, checks for an existing username, hashes the password, and inserts the new account into MySQL.
- style.css - The stylesheet, shared with the login system.
- activate.php - Activates a new account when the user clicks the unique link emailed to them (optional, covered in section 7).
2. How the Registration System Works
Before we build the pieces, here's the journey a new account takes from form to database:
- The visitor fills in a username, email, and password on register.php and submits the form.
- The browser sends the three values to register-process.php in a POST request.
- PHP validates the input: every field present, the email actually shaped like an email, the username alphanumeric, the password long enough.
- A prepared statement checks whether the username already exists in the accounts table. If it does, registration stops with a friendly error.
- The password is hashed with
password_hash()(the plain-text version is never stored anywhere) and a prepared INSERT adds the new account to the database.
With activation enabled, there's one extra hop: the account is created with a unique code, the user receives an email link containing that code, and activate.php flips the account to active when the link is clicked. Either way, once the account exists, the login system takes over from there.
3. Creating the Registration Form with HTML and CSS
The signup form is nearly identical to the login form, with one extra field for the email address. Like the login page, it starts with a short PHP check: users who are already logged in have no business registering, so they get redirected to the home page.
Edit the register.php file and add the following code:
<?php
// We need to use sessions, so you should always initialize sessions using the below function
session_start();
// If the user is logged in, redirect to the home page
if (isset($_SESSION['account_loggedin'])) {
	header('Location: home.php');
	exit;
}
?>
<!DOCTYPE html>
<html>
	<head>
		<meta charset="utf-8">
		<meta name="viewport" content="width=device-width,minimum-scale=1">
		<title>Register</title>
	</head>
	<body>
		<div class="login">

			<h1>Member Register</h1>

			<form action="register-process.php" method="post" class="form login-form">

				<label class="form-label" for="username">Username</label>
				<div class="form-group">
					<svg class="form-icon-left" width="14" height="14" xmlns="http://www.w3.org/2000/svg" viewBox="0 0 448 512"><!--!Font Awesome Free 6.5.1 by @fontawesome - https://fontawesome.com License - https://fontawesome.com/license/free Copyright 2024 Fonticons, Inc.--><path d="M224 256A128 128 0 1 0 224 0a128 128 0 1 0 0 256zm-45.7 48C79.8 304 0 383.8 0 482.3C0 498.7 13.3 512 29.7 512H418.3c16.4 0 29.7-13.3 29.7-29.7C448 383.8 368.2 304 269.7 304H178.3z"/></svg>
					<input class="form-input" type="text" name="username" placeholder="Username" id="username" required>
				</div>

				<label class="form-label" for="email">Email</label>
				<div class="form-group">
					<svg class="form-icon-left" xmlns="http://www.w3.org/2000/svg" width="14" height="14" viewBox="0 0 512 512"><!--!Font Awesome Free 6.5.1 by @fontawesome - https://fontawesome.com License - https://fontawesome.com/license/free Copyright 2024 Fonticons, Inc.--><path d="M48 64C21.5 64 0 85.5 0 112c0 15.1 7.1 29.3 19.2 38.4L236.8 313.6c11.4 8.5 27 8.5 38.4 0L492.8 150.4c12.1-9.1 19.2-23.3 19.2-38.4c0-26.5-21.5-48-48-48H48zM0 176V384c0 35.3 28.7 64 64 64H448c35.3 0 64-28.7 64-64V176L294.4 339.2c-22.8 17.1-54 17.1-76.8 0L0 176z"/></svg>
					<input class="form-input" type="email" name="email" placeholder="Email" id="email" required>
				</div>

				<label class="form-label" for="password">Password</label>
				<div class="form-group mar-bot-5">
					<svg class="form-icon-left" xmlns="http://www.w3.org/2000/svg" width="14" height="14" viewBox="0 0 448 512"><!--!Font Awesome Free 6.5.1 by @fontawesome - https://fontawesome.com License - https://fontawesome.com/license/free Copyright 2024 Fonticons, Inc.--><path d="M144 144v48H304V144c0-44.2-35.8-80-80-80s-80 35.8-80 80zM80 192V144C80 64.5 144.5 0 224 0s144 64.5 144 144v48h16c35.3 0 64 28.7 64 64V448c0 35.3-28.7 64-64 64H64c-35.3 0-64-28.7-64-64V256c0-35.3 28.7-64 64-64H80z"/></svg>
					<input class="form-input" type="password" name="password" placeholder="Password" id="password" autocomplete="new-password" required>
				</div>

				<button class="btn blue" type="submit">Register</button>

				<p class="register-link">Already have an account? <a href="index.php" class="form-link">Login</a></p>

			</form>

		</div>
	</body>
</html>
If we navigate to the registration page (localhost/phplogin/register.php), our form looks like this:
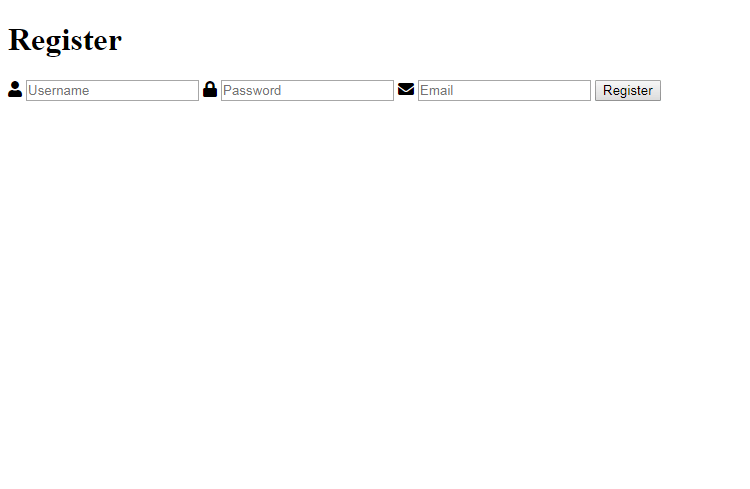
Bare bones, but working. If you followed the login tutorial, the styling is already done, because the registration form reuses the same classes, so it will look right the moment the stylesheet is linked. If you're starting from scratch, edit the style.css file and add the following:
* {
    box-sizing: border-box;
    font-family: system-ui, "Segoe UI", Roboto, Helvetica, Arial, sans-serif, "Apple Color Emoji", "Segoe UI Emoji", "Segoe UI Symbol";
    font-size: 16px;
}
body, html {
    background-color: #f3f5f7;
    margin: 0;
    padding: 0;
}
h1, h2, h3, h4, h5, h6 {
    margin: 0;
    padding: 0;
    color: #474b50;
}
.form {
    display: flex;
    flex-flow: column;
    width: 100%;
}
.form .form-label {
    display: block;
    padding: 20px 0 10px 0;
    font-weight: 500;
    font-size: 14px;
    color: #474b50;
}
.form .form-group {
    display: flex;
    position: relative;
    justify-content: space-between;
    align-items: center;
    width: 100%;
}
.form .form-group .form-icon-left, .form .form-group .form-icon-right {
    fill: #c1c6cb;
    width: 40px;
    position: absolute;
    transform: translateY(-50%);
    top: 50%;
    pointer-events: none;
}
.form .form-group .form-icon-left {
    left: 0;
}
.form .form-group .form-icon-left + .form-input {
    padding-left: 40px;
}
.form .form-group .form-icon-right {
    right: 0;
}
.form .form-group .form-icon-right + .form-input {
    padding-right: 40px;
}
.form .form-group:focus-within .form-icon-left {
    fill: #989fa8;
}
.form .form-input {
    width: 100%;
    height: 43px;
    border: 1px solid #dee1e6;
    padding: 0 15px;
    border-radius: 4px;
    color: #000;
}
.form .form-input::placeholder {
    color: #989fa8;
}
.form .form-link {
    color: #2a8eeb;
    font-weight: 500;
    text-decoration: none;
    font-size: 14px;
}
.form .form-link:hover {
    color: #136fc5;
}
.form p.register-link {
    margin: 0;
    padding: 20px 0 0 0;
    font-size: 14px;
    color: #6b7179;
}
.btn {
    display: inline-flex;
    align-items: center;
    justify-content: center;
    text-decoration: none;
    appearance: none;
    cursor: pointer;
    border: 0;
    background-color: #3e7bd6;
    color: #FFFFFF;
    padding: 0 14px;
    font-size: 14px;
    font-weight: 600;
    border-radius: 4px;
    height: 42px;
    box-shadow: 0px 0px 6px 1px rgba(45, 57, 68, 0.1);
}
.btn:hover {
    background-color: #3172d3;
}
.login, .register {
    display: flex;
    flex-flow: column;
    width: 400px;
    max-width: 95%;
    background-color: #ffffff;
    box-shadow: 0px 0px 7px 1px rgba(45, 57, 68, 0.05);
    border-radius: 5px;
    margin: 100px auto;
    padding: 35px;
}
.login h1, .register h1 {
    text-align: center;
    font-size: 24px;
    font-weight: 500;
    padding: 15px 0;
    margin: 0;
}
.pad-1 { padding: 5px; }
.mar-1 { margin: 5px; }
.pad-2 { padding: 10px; }
.mar-2 { margin: 10px; }
.pad-3 { padding: 15px; }
.mar-3 { margin: 15px; }
.pad-4 { padding: 20px; }
.mar-4 { margin: 20px; }
.pad-5 { padding: 25px; }
.mar-5 { margin: 25px; }
.pad-bot-1 { padding-bottom: 5px; }
.pad-top-1 { padding-top: 5px; }
.pad-left-1 { padding-left: 5px; }
.pad-right-1 { padding-right: 5px; }
.pad-x-1 { padding-left: 5px; padding-right: 5px; }
.pad-y-1 { padding-top: 5px; padding-bottom: 5px; }
.mar-bot-1 { margin-bottom: 5px; }
.mar-top-1 { margin-top: 5px; }
.mar-left-1 { margin-left: 5px; }
.mar-right-1 { margin-right: 5px; }
.mar-x-1 { margin-left: 5px; margin-right: 5px; }
.mar-y-1 { margin-top: 5px; margin-bottom: 5px; }
.pad-bot-2 { padding-bottom: 10px; }
.pad-top-2 { padding-top: 10px; }
.pad-left-2 { padding-left: 10px; }
.pad-right-2 { padding-right: 10px; }
.pad-x-2 { padding-left: 10px; padding-right: 10px; }
.pad-y-2 { padding-top: 10px; padding-bottom: 10px; }
.mar-bot-2 { margin-bottom: 10px; }
.mar-top-2 { margin-top: 10px; }
.mar-left-2 { margin-left: 10px; }
.mar-right-2 { margin-right: 10px; }
.mar-x-2 { margin-left: 10px; margin-right: 10px; }
.mar-y-2 { margin-top: 10px; margin-bottom: 10px; }
.pad-bot-3 { padding-bottom: 15px; }
.pad-top-3 { padding-top: 15px; }
.pad-left-3 { padding-left: 15px; }
.pad-right-3 { padding-right: 15px; }
.pad-x-3 { padding-left: 15px; padding-right: 15px; }
.pad-y-3 { padding-top: 15px; padding-bottom: 15px; }
.mar-bot-3 { margin-bottom: 15px; }
.mar-top-3 { margin-top: 15px; }
.mar-left-3 { margin-left: 15px; }
.mar-right-3 { margin-right: 15px; }
.mar-x-3 { margin-left: 15px; margin-right: 15px; }
.mar-y-3 { margin-top: 15px; margin-bottom: 15px; }
.pad-bot-4 { padding-bottom: 20px; }
.pad-top-4 { padding-top: 20px; }
.pad-left-4 { padding-left: 20px; }
.pad-right-4 { padding-right: 20px; }
.pad-x-4 { padding-left: 20px; padding-right: 20px; }
.pad-y-4 { padding-top: 20px; padding-bottom: 20px; }
.mar-bot-4 { margin-bottom: 20px; }
.mar-top-4 { margin-top: 20px; }
.mar-left-4 { margin-left: 20px; }
.mar-right-4 { margin-right: 20px; }
.mar-x-4 { margin-left: 20px; margin-right: 20px; }
.mar-y-4 { margin-top: 20px; margin-bottom: 20px; }
.pad-bot-5 { padding-bottom: 25px; }
.pad-top-5 { padding-top: 25px; }
.pad-left-5 { padding-left: 25px; }
.pad-right-5 { padding-right: 25px; }
.pad-x-5 { padding-left: 25px; padding-right: 25px; }
.pad-y-5 { padding-top: 25px; padding-bottom: 25px; }
.mar-bot-5 { margin-bottom: 25px; }
.mar-top-5 { margin-top: 25px; }
.mar-left-5 { margin-left: 25px; }
.mar-right-5 { margin-right: 25px; }
.mar-x-5 { margin-left: 25px; margin-right: 25px; }
.mar-y-5 { margin-top: 25px; margin-bottom: 25px; }
Then include the stylesheet in the head section of register.php:
<link href="style.css" rel="stylesheet" type="text/css">Refresh the page, and the form takes shape:

The parts of the markup doing the heavy lifting:
-
Form - The
actionattribute points at register-process.php, so that's where the data goes on submission, andmethod="post"keeps the details in the request body instead of the URL.- Input (text/email/password) - Each field's
nameattribute is how PHP identifies it on the server; the field namedusernamearrives as$_POST['username']. Note the email field usestype="email", which gives us free browser-side format checking before the form even submits. - Input (submit) - Clicking the register button sends everything to our processing file.
- Input (text/email/password) - Each field's
That's the client side done. Everything from here on happens on the server.
4. Setting Up the MySQL Database
Skip this step if you followed the Secure Login System tutorial; you already have this exact table.
You'll need access to your MySQL server, either through phpMyAdmin or whichever database tool you prefer.
If you're using phpMyAdmin, follow these steps:
- In the XAMPP control panel, click Admin next to MySQL
- Wait for phpMyAdmin to open in your browser (localhost/phpmyadmin)
- Click the Databases tab at the top
- Under Create database, enter phplogin in the text box
- Select utf8mb4_unicode_ci as the collation
- Click Create
You can use your own database name, but the code in this tutorial expects phplogin.
The system stores everything in a single accounts table: usernames, hashed passwords, emails, and registration dates.
Select the database on the left side panel (phplogin) and execute the following SQL statement:
CREATE TABLE IF NOT EXISTS `accounts` (
	`id` int(11) NOT NULL AUTO_INCREMENT,
	`username` varchar(50) NOT NULL,
	`password` varchar(255) NOT NULL,
	`email` varchar(100) NOT NULL,
	`registered` datetime NOT NULL,
	PRIMARY KEY (`id`)
) ENGINE=InnoDB AUTO_INCREMENT=2 DEFAULT CHARSET=utf8mb4 COLLATE=utf8mb4_unicode_ci;

INSERT INTO `accounts` (`id`, `username`, `password`, `email`, `registered`) VALUES (1, 'test', '$2y$10$SfhYIDtn.iOuCW7zfoFLuuZHX6lja4lF4XA4JqNmpiH/.P3zB8JCa', 'test@example.com', '2025-01-01 00:00:00');
In phpMyAdmin, this should resemble the following:
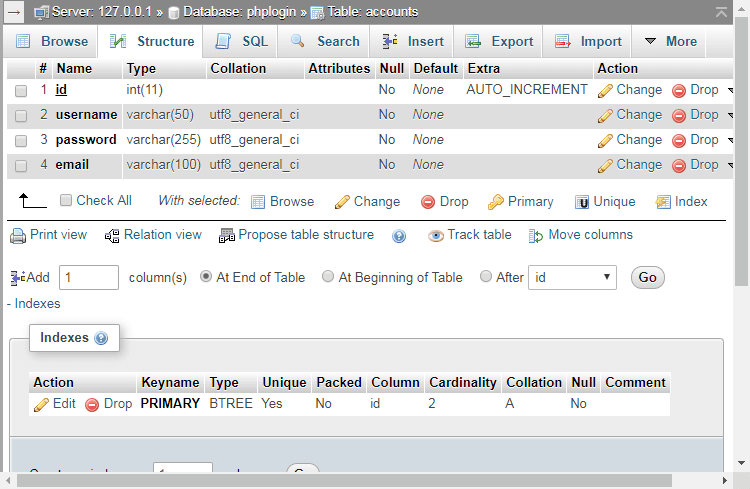
One detail worth noticing: the password column is varchar(255). A bcrypt hash is 60 characters, but PHP's hashing algorithms evolve, and a roomy column means future formats fit without a schema change. If this column is ever too short, MySQL truncates the hash on insert and every login for that account fails forever. It's one of the most common bugs people hit with registration systems.
5. Registering Users with PHP and MySQL
Now for the processing file, the code that receives the form data, checks it, and creates the account.
Edit the register-process.php file and add the following code. This is the complete file, ready to copy - the walkthrough below goes through it piece by piece:
<?php
// Change the below variables to reflect your MySQL database details
$DATABASE_HOST = 'localhost';
$DATABASE_USER = 'root';
$DATABASE_PASS = '';
$DATABASE_NAME = 'phplogin';
// Try and connect using the info above
$con = mysqli_connect($DATABASE_HOST, $DATABASE_USER, $DATABASE_PASS, $DATABASE_NAME);
// Check for connection errors
if (mysqli_connect_errno()) {
	// If there is an error with the connection, stop the script and display the error
	exit('Failed to connect to MySQL: ' . mysqli_connect_error());
}
// We can utilize the isset() function to check if the form has been submitted
if (!isset($_POST['username'], $_POST['password'], $_POST['email'])) {
	// Could not get the data that should have been sent
	exit('Please complete the registration form!');
}
// Make sure the submitted registration values are not empty
if (empty($_POST['username']) || empty($_POST['password']) || empty($_POST['email'])) {
	// One or more values are empty.
	exit('Please complete the registration form');
}
// Validate email address
if (!filter_var($_POST['email'], FILTER_VALIDATE_EMAIL)) {
	exit('Email is not valid!');
}
// Validate username (must be alphanumeric)
if (preg_match('/^[a-zA-Z0-9]+$/', $_POST['username']) == 0) {
	exit('Username is not valid!');
}
// Validate password (between 5 and 20 characters long)
if (strlen($_POST['password']) > 20 || strlen($_POST['password']) < 5) {
	exit('Password must be between 5 and 20 characters long!');
}
// Check if the username already exists
if ($stmt = $con->prepare('SELECT id, password FROM accounts WHERE username = ?')) {
	// Bind parameters (s = string, i = int, b = blob, etc)
	$stmt->bind_param('s', $_POST['username']);
	$stmt->execute();
	// Store the result so we can check if the account exists in the database
	$stmt->store_result();
	// Check if the account exists
	if ($stmt->num_rows > 0) {
		// Username already exists
		echo 'Username already exists! Please choose another!';
	} else {
		// Declare variables
		$registered = date('Y-m-d H:i:s');
		// We do not want to expose passwords in our database, so hash the password and use password_verify when a user logs in
		$password = password_hash($_POST['password'], PASSWORD_DEFAULT);
		// Username does not exist, insert new account
		if ($stmt = $con->prepare('INSERT INTO accounts (username, password, email, registered) VALUES (?, ?, ?, ?)')) {
			// Bind POST data to the prepared statement
			$stmt->bind_param('ssss', $_POST['username'], $password, $_POST['email'], $registered);
			$stmt->execute();
			// Output success message
			echo 'You have successfully registered! You can now login!';
		} else {
			// Something is wrong with the SQL statement, check to make sure the accounts table exists with all 3 fields
			echo 'Could not prepare statement!';
		}
	}
	// Close the statement
	$stmt->close();
} else {
	// Something is wrong with the SQL statement, check to make sure the accounts table exists with all 3 fields.
	echo 'Could not prepare statement!';
}
// Close the connection
$con->close();
?>
Here's what happens, in order.
The connection. Update the four database variables if your MySQL credentials differ; on stock XAMPP the user is root with an empty password.
The guard clauses. The isset() check catches someone opening the file directly without submitting the form; the empty() check catches submitted-but-blank fields. Belt and suspenders.
The validation. Three quick checks make sure the email actually looks like an email, the username sticks to letters and numbers, and the password is a sensible length. Each one stops the script with a clear message if its rule is broken - the next section covers all three in detail.
The duplicate check. Two people can't share a username, so before inserting anything we look up whether the name is taken. Same prepared-statement pattern as the login system: the username is bound to the ? placeholder, so it's treated purely as data no matter what the visitor typed.
The insert. This is the most important security decision in the whole file: the password goes through password_hash before it's stored. It uses bcrypt, salts every password uniquely, and produces a one-way hash that can't be reversed. When the user logs in later, password_verify in our login system checks their input against it.
Did You Know?If your database were ever leaked, hashed passwords would be the difference between a bad day and a catastrophe. Since people reuse passwords across sites, storing them in plain text puts your users' other accounts at risk too.
And that's a working registration system. Open register.php, fill in the form, and check the accounts table in phpMyAdmin: the new row will be there with a hashed password, and the new member can log in straight away. The rest of this tutorial makes it stricter and adds email activation.
6. Validating the Registration Form Data
The complete file above already includes three validation checks beyond "not empty" and "username not taken". They run before anything touches the database, so bad input gets rejected as early as possible. Here's what each one does and how to adjust it.
Email Validation
The filter_var($_POST['email'], FILTER_VALIDATE_EMAIL) check uses PHP's built-in email filter, so there's no regular expression to fight with. If the value isn't shaped like a real email address, registration stops with Email is not valid!
Username Validation
The preg_match() check restricts usernames to letters and numbers only: no spaces, no emoji, no <script> tags masquerading as usernames. If you'd like to allow underscores or dashes too, add them to the character class: /^[a-zA-Z0-9_-]+$/
Password Length Check
The strlen() check enforces a password of between 5 and 20 characters. Honestly, for a real site I'd raise that minimum; 8 characters is a more defensible floor these days, and there's no strong reason to cap the maximum at 20 since the password is hashed to a fixed length anyway. Adjust the numbers in the condition to taste.
One thing worth remembering: browser-side checks like type="email" are conveniences, not security. Anyone can bypass them with a crafted request, which is why all of this validation runs on the server.
7. Adding Email Verification (Account Activation)
Email verification, usually implemented as account activation, confirms that new users actually own the email address they signed up with. On registration, the account is created with a unique code, and the user receives an email containing an activation link. Until they click it, the account isn't considered active. It's a great spam deterrent, and it means typos in email addresses get caught immediately.
First, the database needs somewhere to keep the code. Open phpMyAdmin, select the phplogin database, and either add an activation_code column to the accounts table by hand or run this SQL statement:
ALTER TABLE accounts ADD activation_code VARCHAR(255) DEFAULT NULL;Next, we update the registration code to generate and store the code. Edit register-process.php and search for this line:
if ($stmt = $con->prepare('INSERT INTO accounts (username, password, email, registered) VALUES (?, ?, ?, ?)')) {Replace with:
if ($stmt = $con->prepare('INSERT INTO accounts (username, password, email, registered, activation_code) VALUES (?, ?, ?, ?, ?)')) {Search for:
$stmt->bind_param('ssss', $_POST['username'], $password, $_POST['email'], $registered);Replace with:
// Generate unique activation code
$uniqid = sha1($_POST['username'] . uniqid());
$stmt->bind_param('sssss', $_POST['username'], $password, $_POST['email'], $registered, $uniqid);
The $uniqid variable holds a hard-to-guess activation code (a SHA-1 hash of the username combined with PHP's uniqid()), which is stored with the account and will ride along in the emailed link.
Search for:
echo 'You have successfully registered! You can now login!';Replace with:
// From email address
$from = 'noreply@example.com';
// Email subject
$subject = 'Account Activation Required';
// Email headers
$headers = 'From: ' . $from . "\r\n" . 'Reply-To: ' . $from . "\r\n" . 'X-Mailer: PHP/' . phpversion() . "\r\n" . 'MIME-Version: 1.0' . "\r\n" . 'Content-Type: text/html; charset=UTF-8' . "\r\n";
// Update the activation variable below
$activate_link = 'https://example.com/phplogin/activate.php?email=' . $_POST['email'] . '&code=' . $uniqid;
// Email message
$message = '<p>Please click the following link to activate your account: <a href="' . $activate_link . '">' . $activate_link . '</a></p>';
// Send mail
mail($_POST['email'], $subject, $message, $headers);
// Output message
echo 'Please check your email to activate your account!';
This sends the activation email with PHP's mail() function. Two variables need your attention before it will work for real users: $from should be an address on your own domain, and $activate_link must point to wherever activate.php actually lives on your server.
Now for the file that receives the click. It reads the email and code from the link's GET parameters, checks them against the database, and marks the account as activated if they match.
Edit/create the activate.php file and add the following code:
<?php
// Start the session
session_start();
// Change the below variables to reflect your MySQL database details
$DATABASE_HOST = 'localhost';
$DATABASE_USER = 'root';
$DATABASE_PASS = '';
$DATABASE_NAME = 'phplogin';
// Try and connect using the info above
$con = mysqli_connect($DATABASE_HOST, $DATABASE_USER, $DATABASE_PASS, $DATABASE_NAME);
// First we check if the email and code exists...
if (isset($_GET['email'], $_GET['code']) && !empty($_GET['email']) && !empty($_GET['code'])) {
	if ($stmt = $con->prepare('SELECT * FROM accounts WHERE email = ? AND activation_code = ?')) {
		$stmt->bind_param('ss', $_GET['email'], $_GET['code']);
		$stmt->execute();
		// Store the result so we can check if the account exists in the database.
		$stmt->store_result();
		if ($stmt->num_rows > 0) {
			// Account exists with the requested email and code.
			if ($stmt = $con->prepare('UPDATE accounts SET activation_code = ? WHERE email = ? AND activation_code = ?')) {
				// Set the new activation code to 'activated', this is how we can check if the user has activated their account.
				$newcode = 'activated';
				$stmt->bind_param('sss', $newcode, $_GET['email'], $_GET['code']);
				$stmt->execute();
				// Output success message
				echo 'Your account is now activated! You can now <a href="index.php">login</a>!';
			}
		} else {
			echo 'The account is already activated or doesn\'t exist!';
		}
	}
} else {
	echo 'Invalid request!';
}
?>
Both GET parameters go through a prepared statement. Same rule as always: anything from the user is data, never SQL. If the email and code match a row, the activation_code column is set to activated, which is how the rest of the site can tell an activated account from a pending one.
To actually enforce activation, add a check like this to the pages you want to restrict (or to the login flow itself):
// Get account by username (you can change this to email or id if you prefer)
$stmt = $con->prepare('SELECT activation_code FROM accounts WHERE username = ?');
$stmt->bind_param('s', $_POST['username']);
$stmt->execute();
$stmt->bind_result($activation_code);
$stmt->fetch();
$stmt->close();
// Check if the account is activated
if ($activation_code == 'activated') {
	// account is activated
	// Display home page etc
} else {
	// account is not activated
	// redirect user or display an error
}
You'll need an open database connection for that snippet, and you can look the account up by username, email, or ID, whatever the page has on hand.
A word of warning about mail(): it hands the message to whatever mail transfer agent the server has configured, and on a fresh XAMPP install there isn't one, so nothing gets delivered. On a live Linux server you'd install something like Postfix. Honestly though, for reliable delivery that doesn't land in spam folders, the better route is SMTP through the PHPMailer library; our guide to sending emails in PHP with Gmail SMTP walks through the whole setup.
8. Making Your Registration System More Secure
The system already does the big things right: prepared statements, bcrypt hashing, server-side validation. Before you take it live, run through this checklist:
- Escape user data with
htmlspecialchars()whenever you output it to a page, including data that came back out of the database. - Move the database credentials into a config file outside the webroot so they can never be served as plain text by a misconfigured server.
- Serve everything over HTTPS. Registration forms send passwords across the network, and without TLS they travel in the clear.
- Harden your session settings using the PHP manual's session security page as a guide.
- Disable error display in production with
error_reporting(0)and log errors to a file instead, since a stack trace can reveal file paths and query structure to attackers. - Add CSRF tokens to your forms to stop other sites from submitting them on a user's behalf.
- Consider a captcha or rate limiting on the registration form; bots love an unprotected signup page.
- Never use XAMPP for production hosting; it's a development environment with development defaults.
9. Common Problems and How to Fix Them
The issues that come up most often in the comments, and how to solve them.
The activation email never arrives
PHP's mail() function requires a working mail server on the machine, and local setups like XAMPP don't include one, so the function reports success and the message evaporates. Even on live servers, mail sent this way often lands in spam. The fix is to send through authenticated SMTP with PHPMailer; see our Gmail SMTP tutorial for a working configuration.
"Could not prepare statement!"
The SQL itself failed to compile, which almost always means the table doesn't match the query: the accounts table is missing, a column name is different, or you added the activation code to the INSERT without adding the activation_code column to the table. Run the CREATE TABLE and ALTER TABLE statements from this page and check the spelling of every column.
The form submits but nothing appears in the database
First check the browser's address bar. If it still shows register.php, the form never reached the processing file, so verify the action attribute points at register-process.php and both files sit in the same directory. If the processing file does run but stays silent, temporarily add error_reporting(E_ALL) and ini_set('display_errors', 1) at the top so PHP tells you what went wrong instead of failing quietly.
"Username already exists!" for every username
Usually a leftover from testing: the username genuinely is in the table from an earlier attempt. Browse the accounts table in phpMyAdmin and clear out your test rows. If it happens for brand-new usernames too, check that the SELECT query in the duplicate check is comparing against the right column.
Registered users can't log in
If the login system says the password is wrong even though registration succeeded, inspect the password column of the new row in phpMyAdmin. It should contain a 60-character string starting with $2y$. If you see the plain password, the INSERT is binding $_POST['password'] instead of the hashed $password variable; if you see a shortened hash, the column is too small; it needs to be varchar(255).
Frequently Asked Questions
How do I add a confirm password field?
Add a second password input to the form (name it something like cpassword), then in register-process.php compare the two values before hashing: if $_POST['password'] doesn't exactly match $_POST['cpassword'], exit with an error. The comparison happens on the plain text, before password_hash() runs, because you can't compare two hashes of the same password, because every hash gets a different salt.
How do I stop the same email address from registering twice?
The duplicate check in this tutorial only looks at the username, so extend it: query the accounts table for the email as well (WHERE username = ? OR email = ?) and reject the registration if either matches. For a stronger guarantee, add a UNIQUE index to the email column in MySQL; then even a race condition between two simultaneous signups can't create a duplicate.
Why is the password hash different every time someone registers?
That's by design. password_hash() generates a fresh random salt for each call, so the same password produces a different hash every time. The salt is stored inside the hash string itself, which is how password_verify() can still check submitted passwords against it. Two users with identical passwords end up with completely different hashes, and that's exactly what you want.
Can I log users in automatically after they register?
Yes. After the INSERT succeeds, start a session and set the same variables the login system creates (account_loggedin, account_name, and account_id, which you can get from $con->insert_id), then redirect to the home page. Skip this if you're using account activation, since the whole point is that the account isn't usable until the email is confirmed.
How do I add more fields, like a full name or phone number?
Three places need to change: add the input to the form in register.php, add the column to the accounts table, and add the field to the INSERT statement with an extra ? placeholder, an extra s in bind_param, and the new $_POST value. Validate it server-side like the other fields.
Should the activation code expire?
For a stricter system, yes. Store a timestamp alongside the activation code and reject codes older than, say, 24 or 48 hours, offering to resend a fresh one. The version in this tutorial keeps codes valid indefinitely for simplicity, which is fine for hobby projects but worth tightening for anything public.
Is this registration system safe to use in production?
The fundamentals are production-grade: prepared statements against SQL injection, bcrypt hashing via password_hash(), and server-side validation. What you should add before going live is HTTPS, CSRF tokens, rate limiting or a captcha on the form, and proper SMTP email delivery. The security checklist in section 8 covers the full list.
Where can I download the registration form source code?
All of it is on this page, free to copy: register.php, register-process.php, the stylesheet, and the optional activate.php. If you'd prefer a ready-made download, the Advanced Package includes the complete tutorial source code plus extras like email activation, remember me, and an admin panel.
Can I turn this into a student registration form or an event signup form?
Yes, and you won't have to change the structure at all. A student registration form is the same pattern with different fields: add inputs for the name, course, or ID number, add matching columns to the accounts table, and extend the INSERT statement and validation. The password hashing and prepared statements stay exactly as they are.
Conclusion
You now have both halves of the puzzle: a login system that authenticates users and a registration system that creates them, with hashed passwords, duplicate checks, server-side validation, and optional email activation. Together they form a complete login and registration system you can drop into almost any PHP project.
Treat it as a starting point rather than a finished product. Add the confirm-password field, enforce a longer minimum password, wire up proper SMTP delivery; each small improvement compounds. The security habits baked in here (prepared statements everywhere, hash before you store, validate on the server) will serve you well far beyond this project.
If you'd like more tutorials in this series, drop a comment and tell us what you'd like to see next.
Thank you for reading, and enjoy coding!
Skip the copy-pasting and get the complete, working project from this tutorial as a free ZIP with a setup guide included. Free for personal and commercial use.
If you would like to support us, consider the advanced secure login & registration system below. It will greatly help us create more tutorials and keep our website up and running. The advanced package includes improved code and more features.
— CSRF Protection
— Brute Force Protection
— reCAPTCHA v3 Protection
— Two-Factor Authentication
— OAuth Login (Google, Facebook, and more)
— View Dashboard
— Create, edit, and delete accounts
— Search, sort, and filter accounts
— Manage Email Templates
— Edit Settings
— Export & Import Accounts (CSV, JSON, etc.)
* Advanced package also includes the tutorial source and basic package.
* Instant download after payment.
To learn more about the advanced package, please visit the Advanced Secure Login & Registration System page.