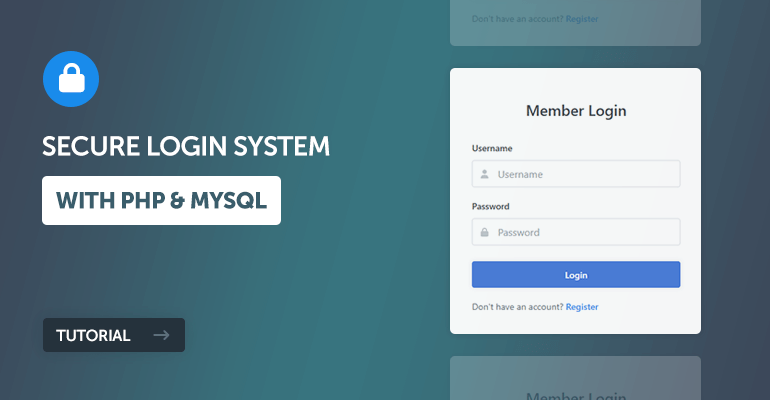
Almost every website with members needs the same three things: a login form, an accounts table, and some PHP to tie them together. That's what we're building: a complete login system with PHP and MySQL that checks credentials safely and keeps users logged in with sessions.
By the end you'll have a styled login page, a protected home page, a profile page, and a logout script. Prefer a finished product? The Advanced Package bundles account activation, remember me, an admin panel, and PDO and MVC versions.
To build a secure login system in PHP, hash passwords with password_hash(), look the account up with a prepared statement, verify the login with password_verify(), and on success regenerate the session ID and store the user's ID in $_SESSION.
Want the finished code? The free download and the Advanced Package are at the end of this tutorial.
Contents
- Getting Started
- How the Login System Works
- Creating the Login Form with HTML and CSS
- Setting Up the MySQL Database
- Authenticating Users with PHP and MySQL
- Creating the Home Page
- Creating the Profile Page
- Creating the Logout Script
- PHP Login Security Best Practices
- Common Problems and How to Fix Them
- Frequently Asked Questions
1. Getting Started
We need a local web server with PHP and MySQL running. Already have one? Skip ahead to the file structure.
1.1. Requirements
- No local server yet? Download and install XAMPP. It bundles Apache, PHP, MySQL (MariaDB), and phpMyAdmin in a single installer.
- Any PHP version from 7.4 through 8.5 works, as long as the
mysqliextension is enabled (it is by default in XAMPP).
1.2. What You Will Learn in this Tutorial
- Form design: build a clean login form with HTML and CSS that posts the username and password to the server.
- Prepared statements: query the database safely, so SQL injection has nothing to grab onto.
- Password verification: check a submitted password against the bcrypt hash stored in your database.
- Session management: keep users logged in across pages with data that lives on the server.
1.3. File Structure & Setup
Start Apache and MySQL from the XAMPP control panel, open the htdocs directory (C:\xampp\htdocs), create a phplogin folder inside it, and create these files in that folder:
File Structure
\-- phplogin
|-- index.php
|-- style.css
|-- authenticate.php
|-- logout.php
|-- home.php
|-- profile.php
- index.php: the login form.
- style.css: the stylesheet for every page.
- authenticate.php: verifies the login and creates the session.
- logout.php: destroys the session.
- home.php: a protected home page.
- profile.php: displays the user's account details.
2. How the Login System Works
Here's the journey a login request takes:
- The user enters a username and password on index.php and hits the login button.
- The browser sends both values to authenticate.php in a POST request.
- PHP looks up the username in the accounts table with a prepared statement.
- If the account exists,
password_verify()compares the password against the bcrypt hash in the database. The real password is never stored anywhere. - On a match, PHP regenerates the session ID and saves the user's ID and username in session variables, which every protected page checks.
Logging out is the reverse: destroy the session and the protected pages no longer recognize the visitor. PHP user authentication really is just a form, one SQL query, and a session.
3. Creating the Login Form with HTML and CSS
Let's start with the part your users will see: plain HTML with a short PHP snippet that sends anyone who is already logged in straight to the home page.
Edit the index.php file and add the following code:
<?php
// We need to use sessions, so you should always initialize sessions using the below function
session_start();
// If the user is logged in, redirect to the home page
if (isset($_SESSION['account_loggedin'])) {
    header('Location: home.php');
    exit;
}
?>
<!DOCTYPE html>
<html>
    <head>
        <meta charset="utf-8">
        <meta name="viewport" content="width=device-width,minimum-scale=1">
        <title>Login</title>
    </head>
    <body>
        <div class="login">

            <h1>Member Login</h1>

            <form action="authenticate.php" method="post" class="form login-form">

                <label class="form-label" for="username">Username</label>
                <div class="form-group">
                    <svg class="form-icon-left" width="14" height="14" xmlns="http://www.w3.org/2000/svg" viewBox="0 0 448 512"><!--!Font Awesome Free 6.5.1 by @fontawesome - https://fontawesome.com License - https://fontawesome.com/license/free Copyright 2024 Fonticons, Inc.--><path d="M224 256A128 128 0 1 0 224 0a128 128 0 1 0 0 256zm-45.7 48C79.8 304 0 383.8 0 482.3C0 498.7 13.3 512 29.7 512H418.3c16.4 0 29.7-13.3 29.7-29.7C448 383.8 368.2 304 269.7 304H178.3z"/></svg>
                    <input class="form-input" type="text" name="username" placeholder="Username" id="username" required>
                </div>

                <label class="form-label" for="password">Password</label>
                <div class="form-group mar-bot-5">
                    <svg class="form-icon-left" xmlns="http://www.w3.org/2000/svg" width="14" height="14" viewBox="0 0 448 512"><!--!Font Awesome Free 6.5.1 by @fontawesome - https://fontawesome.com License - https://fontawesome.com/license/free Copyright 2024 Fonticons, Inc.--><path d="M144 144v48H304V144c0-44.2-35.8-80-80-80s-80 35.8-80 80zM80 192V144C80 64.5 144.5 0 224 0s144 64.5 144 144v48h16c35.3 0 64 28.7 64 64V448c0 35.3-28.7 64-64 64H64c-35.3 0-64-28.7-64-64V256c0-35.3 28.7-64 64-64H80z"/></svg>
                    <input class="form-input" type="password" name="password" placeholder="Password" id="password" required>
                </div>

                <button class="btn blue" type="submit">Login</button>

                <p class="register-link">Don't have an account? <a href="register.php" class="form-link">Register</a></p>

            </form>

        </div>
    </body>
</html>
Open localhost/phplogin/index.php in a browser and it should resemble the following:
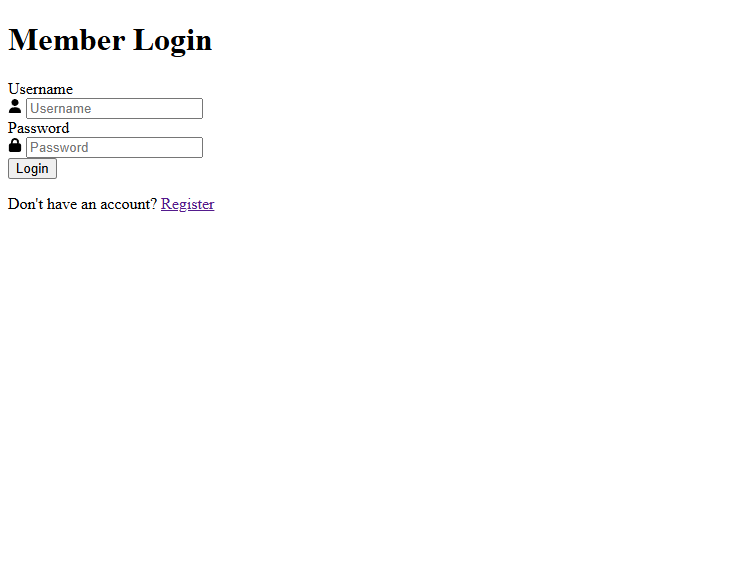
Functional, but not something you'd want on a real site. Add the following code to the style.css file:
* {
    box-sizing: border-box;
    font-family: system-ui, "Segoe UI", Roboto, Helvetica, Arial, sans-serif, "Apple Color Emoji", "Segoe UI Emoji", "Segoe UI Symbol";
    font-size: 16px;
}
body, html {
    background-color: #f3f5f7;
    margin: 0;
    padding: 0;
}
h1, h2, h3, h4, h5, h6 {
    margin: 0;
    padding: 0;
    color: #474b50;
}
.form {
    display: flex;
    flex-flow: column;
    width: 100%;
}
.form .form-label {
    display: block;
    padding: 20px 0 10px 0;
    font-weight: 500;
    font-size: 14px;
    color: #474b50;
}
.form .form-group {
    display: flex;
    position: relative;
    justify-content: space-between;
    align-items: center;
    width: 100%;
}
.form .form-group .form-icon-left, .form .form-group .form-icon-right {
    fill: #c1c6cb;
    width: 40px;
    position: absolute;
    transform: translateY(-50%);
    top: 50%;
    pointer-events: none;
}
.form .form-group .form-icon-left {
    left: 0;
}
.form .form-group .form-icon-left + .form-input {
    padding-left: 40px;
}
.form .form-group .form-icon-right {
    right: 0;
}
.form .form-group .form-icon-right + .form-input {
    padding-right: 40px;
}
.form .form-group:focus-within .form-icon-left {
    fill: #989fa8;
}
.form .form-input {
    width: 100%;
    height: 43px;
    border: 1px solid #dee1e6;
    padding: 0 15px;
    border-radius: 4px;
    color: #000;
}
.form .form-input::placeholder {
    color: #989fa8;
}
.form .form-link {
    color: #2a8eeb;
    font-weight: 500;
    text-decoration: none;
    font-size: 14px;
}
.form .form-link:hover {
    color: #136fc5;
}
.form p.register-link {
    margin: 0;
    padding: 20px 0 0 0;
    font-size: 14px;
    color: #6b7179;
}
.btn {
    display: inline-flex;
    align-items: center;
    justify-content: center;
    text-decoration: none;
    appearance: none;
    cursor: pointer;
    border: 0;
    background-color: #3e7bd6;
    color: #FFFFFF;
    padding: 0 14px;
    font-size: 14px;
    font-weight: 600;
    border-radius: 4px;
    height: 42px;
    box-shadow: 0px 0px 6px 1px rgba(45, 57, 68, 0.1);
}
.btn:hover {
    background-color: #3172d3;
}
.login, .register {
    display: flex;
    flex-flow: column;
    width: 400px;
    max-width: 95%;
    background-color: #ffffff;
    box-shadow: 0px 0px 7px 1px rgba(45, 57, 68, 0.05);
    border-radius: 5px;
    margin: 100px auto;
    padding: 35px;
}
.login h1, .register h1 {
    text-align: center;
    font-size: 24px;
    font-weight: 500;
    padding: 15px 0;
    margin: 0;
}
.pad-1 { padding: 5px; }
.mar-1 { margin: 5px; }
.pad-2 { padding: 10px; }
.mar-2 { margin: 10px; }
.pad-3 { padding: 15px; }
.mar-3 { margin: 15px; }
.pad-4 { padding: 20px; }
.mar-4 { margin: 20px; }
.pad-5 { padding: 25px; }
.mar-5 { margin: 25px; }
.pad-bot-1 { padding-bottom: 5px; }
.pad-top-1 { padding-top: 5px; }
.pad-left-1 { padding-left: 5px; }
.pad-right-1 { padding-right: 5px; }
.pad-x-1 { padding-left: 5px; padding-right: 5px; }
.pad-y-1 { padding-top: 5px; padding-bottom: 5px; }
.mar-bot-1 { margin-bottom: 5px; }
.mar-top-1 { margin-top: 5px; }
.mar-left-1 { margin-left: 5px; }
.mar-right-1 { margin-right: 5px; }
.mar-x-1 { margin-left: 5px; margin-right: 5px; }
.mar-y-1 { margin-top: 5px; margin-bottom: 5px; }
.pad-bot-2 { padding-bottom: 10px; }
.pad-top-2 { padding-top: 10px; }
.pad-left-2 { padding-left: 10px; }
.pad-right-2 { padding-right: 10px; }
.pad-x-2 { padding-left: 10px; padding-right: 10px; }
.pad-y-2 { padding-top: 10px; padding-bottom: 10px; }
.mar-bot-2 { margin-bottom: 10px; }
.mar-top-2 { margin-top: 10px; }
.mar-left-2 { margin-left: 10px; }
.mar-right-2 { margin-right: 10px; }
.mar-x-2 { margin-left: 10px; margin-right: 10px; }
.mar-y-2 { margin-top: 10px; margin-bottom: 10px; }
.pad-bot-3 { padding-bottom: 15px; }
.pad-top-3 { padding-top: 15px; }
.pad-left-3 { padding-left: 15px; }
.pad-right-3 { padding-right: 15px; }
.pad-x-3 { padding-left: 15px; padding-right: 15px; }
.pad-y-3 { padding-top: 15px; padding-bottom: 15px; }
.mar-bot-3 { margin-bottom: 15px; }
.mar-top-3 { margin-top: 15px; }
.mar-left-3 { margin-left: 15px; }
.mar-right-3 { margin-right: 15px; }
.mar-x-3 { margin-left: 15px; margin-right: 15px; }
.mar-y-3 { margin-top: 15px; margin-bottom: 15px; }
.pad-bot-4 { padding-bottom: 20px; }
.pad-top-4 { padding-top: 20px; }
.pad-left-4 { padding-left: 20px; }
.pad-right-4 { padding-right: 20px; }
.pad-x-4 { padding-left: 20px; padding-right: 20px; }
.pad-y-4 { padding-top: 20px; padding-bottom: 20px; }
.mar-bot-4 { margin-bottom: 20px; }
.mar-top-4 { margin-top: 20px; }
.mar-left-4 { margin-left: 20px; }
.mar-right-4 { margin-right: 20px; }
.mar-x-4 { margin-left: 20px; margin-right: 20px; }
.mar-y-4 { margin-top: 20px; margin-bottom: 20px; }
.pad-bot-5 { padding-bottom: 25px; }
.pad-top-5 { padding-top: 25px; }
.pad-left-5 { padding-left: 25px; }
.pad-right-5 { padding-right: 25px; }
.pad-x-5 { padding-left: 25px; padding-right: 25px; }
.pad-y-5 { padding-top: 25px; padding-bottom: 25px; }
.mar-bot-5 { margin-bottom: 25px; }
.mar-top-5 { margin-top: 25px; }
.mar-left-5 { margin-left: 25px; }
.mar-right-5 { margin-right: 25px; }
.mar-x-5 { margin-left: 25px; margin-right: 25px; }
.mar-y-5 { margin-top: 25px; margin-bottom: 25px; }
The spacing utilities at the bottom aren't all used yet, but they'll come in handy as you extend the system. Adjust the fonts and background color to match your site.
For the styles to take effect, include the stylesheet in the head section of index.php:
<link href="style.css" rel="stylesheet" type="text/css">Refresh the page and the form looks a lot more presentable:
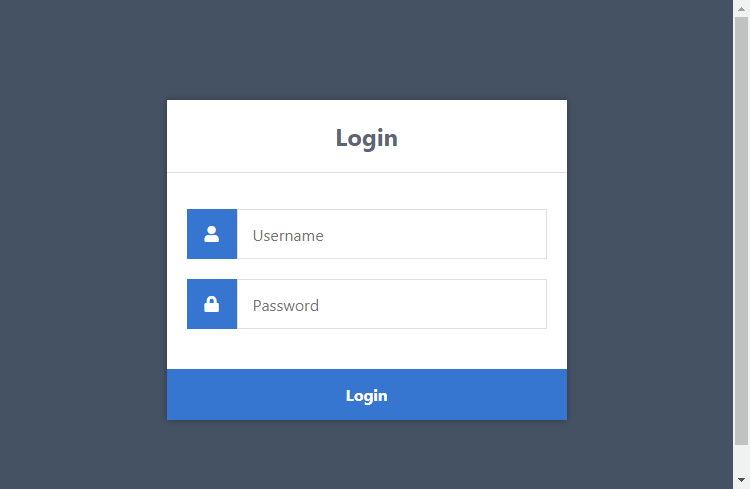
The form elements worth a closer look:
- Form: the form action points to authenticate.php, and the method is
post, so the credentials travel in the request body instead of the URL. - Input fields: each field's
nameattribute is how PHP finds the value on the server; the username field becomes$_POST['username']. - Login button: clicking it submits the form; a classic
<input type="submit">would do the same job. - Register link: points to register.php, which we build in the registration tutorial; it 404s until then.
4. Setting Up the MySQL Database
The login system needs somewhere to store accounts. Most people on XAMPP manage their database with phpMyAdmin, so that's what these steps use:
- In the XAMPP control panel, click Admin next to MySQL
- Click the Databases tab, enter phplogin as the name, select utf8mb4_unicode_ci as the collation, and click Create
All we need inside it is one accounts table to hold the usernames, hashed passwords, email addresses, and registration dates. Select the phplogin database on the left and execute the following SQL:
CREATE TABLE IF NOT EXISTS `accounts` (
	`id` int(11) NOT NULL AUTO_INCREMENT,
  	`username` varchar(50) NOT NULL,
  	`password` varchar(255) NOT NULL,
  	`email` varchar(100) NOT NULL,
	`registered` datetime NOT NULL,
    PRIMARY KEY (`id`)
) ENGINE=InnoDB AUTO_INCREMENT=2 DEFAULT CHARSET=utf8mb4 COLLATE=utf8mb4_unicode_ci;

INSERT INTO `accounts` (`id`, `username`, `password`, `email`, `registered`) VALUES (1, 'test', '$2y$10$SfhYIDtn.iOuCW7zfoFLuuZHX6lja4lF4XA4JqNmpiH/.P3zB8JCa', 'test@example.com', '2025-01-01 00:00:00');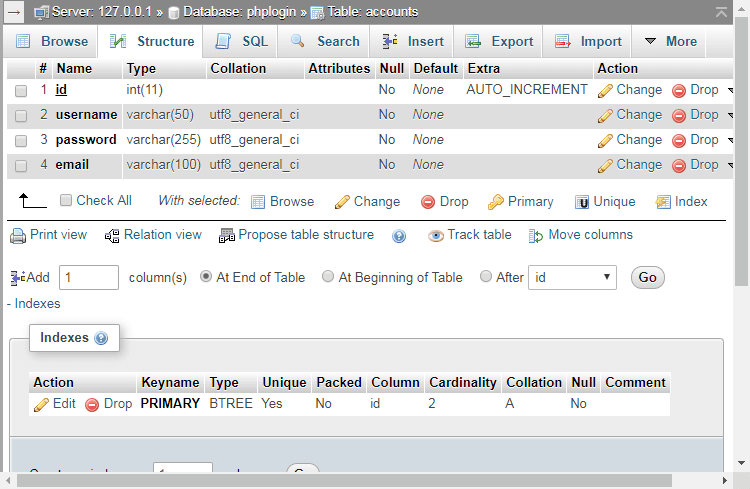
The password column is varchar(255) rather than the 60 characters a bcrypt hash takes today, because PHP's hashing algorithms can change over time and a hash that doesn't fit the column will never verify.
The INSERT also creates a test account, with test as both the username and password; the long $2y$10$ string is the bcrypt hash of the word test.
5. Authenticating Users with PHP and MySQL
Now for the code that decides whether a login attempt succeeds. Edit authenticate.php and add the complete file below; the walkthrough after it explains each part:
<?php
// Start the session
session_start();
// Change the below variables to reflect your MySQL database details
$DATABASE_HOST = 'localhost';
$DATABASE_USER = 'root';
$DATABASE_PASS = '';
$DATABASE_NAME = 'phplogin';
// Try and connect using the info above
$con = mysqli_connect($DATABASE_HOST, $DATABASE_USER, $DATABASE_PASS, $DATABASE_NAME);
// Check for connection errors
if (mysqli_connect_errno()) {
    // If there is an error with the connection, stop the script and display the error
    exit('Failed to connect to MySQL!');
}
// Now we check if the data from the login form was submitted, isset() will check if the data exists
if (!isset($_POST['username'], $_POST['password'])) {
    // Could not get the data that should have been sent
    exit('Please fill both the username and password fields!');
}
// Prepare our SQL, which will prevent SQL injection
if ($stmt = $con->prepare('SELECT id, password FROM accounts WHERE username = ?')) {
    // Bind parameters (s = string, i = int, b = blob, etc), in our case the username is a string so we use "s"
    $stmt->bind_param('s', $_POST['username']);
    $stmt->execute();
    // Store the result so we can check if the account exists in the database
    $stmt->store_result();
    // Check if account exists with the input username
    if ($stmt->num_rows > 0) {
        // Account exists, so bind the results to variables
        $stmt->bind_result($id, $password);
        $stmt->fetch();
        // Note: remember to use password_hash in your registration file to store the hashed passwords
        if (password_verify($_POST['password'], $password)) {
            // Password is correct! User has logged in!
            // Regenerate the session ID to prevent session fixation attacks
            session_regenerate_id();
            // Declare session variables (they basically act like cookies but the data is remembered on the server)
            $_SESSION['account_loggedin'] = TRUE;
            $_SESSION['account_name'] = $_POST['username'];
            $_SESSION['account_id'] = $id;
            // Redirect to the home page
            header('Location: home.php');
            exit;
        } else {
            // Incorrect password
            echo 'Incorrect username and/or password!';
        }
    } else {
        // Incorrect username
        echo 'Incorrect username and/or password!';
    }
    // Close the prepared statement
    $stmt->close();
}
?>
The session and connection. session_start() is how the site remembers who a user is between page loads. Update the four database variables if your credentials differ from XAMPP's defaults (root with an empty password).
The guard clause. If someone opens authenticate.php directly without submitting the form, both form fields are missing, so the isset() check stops the script before PHP starts throwing warnings.
The query. The ? placeholder and bind_param() make MySQL treat the username purely as data, never as SQL. Someone can type ' OR 1=1-- into your login form all day and it will simply be looked up as a nonexistent username.
The password check. If the account exists, password_verify compares the submitted password against the hash from the database. It only works with hashes created by password_hash, which is what our registration system will use.
The error message. It's identical whether the username or the password was wrong, so an attacker can't work out which usernames exist.
The success path. On a successful login we regenerate the session ID, store the user's ID and username in session variables, and redirect to the home page. Session data lives on the server, so users can't edit it.
Did you know?Regenerating the session ID at login prevents session fixation attacks. Any ID an attacker planted beforehand becomes worthless.
Stuck with a legacy database of plain text passwords? You could temporarily replace the following line:
if (password_verify($_POST['password'], $password)) {With:
if ($_POST['password'] === $password) {Treat that as a crutch, never a production setup. People reuse the same password for email and social media accounts, so if your database ever leaks, the damage won't stop at your site.
We can't test a successful login yet; home.php is still empty until the next step. You can already submit a made-up username though; the page should answer with Incorrect username and/or password! If you see anything else, jump to the troubleshooting section.
6. Creating the Home Page
The home page is where users land after logging in, and it's for logged-in users only: no session, no access.
Edit the home.php file and add the following code:
<?php
// We need to use sessions, so you should always initialize sessions using the below function
session_start();
// If the user is not logged in, redirect to the login page
if (!isset($_SESSION['account_loggedin'])) {
    header('Location: index.php');
    exit;
}
?>
<!DOCTYPE html>
<html>
    <head>
        <meta charset="utf-8">
        <meta name="viewport" content="width=device-width,minimum-scale=1">
        <title>Home</title>
        <link href="style.css" rel="stylesheet" type="text/css">
    </head>
    <body>

        <header class="header">

            <div class="wrapper">

                <h1>Website Title</h1>

                <nav class="menu">
                    <a href="home.php">Home</a>
                    <a href="profile.php">Profile</a>
                    <a href="logout.php">
                        <svg width="12" height="12" xmlns="http://www.w3.org/2000/svg" viewBox="0 0 512 512"><!--!Font Awesome Free 6.5.1 by @fontawesome - https://fontawesome.com License - https://fontawesome.com/license/free Copyright 2024 Fonticons, Inc.--><path d="M377.9 105.9L500.7 228.7c7.2 7.2 11.3 17.1 11.3 27.3s-4.1 20.1-11.3 27.3L377.9 406.1c-6.4 6.4-15 9.9-24 9.9c-18.7 0-33.9-15.2-33.9-33.9l0-62.1-128 0c-17.7 0-32-14.3-32-32l0-64c0-17.7 14.3-32 32-32l128 0 0-62.1c0-18.7 15.2-33.9 33.9-33.9c9 0 17.6 3.6 24 9.9zM160 96L96 96c-17.7 0-32 14.3-32 32l0 256c0 17.7 14.3 32 32 32l64 0c17.7 0 32 14.3 32 32s-14.3 32-32 32l-64 0c-53 0-96-43-96-96L0 128C0 75 43 32 96 32l64 0c17.7 0 32 14.3 32 32s-14.3 32-32 32z"/></svg>
                        Logout
                    </a>
                </nav>

            </div>

        </header>

        <div class="content">

            <div class="page-title">
                <div class="wrap">
                    <h2>Home</h2>
                    <p>Welcome back, <?=htmlspecialchars($_SESSION['account_name'], ENT_QUOTES)?>!</p>
                </div>
            </div>

            <div class="block">

                <p>This is the home page. You are logged in!</p>

            </div>

        </div>

    </body>
</html>
The four lines of PHP at the top are the entire access control. If $_SESSION['account_loggedin'] isn't set, the visitor never logged in, so off to index.php they go. Add the same check to every members-only page you create.
In the HTML, the welcome message echoes the username through htmlspecialchars(), so a username containing HTML can't inject anything into the page.
The home and profile pages share some styles we haven't written yet, so add the following to style.css:
.header {
    background-color: #333941;
    height: 60px;
    width: 100%;
}
.header .wrapper {
    display: flex;
    justify-content: space-between;
    align-items: center;
    position: relative;
    margin: 0 auto;
    width: 900px;
    height: 100%;
}
.header .wrapper h1, .header .wrapper a {
    display: inline-flex;
    align-items: center;
}
.header .wrapper h1 {
    font-size: 20px;
    padding: 0;
    margin: 0;
    color: #fff;
    font-weight: normal;
}
.header .wrapper .menu {
    display: flex;
    align-items: center;
}
.header .wrapper .menu a {
    display: flex;
    align-items: center;
    justify-content: center;
    height: 32px;
    padding: 0 12px;
    margin: 0 3px;
    text-decoration: none;
    color: #dddfe2;
    font-weight: 500;
    font-size: 16px;
    line-height: 16px;
}
.header .wrapper .menu a svg {
    fill: #dddfe2;
    margin: 2px 8px 0 0;
}
.header .wrapper .menu a:hover, .header .wrapper .menu a:active {
    color: #ebebec;
}
.header .wrapper .menu a:hover svg, .header .wrapper .menu a:active svg {
    fill: #ebebec;
}
.header .wrapper .menu a:last-child {
    margin-right: 0;
}
.content {
    width: 900px;
    margin: 0 auto;
}
.content .page-title {
    display: flex;
    align-items: center;
    padding: 25px 0 10px 0;
}
.content .page-title h2 {
    margin: 0;
    padding: 0 0 7px 0;
    font-size: 20px;
    font-weight: 600;
    color: #53585e;
}
.content .page-title p {
    margin: 0;
    padding: 0;
    font-size: 14px;
    color: #777e86;
}
.content .block {
    box-shadow: 0px 0px 7px 1px rgba(45, 57, 68, 0.05);
    margin: 25px 0;
    padding: 25px;
    border-radius: 5px;
    background-color: #fff;
}
.content .block p {
    padding: 7px;
    margin: 0;
}
.content .profile-detail {
    display: flex;
    flex-flow: column;
    font-size: 18px;
    padding: 5px 0;
}
.content .profile-detail strong {
    display: block;
    color: #92979e;
    font-size: 14px;
    font-weight: 500;
    margin-bottom: 2px;
}
Now for the moment of truth. Open index.php and log in with test as both the username and the password. You should land right here:
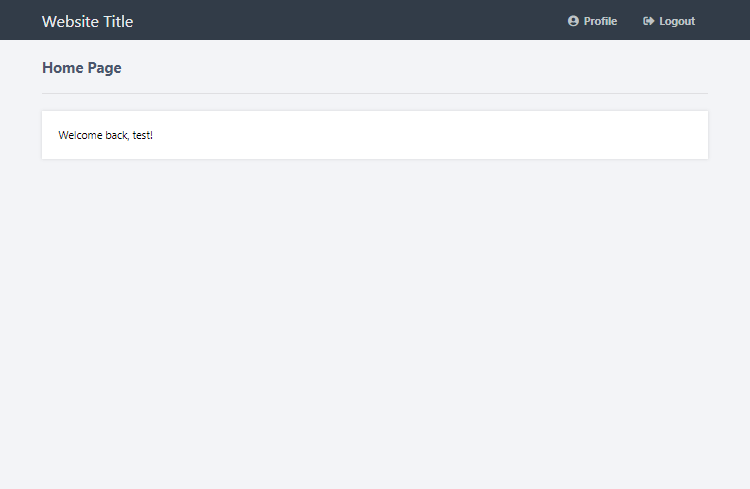
It's deliberately bare; this is the skeleton you'll hang your web application on. If logging in bounces you back to the form, the troubleshooting section covers the usual causes.
7. Creating the Profile Page
The profile page displays user information that isn't in the session, like the email address and registration date. It's the same pattern you'll use to read personal information from MySQL on any page.
Edit the profile.php file and add the following code:
<?php
// We need to use sessions, so you should always initialize sessions using the below function
session_start();
// If the user is not logged in, redirect to the login page
if (!isset($_SESSION['account_loggedin'])) {
    header('Location: index.php');
    exit;
}
// Change the below variables to reflect your MySQL database details
$DATABASE_HOST = 'localhost';
$DATABASE_USER = 'root';
$DATABASE_PASS = '';
$DATABASE_NAME = 'phplogin';
// Try and connect using the info above
$con = mysqli_connect($DATABASE_HOST, $DATABASE_USER, $DATABASE_PASS, $DATABASE_NAME);
// Ensure there are no connection errors
if (mysqli_connect_errno()) {
    exit('Failed to connect to MySQL!');
}
// We don't have the email or registered info stored in sessions so instead we can get the results from the database
$stmt = $con->prepare('SELECT email, registered FROM accounts WHERE id = ?');
// In this case, we can use the account ID to get the account info
$stmt->bind_param('i', $_SESSION['account_id']);
$stmt->execute();
$stmt->bind_result($email, $registered);
$stmt->fetch();
$stmt->close();
?>
<!DOCTYPE html>
<html>
    <head>
        <meta charset="utf-8">
        <meta name="viewport" content="width=device-width,minimum-scale=1">
        <title>Home</title>
        <link href="style.css" rel="stylesheet" type="text/css">
    </head>
    <body>

        <header class="header">

            <div class="wrapper">

                <h1>Website Title</h1>

                <nav class="menu">
                    <a href="home.php">Home</a>
                    <a href="profile.php">Profile</a>
                    <a href="logout.php">
                        <svg width="12" height="12" xmlns="http://www.w3.org/2000/svg" viewBox="0 0 512 512"><!--!Font Awesome Free 6.5.1 by @fontawesome - https://fontawesome.com License - https://fontawesome.com/license/free Copyright 2024 Fonticons, Inc.--><path d="M377.9 105.9L500.7 228.7c7.2 7.2 11.3 17.1 11.3 27.3s-4.1 20.1-11.3 27.3L377.9 406.1c-6.4 6.4-15 9.9-24 9.9c-18.7 0-33.9-15.2-33.9-33.9l0-62.1-128 0c-17.7 0-32-14.3-32-32l0-64c0-17.7 14.3-32 32-32l128 0 0-62.1c0-18.7 15.2-33.9 33.9-33.9c9 0 17.6 3.6 24 9.9zM160 96L96 96c-17.7 0-32 14.3-32 32l0 256c0 17.7 14.3 32 32 32l64 0c17.7 0 32 14.3 32 32s-14.3 32-32 32l-64 0c-53 0-96-43-96-96L0 128C0 75 43 32 96 32l64 0c17.7 0 32 14.3 32 32s-14.3 32-32 32z"/></svg>
                        Logout
                    </a>
                </nav>

            </div>

        </header>

        <div class="content">

            <div class="page-title">
                <div class="wrap">
                    <h2>Profile</h2>
                    <p>View your profile details below.</p>
                </div>
            </div>

            <div class="block">

                <div class="profile-detail">
                    <strong>Username</strong>
                    <?=htmlspecialchars($_SESSION['account_name'])?>
                </div>

                <div class="profile-detail">
                    <strong>Email</strong>
                    <?=htmlspecialchars($email)?>
                </div>

                <div class="profile-detail">
                    <strong>Registered</strong>
                    <?=htmlspecialchars($registered)?>
                </div>

            </div>

        </div>

    </body>
</html>
Same protection check as the home page, then one prepared statement. This time we bind the account ID as an integer ('i' instead of 's') and pull the email and registered columns for that account.
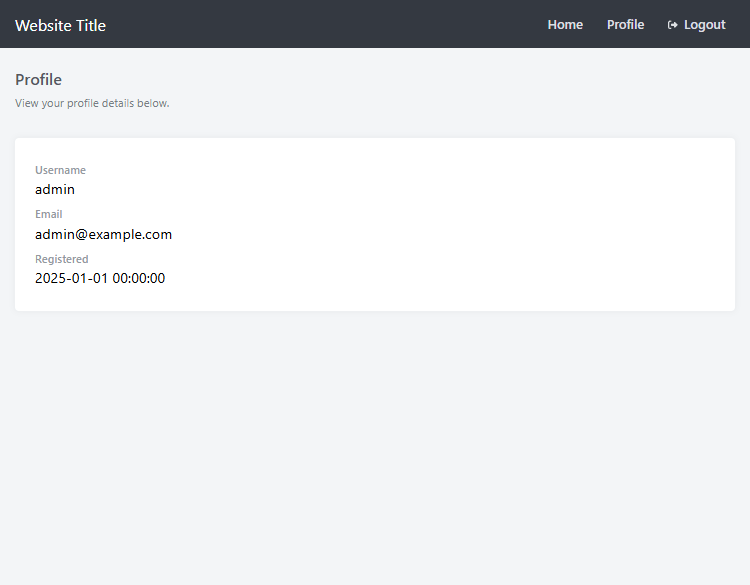
Want more fields later? Add the columns to the table and the SELECT query, and bind them to variables.
8. Creating the Logout Script
Logging out is the easiest part of the whole system: destroy the session and the user is a stranger again. Edit the logout.php file and add the following code:
<?php
// Start the session
session_start();
// Destroy the active session, which logs the user out
session_destroy();
// Redirect to the login pag
header('Location: index.php');
exit;
?>
Every protected page checks for $_SESSION['account_loggedin'], and session_destroy() wipes it. The logout link in the header of the home and profile pages already points here.
9. PHP Login Security Best Practices
A login form is the front door to your users' personal information; one weak spot and an attacker gains access to every account. Before taking a system like this live, work through this list:
- Escape user data with
htmlspecialchars()whenever you print it into a page. - Move the database credentials into a config file stored outside the webroot.
- Serve the site over HTTPS; without it, credentials and session cookies cross the network in the clear.
- Harden your session settings; the PHP manual's session security page covers the options worth changing.
- Disable error display in production and log errors to a file instead.
- Add CSRF tokens to your forms so other sites can't submit them on a user's behalf.
- Rate limit failed logins to slow brute force attacks to a crawl.
- Never run XAMPP as a production server.
10. Common Problems and How to Fix Them
The issues that come up again and again in the comments:
"Failed to connect to MySQL!"
Check that MySQL is running in the XAMPP control panel and that the four $DATABASE_* variables match your setup.
The correct username and password are rejected
Almost always a hashing problem. Make sure the full 60-character hash made it into the password column, because a truncated hash will never verify. Keep the column at varchar(255).
"Warning: Cannot modify header information - headers already sent"
Something was printed before the redirect, usually a space before the opening <?php tag or a file saved as UTF-8 with BOM. Remove the stray output and the redirect will work.
I log in successfully but home.php sends me back to the login form
The session isn't surviving between pages. Confirm that session_start() is the first thing called on every page that touches $_SESSION, and that your browser accepts cookies for localhost.
Blank white page or HTTP 500 error
A PHP error with display switched off. While developing, put error_reporting(E_ALL) and ini_set('display_errors', 1) at the top and PHP will point at the exact line.
11. Frequently Asked Questions
Should I use MySQLi or PDO for a login system?
Either one. They're equally secure as long as you use prepared statements, which both support. This tutorial uses MySQLi because it's enabled everywhere; the Advanced Package includes a PDO version.
How do I keep users logged in after they close the browser?
That's the remember me feature: a long-lived cookie holding a random token, with a hash of that token stored in the database. Never put the password itself in the cookie. The Advanced Package includes a ready-made implementation.
Is password_hash() secure, and do I need to add my own salt?
Yes, and no. It uses bcrypt by default, generates a unique random salt for every password, and stores the salt inside the hash itself. Rolling your own salting scheme, or using md5() for passwords, would make things worse.
How do PHP login sessions work, and how are they different from cookies?
PHP stores the data on the server and gives the browser a random session ID cookie that reconnects the visitor on every request. Unlike a normal cookie, the user can't edit session data, which is why login state belongs there.
Where can I download the full login source code?
Every file is on this page, free to copy. The Advanced Package includes the complete source code as a download, plus extras like account activation, remember me, and an admin panel.
How do I make a PHP login form secure?
Prepared statements for every query, password_hash() for storage, HTTPS, a regenerated session ID at login, and generic error messages. Rate limiting on failed attempts and CSRF tokens round it out.
Conclusion
That's a complete login system with PHP and MySQL: form, database, authentication, protected pages, and logout. You also know why each piece is there, from prepared statements to hashed passwords to session regeneration, and the whole script is yours to reuse in your own projects.
Right now there's just one test account, so the obvious next step is a registration form that lets visitors create an account themselves: Secure Registration System with PHP and MySQL. It reuses everything you built today.
If something isn't working, leave a comment below and we'll figure it out. Thank you for reading, and enjoy coding!
You have the complete tutorial code above, free to use. If you want the production-ready build of this project, or everything on the site at once, here is how they compare.
Advanced Secure Login & Registration System
The production build of this one project
Instant download after payment
- Admin Panel (View Dashboard, Manage Email Templates, Edit Settings)
- Add-ons: Brute Force Protection, CSRF Protection, Two-factor Authentication, Native Captcha, reCAPTCHA v3, Google OAuth, Facebook OAuth
- Export & Import Accounts (CSV, etc.)
- Account Approval Feature
- Email Notifications
- PHPMailer Integration
- Account Activation Feature
- Just this project, not the other 15
- Ads stay on the page
Show all 24 features
- Remember Me Feature
- Forgot & Reset Password
- Deactivate Accounts Feature
- MySQLi, PDO & MVC OOP Versions
- Secure Login & Registration System
- AJAX Integration
- Home, Profile & Edit Profile Pages
- Source Code
- Database SQL File
- Responsive Design (mobile-friendly)
- SCSS File
- Commented Code
- NO Code Restrictions
- Free Updates & Support (minor issues)
- User Guide
- Extra: Tutorial Source Code
- Extra: Basic Source Code
CodeShack Pro
Every package and premium tool, for less than one costs
Billed yearly at $96. Save $48 against monthly.
- All 16 packages, worth $360 bought one at a time
- Every premium tool on the site
- No ads on any page of the site
- Members-only tools and articles
- Everything we add while you are a member
- Cancel from your account in one click