 Download the full source codeComplete working project · Setup guide included · Free for commercial use
Free ZIP
Download the full source codeComplete working project · Setup guide included · Free for commercial use
Free ZIP
Implementing the Google OAuth can be pretty challenging, especially if you aren't familiar with APIs and server-side programming. In this article, we'll cover the entire process of implementing the Google OAuth login using the Google API client, PHP, HTML, CSS, and MySQL (which will be optional).
The Google OAuth login implementation can provide a gateway for new users to access your website, which could be restricted content, profile page, and more. Social logins in general have become increasingly popular on most websites because you can seamlessly log in without registration or filling out a form that could take up to 10 minutes to complete.
We'll utilize the Google API client to authorize our users and PHP cURL to process the API requests. Alternatively, we'll use the Google API library to handle the login.
Why should I implement Google OAuth login?
The Google OAuth login can open up doors to new users who prefer to use their own Google account to log in to other websites. In addition, users typically prefer using existing credentials rather than creating new ones. OAuth allows users to access multiple applications with a single set of credentials.
Social authentication has become fundamentally essential on modern websites because it includes enhanced security, rapid sign-in process, and above all else, you get to avoid the complexity of implementing your own authentication.
Contents
1. Getting Started
Let's start with ensuring all requirements are met, and we have a Google API console project to work with. Also, a client ID and secret key are required to implement Google OAuth.
1.1. Prerequisites
To execute PHP code, a web server is required with the following components:
- Apache or Nginx
- MySQL Server (only if you plan to follow the database integration step)
- PHP >= 5.5 (PHP >= 8.0 for optimal performance)
- PHP cURL Module (usually enabled by default)
If you're working on a development environment, you can install XAMPP as it will include all the above components and therefore is convenient for novices. Follow the below instructions on how to install XAMPP.
- Navigate to the XAMPP website.
- Under the downloads section, select the platform of your choice.
- Once downloaded and installed, open the XAMPP Control Panel.
- Next to Apache select Start.
- Next to MySQL select Start.
- Select the Admin button next to Apache to verify that it's working.
Warning XAMPP should only be used for development purposes only!
That's essential all we need for our project. We can now proceed to create a Google console project and generate the keys.
1.2. File Structure
Below is the file structure for our Google OAuth project.
\-- google-login
|-- login.php
|-- logout.php
|-- profile.php
|-- google-oauth.php
|-- style.css
1.3. Create a Google API Console Project
The Google API console project is imperative to our project because, without it, we cannot execute requests to the endpoint and authenticate the users.
To begin, follow the below instructions.
- Nagivate to the Google API Console.
- On the dashboard, select the project dropdown box in the top navigation bar.
- Select the New Project button.
- Enter the project details:
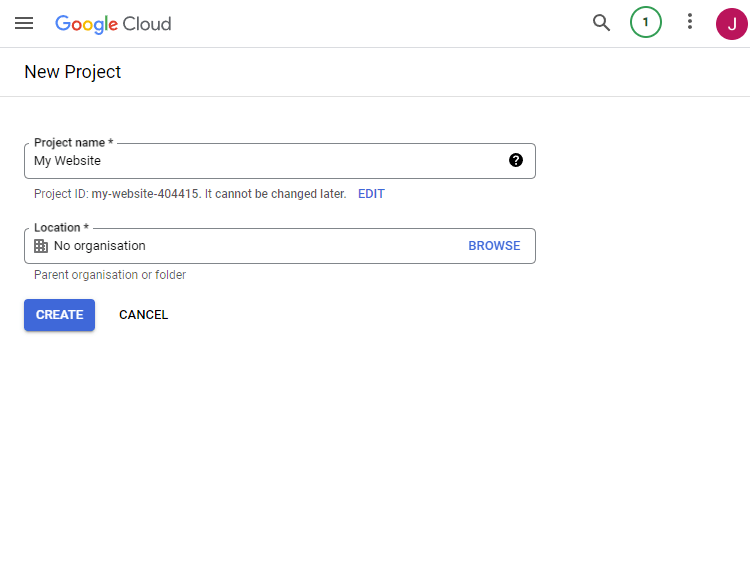
- Select Create.
- Once the project has been created, select OAuth consent screen in the left hand side navigation menu.
- Select the External option:
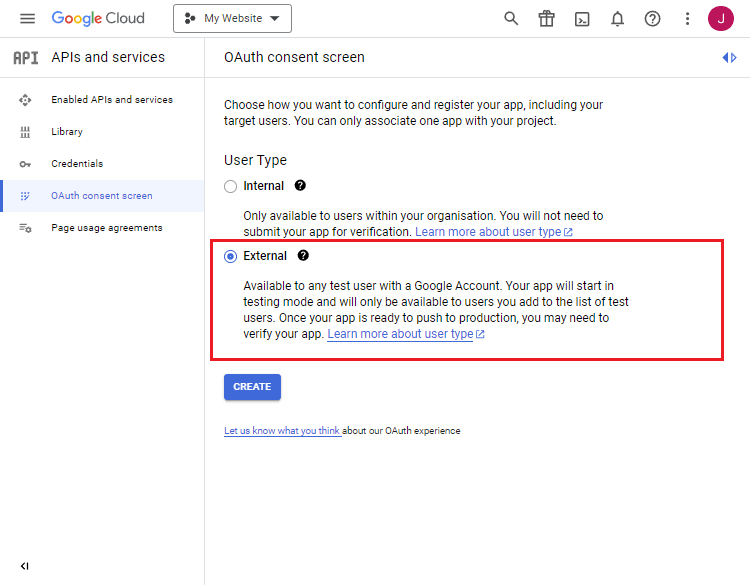
- In the next section, enter the app-related details and select Save and Continue.
- Add the Email and Profile scopes to the non-sensitive scopes list:
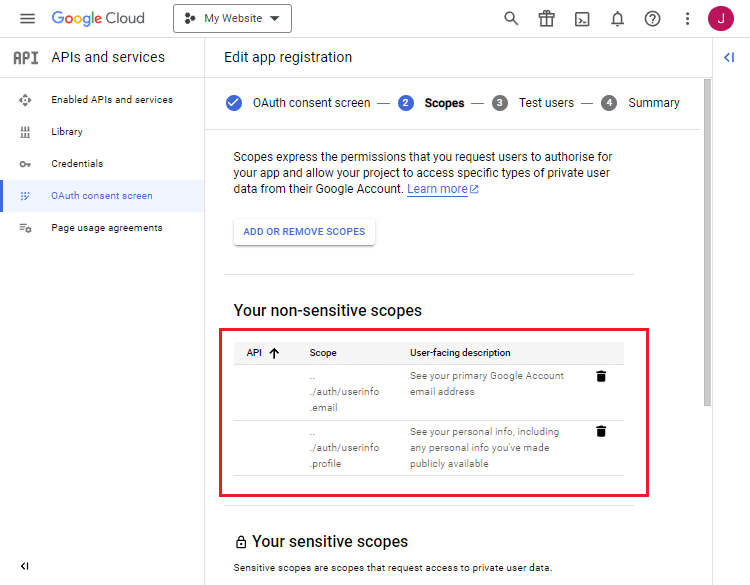
- Select Save and Continue.
- Add the test users to the project (e.g., which Google accounts can log in to your app):
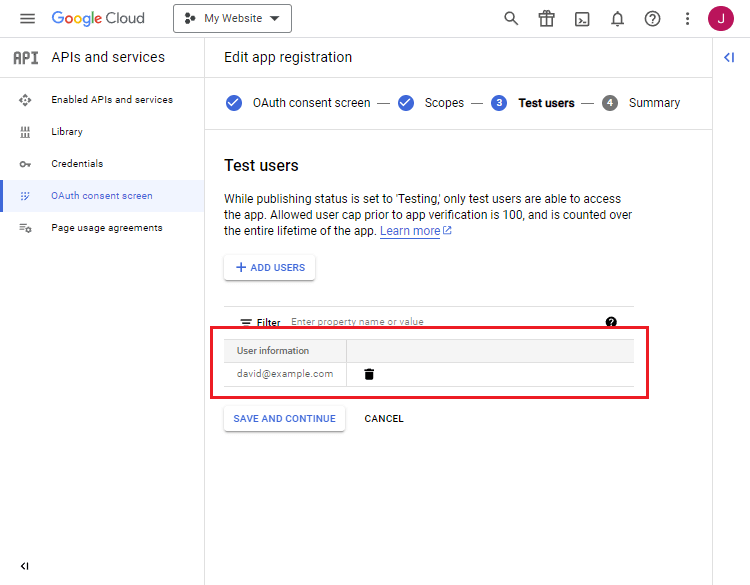
- Continue to the next section and submit the details.
Straightforward, right? That's our Google API project created. We can now proceed to generate the client ID and secret.
1.4. Retrieve the Client ID and Secret Key
The client ID and secret are required to execute requests to the API endpoints. To begin, follow the below instructions.
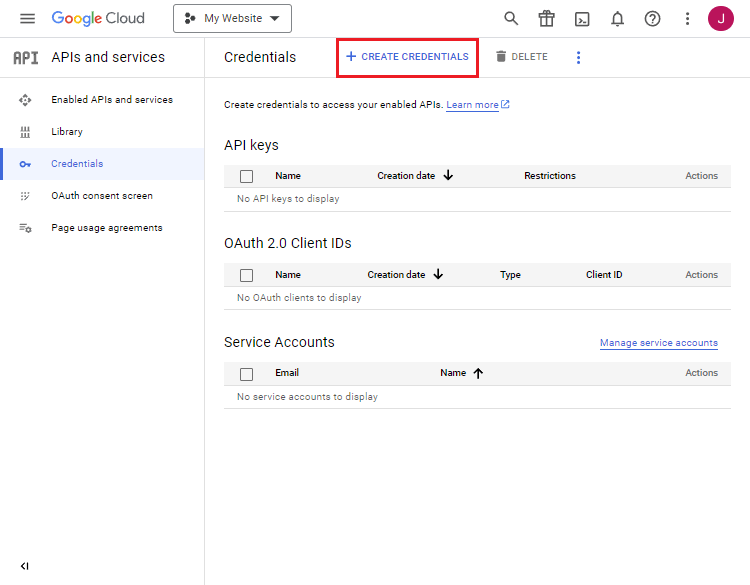
- While on the Google API project dashboard page, select Credentials in the left hand side navigation menu.
- Select Create Credentials in the top menu:
- Select Web application in the dropdown box:

- Add the URI to the Authorised Redirect URIs section:
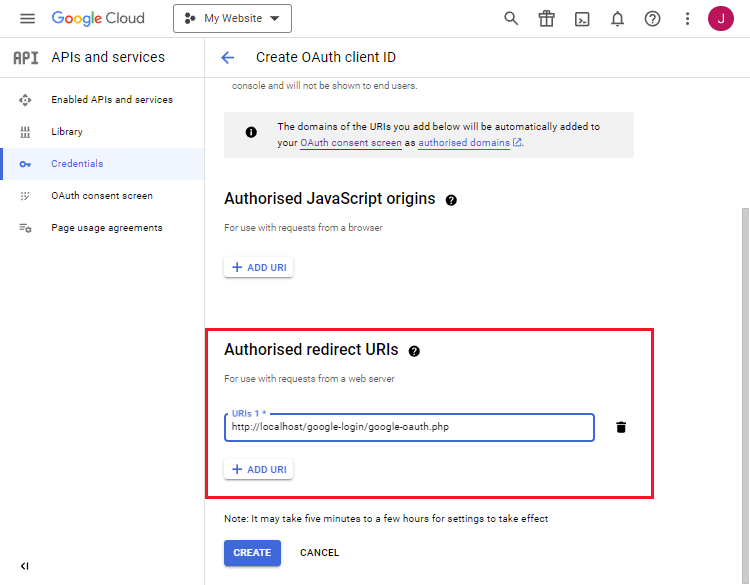
- Note: The URI must reflect the URI to the google-oauth.php file. If it's incorrect, the consent screen will fail.
- Once completed, we can go back to the Credentials page to obtain the Client ID:
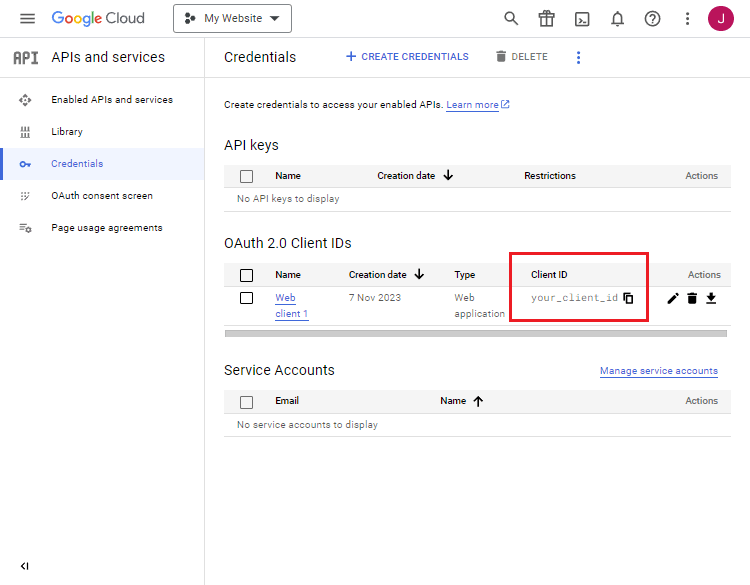
- Under the Name column, select the Application Name.
- On the subsequent page, the client secret will appear in the right-hand side panel.
I strongly advise you not to share the client ID and secret as these are confidential and could potentially risk your account.
2. Stylesheet (CSS3)
The stylesheet will style our HTML elements and make them look elegant.
Edit the style.css file and add the following code:
* {
  box-sizing: border-box;
  font-family: system-ui, "Segoe UI", Roboto, Helvetica, Arial, sans-serif, "Apple Color Emoji", "Segoe UI Emoji", "Segoe UI Symbol";
  font-size: 16px;
}
body {
  background-color: #ca6454;
  margin: 0;
}
.content {
  max-width: 400px;
  width: 100%;
  margin: 50px auto 15px auto;
  border-radius: 5px;
  background-color: #fff;
  box-shadow: 0 0 15px rgba(0, 0, 0, 0.15);
  padding: 25px;
}
.content h1 {
  text-align: center;
  font-size: 24px;
  font-weight: 500;
  margin: 0 0 15px 0;
  color: #3b4252;
}
.content h1 .icon {
  display: inline-flex;
  align-items: center;
  justify-content: center;
  width: 28px;
  height: 28px;
  border-radius: 50%;
  background-color: #9196a5;
  margin-left: 5px;
  font-size: 14px;
}
.content h1 .icon svg {
  fill: #fff;
}
.content .login-txt {
  margin: 0;
  padding: 15px 0 25px 0;
  color: #3b4252;
}
.content .google-login-btn {
  display: flex;
  align-items: center;
  text-decoration: none;
  font-size: 14px;
  font-weight: 500;
  color: #fff;
  width: 100%;
  overflow: hidden;
  border-radius: 5px;
  background-color: #d6523e;
  cursor: pointer;
}
.content .google-login-btn .icon {
  display: inline-flex;
  height: 100%;
  padding: 15px 20px;
  align-items: center;
  justify-content: center;
  background-color: #cf412c;
  margin-right: 15px;
}
.content .google-login-btn .icon svg {
  fill: #fff;
}
.content .google-login-btn:hover {
  background-color: #d44a36;
}
.content .google-login-btn:hover .icon {
  background-color: #c63f2a;
}
.content .profile-picture {
  display: flex;
  align-items: center;
  justify-content: center;
  margin: 15px 0 25px 0;
}
.content .profile-picture img {
  width: 100%;
  max-width: 100px;
  border-radius: 50%;
}
.content .profile-details {
  display: flex;
  flex-flow: column;
  padding: 10px 0;
}
.content .profile-details > div {
  display: flex;
  align-items: center;
  border-bottom: 1px solid #f1f2f5;
  margin-bottom: 15px;
  padding-bottom: 15px;
}
.content .profile-details > div .icon {
  display: inline-flex;
  align-items: center;
  justify-content: center;
  width: 36px;
  height: 36px;
  border-radius: 50%;
  background-color: #9196a5;
  margin-right: 15px;
  font-size: 14px;
}
.content .profile-details > div .icon svg {
  fill: #fff;
}
.content .profile-details > div strong {
  display: block;
  font-size: 14px;
  font-weight: 500;
}
.content .profile-details > div:last-child {
  border-bottom: none;
}
.content .logout-btn {
  display: flex;
  align-items: center;
  text-decoration: none;
  font-size: 14px;
  font-weight: 500;
  color: #fff;
  width: 100%;
  overflow: hidden;
  border-radius: 5px;
  background-color: #db5d36;
  cursor: pointer;
}
.content .logout-btn .icon {
  display: inline-flex;
  height: 100%;
  padding: 15px 20px;
  align-items: center;
  justify-content: center;
  background-color: #d24e26;
  margin-right: 15px;
}
.content .logout-btn .icon svg {
  fill: #fff;
}
.content .logout-btn:hover {
  background-color: #d9562d;
}
.content .logout-btn:hover .icon {
  background-color: #c94b24;
}
Feel free to customize it to your liking.
3. Creating the Login Page with HTML
The login page will be the gateway for users to access restricted pages. From here, the user can select the Login with Google button and proceed to log in with Google via the consent screen.
We actually don't need to implement PHP code in the login file because the google-oauth.php will be responsible for authenticating the user, but to be coherent with the other files, we'll use the .php extension.
Edit the login.php file and add the following code:
<!DOCTYPE html>
<html>
	<head>
		<meta charset="utf-8">
		<meta name="viewport" content="width=device-width,minimum-scale=1">
		<title>Login with Google</title>
		<link href="style.css" rel="stylesheet" type="text/css">
	</head>
	<body>

		<div class="content home">

			<h1>
                Login
                <span class="icon">
                    <svg xmlns="http://www.w3.org/2000/svg" height="0.875em" viewBox="0 0 512 512"><!--! Font Awesome Free 6.4.2 by @fontawesome - https://fontawesome.com License - https://fontawesome.com/license (Commercial License) Copyright 2023 Fonticons, Inc. --><path d="M217.9 105.9L340.7 228.7c7.2 7.2 11.3 17.1 11.3 27.3s-4.1 20.1-11.3 27.3L217.9 406.1c-6.4 6.4-15 9.9-24 9.9c-18.7 0-33.9-15.2-33.9-33.9l0-62.1L32 320c-17.7 0-32-14.3-32-32l0-64c0-17.7 14.3-32 32-32l128 0 0-62.1c0-18.7 15.2-33.9 33.9-33.9c9 0 17.6 3.6 24 9.9zM352 416l64 0c17.7 0 32-14.3 32-32l0-256c0-17.7-14.3-32-32-32l-64 0c-17.7 0-32-14.3-32-32s14.3-32 32-32l64 0c53 0 96 43 96 96l0 256c0 53-43 96-96 96l-64 0c-17.7 0-32-14.3-32-32s14.3-32 32-32z"/></svg>
                </span>
            </h1>

            <p class="login-txt">Please login using the button below. You'll be redirected to Google.</p>

            <a href="google-oauth.php" class="google-login-btn">
                <span class="icon">
                    <svg xmlns="http://www.w3.org/2000/svg" height="1em" viewBox="0 0 488 512"><!--! Font Awesome Free 6.4.2 by @fontawesome - https://fontawesome.com License - https://fontawesome.com/license (Commercial License) Copyright 2023 Fonticons, Inc. --><path d="M488 261.8C488 403.3 391.1 504 248 504 110.8 504 0 393.2 0 256S110.8 8 248 8c66.8 0 123 24.5 166.3 64.9l-67.5 64.9C258.5 52.6 94.3 116.6 94.3 256c0 86.5 69.1 156.6 153.7 156.6 98.2 0 135-70.4 140.8-106.9H248v-85.3h236.1c2.3 12.7 3.9 24.9 3.9 41.4z"/></svg>
                </span>
                Login with Google
            </a>

		</div>

	</body>
</html>
Which will resemble the following:

Basically, all we actually require for our login page is a button to redirect to our google-oauth.php file. The login page doesn't require an HTML form and therefore we don't need to declare any input elements.
The Google OAuth consent screen will handle the authentication. All we have to do is declare the session variables to keep the user logged in, which we will implement later on.
4. Implementing the Google OAuth API with PHP and cURL
In this section, we'll implement code to process API requests, validate the response, and declare session variables to preserve the login state.
The cURL interface will effectively enable us to execute API requests to a specific endpoint and retrieve the response in JSON format, which is a commonly used format for APIs. We can then extract data from the response and assign them to session variables.
4.1. Declare OAuth Variables
Edit the google-oauth.php file and add the following code:
<?php
// Initialize the session
session_start();
// Update the following variables
$google_oauth_client_id = 'YOUR_CLIENT_ID';
$google_oauth_client_secret = 'YOUR_CLIENT_SECRET';
$google_oauth_redirect_uri = 'http://localhost/google-login/google-oauth.php';
$google_oauth_version = 'v3';
?>
Update the OAuth variables to reflect the client ID and secret that we retrieved earlier.
The session_start function is required to initialize sessions. It's required on all pages that utilize sessions. We'll leverage them to check the login state and output relevant account details. They are basically server cookies that remember data until the session expires (usually around 30 minutes).
4.2. Process cURL Requests
We can now implement code to execute requests to the Google API endpoints. For this, we can leverage cURL.
Add the following code below the variables in the previous section:
// If the captured code param exists and is valid
if (isset($_GET['code']) && !empty($_GET['code'])) {
    // Execute cURL request to retrieve the access token
    $params = [
        'code' => $_GET['code'],
        'client_id' => $google_oauth_client_id,
        'client_secret' => $google_oauth_client_secret,
        'redirect_uri' => $google_oauth_redirect_uri,
        'grant_type' => 'authorization_code'
    ];
    $ch = curl_init();
    curl_setopt($ch, CURLOPT_URL, 'https://accounts.google.com/o/oauth2/token');
    curl_setopt($ch, CURLOPT_POST, true);
    curl_setopt($ch, CURLOPT_POSTFIELDS, http_build_query($params));
    curl_setopt($ch, CURLOPT_RETURNTRANSFER, true);
    $response = curl_exec($ch);
    curl_close($ch);
    $response = json_decode($response, true);
    // Code goes here...
} else {
    // Define params and redirect to Google Authentication page
    $params = [
        'response_type' => 'code',
        'client_id' => $google_oauth_client_id,
        'redirect_uri' => $google_oauth_redirect_uri,
        'scope' => 'https://www.googleapis.com/auth/userinfo.email https://www.googleapis.com/auth/userinfo.profile',
        'access_type' => 'offline',
        'prompt' => 'consent'
    ];
    header('Location: https://accounts.google.com/o/oauth2/auth?' . http_build_query($params));
    exit;
}
Initially, when we navigate to the google-oauth.php file, the code at the very bottom is executed, which basically specifies the scopes to retrieve and redirects the user to the Google OAuth consent screen.
If successful, the user is redirected back to the google-oauth.php file along with the GET request parameter that will appear in the URI. With that valid code parameter, we can execute a cURL request to retrieve the access token.
Did You know? Once we have obtained the OAuth access token, we can execute multiple requests to different API endpoints.
In addition, we have declared all the relevant parameters that are required to execute requests (client ID, scopes, redirect URI, etc.).
4.3. Validate Access Token and Obtain User Info
We validate the access token by utilizing the isset() function to make sure the data exists and subsequently use the empty() function to check if the response returned a value.
Add the following code directly below the $response variable:
// Make sure access token is valid
if (isset($response['access_token']) && !empty($response['access_token'])) {
    // Execute cURL request to retrieve the user info associated with the Google account
    $ch = curl_init();
    curl_setopt($ch, CURLOPT_URL, 'https://www.googleapis.com/oauth2/' . $google_oauth_version . '/userinfo');
    curl_setopt($ch, CURLOPT_RETURNTRANSFER, true);
    curl_setopt($ch, CURLOPT_HTTPHEADER, ['Authorization: Bearer ' . $response['access_token']]);
    $response = curl_exec($ch);
    curl_close($ch);
    $profile = json_decode($response, true);
    // Make sure the profile data exists
    if (isset($profile['email'])) {
        $google_name_parts = [];
        $google_name_parts[] = isset($profile['given_name']) ? preg_replace('/[^a-zA-Z0-9]/s', '', $profile['given_name']) : '';
        $google_name_parts[] = isset($profile['family_name']) ? preg_replace('/[^a-zA-Z0-9]/s', '', $profile['family_name']) : '';
        // Code goes here...
    } else {
        exit('Could not retrieve profile information! Please try again later!');
    }
} else {
    exit('Invalid access token! Please try again later!');
}
Once the access token is validated, we execute a request to the /userinfo API endpoint, which will retrieve all the relevant details that we require (email, name, picture, etc.).
And to ensure the data exists, we can utilize the isset() function again to check if the data exists. If it doesn't, the exit() function will stop the script and output the error to the screen.
The $google_name_parts array will determine the full name. We can implode the array and bind it to a session variable in the next step.
4.4. Authenticate User with Sessions
Finally, we can declare the session variables and redirect the user to the profile page.
Add the following code below the $google_name_parts array:
// Authenticate the user
session_regenerate_id();
$_SESSION['google_loggedin'] = TRUE;
$_SESSION['google_email'] = $profile['email'];
$_SESSION['google_name'] = implode(' ', $google_name_parts);
$_SESSION['google_picture'] = isset($profile['picture']) ? $profile['picture'] : '';
That'll essentially keep the user logged in to our project until the session expires. We can output those variables on the profile page and validate the logged-in state with the google_loggedin variable.
4.5. OAuth Source Code
If somehow you've lost track, you can use the code below.
<?php
// Initialize the session
session_start();
// Update the following variables
$google_oauth_client_id = 'YOUR_CLIENT_ID';
$google_oauth_client_secret = 'YOUR_CLIENT_SECRET';
$google_oauth_redirect_uri = 'http://localhost/google-login/google-oauth.php';
$google_oauth_version = 'v3';
// If the captured code param exists and is valid
if (isset($_GET['code']) && !empty($_GET['code'])) {
    // Execute cURL request to retrieve the access token
    $params = [
        'code' => $_GET['code'],
        'client_id' => $google_oauth_client_id,
        'client_secret' => $google_oauth_client_secret,
        'redirect_uri' => $google_oauth_redirect_uri,
        'grant_type' => 'authorization_code'
    ];
    $ch = curl_init();
    curl_setopt($ch, CURLOPT_URL, 'https://accounts.google.com/o/oauth2/token');
    curl_setopt($ch, CURLOPT_POST, true);
    curl_setopt($ch, CURLOPT_POSTFIELDS, http_build_query($params));
    curl_setopt($ch, CURLOPT_RETURNTRANSFER, true);
    $response = curl_exec($ch);
    curl_close($ch);
    $response = json_decode($response, true);
    // Make sure access token is valid
    if (isset($response['access_token']) && !empty($response['access_token'])) {
        // Execute cURL request to retrieve the user info associated with the Google account
        $ch = curl_init();
        curl_setopt($ch, CURLOPT_URL, 'https://www.googleapis.com/oauth2/' . $google_oauth_version . '/userinfo');
        curl_setopt($ch, CURLOPT_RETURNTRANSFER, true);
        curl_setopt($ch, CURLOPT_HTTPHEADER, ['Authorization: Bearer ' . $response['access_token']]);
        $response = curl_exec($ch);
        curl_close($ch);
        $profile = json_decode($response, true);
        // Make sure the profile data exists
        if (isset($profile['email'])) {
            $google_name_parts = [];
            $google_name_parts[] = isset($profile['given_name']) ? preg_replace('/[^a-zA-Z0-9]/s', '', $profile['given_name']) : '';
            $google_name_parts[] = isset($profile['family_name']) ? preg_replace('/[^a-zA-Z0-9]/s', '', $profile['family_name']) : '';
            // Authenticate the user
            session_regenerate_id();
            $_SESSION['google_loggedin'] = TRUE;
            $_SESSION['google_email'] = $profile['email'];
            $_SESSION['google_name'] = implode(' ', $google_name_parts);
            $_SESSION['google_picture'] = isset($profile['picture']) ? $profile['picture'] : '';
            // Redirect to profile page
            header('Location: profile.php');
            exit;
        } else {
            exit('Could not retrieve profile information! Please try again later!');
        }
    } else {
        exit('Invalid access token! Please try again later!');
    }
} else {
    // Define params and redirect to Google Authentication page
    $params = [
        'response_type' => 'code',
        'client_id' => $google_oauth_client_id,
        'redirect_uri' => $google_oauth_redirect_uri,
        'scope' => 'https://www.googleapis.com/auth/userinfo.email https://www.googleapis.com/auth/userinfo.profile',
        'access_type' => 'offline',
        'prompt' => 'consent'
    ];
    header('Location: https://accounts.google.com/o/oauth2/auth?' . http_build_query($params));
    exit;
}
?>
That's the entire source code for the google-oauth.php file.
5. Creating the Profile Page with PHP and HTML
The profile page is restricted to logged-in users. It will display all the relevant profile details associated with the Google account (email, name, profile picture, etc.).
To ensure the user is logged in, we can add the following code to the profile.php file:
<?php
// Initialize the session - is required to check the login state.
session_start();
// Check if the user is logged in, if not then redirect to login page
if (!isset($_SESSION['google_loggedin'])) {
    header('Location: login.php');
    exit;
}
// Retrieve session variables
$google_loggedin = $_SESSION['google_loggedin'];
$google_email = $_SESSION['google_email'];
$google_name = $_SESSION['google_name'];
$google_picture = $_SESSION['google_picture'];
?>
With that, we can prevent unauthorized users from accessing the page. In addition, we've declared variables that we can use in our template code.
Add after the PHP closing tag:
<!DOCTYPE html>
<html>
	<head>
		<meta charset="utf-8">
		<meta name="viewport" content="width=device-width,minimum-scale=1">
		<title>Profile</title>
		<link href="style.css" rel="stylesheet" type="text/css">
	</head>
	<body>

		<div class="content home">

			<div class="profile-picture">
                <img src="<?=$google_picture?>" alt="<?=$google_name?>" width="100" height="100">
            </div>

            <div class="profile-details">

                <div class="name">
                    <div class="icon">
                        <svg xmlns="http://www.w3.org/2000/svg" height="1em" viewBox="0 0 448 512"><!--! Font Awesome Free 6.4.2 by @fontawesome - https://fontawesome.com License - https://fontawesome.com/license (Commercial License) Copyright 2023 Fonticons, Inc. --><path d="M224 256A128 128 0 1 0 224 0a128 128 0 1 0 0 256zm-45.7 48C79.8 304 0 383.8 0 482.3C0 498.7 13.3 512 29.7 512H418.3c16.4 0 29.7-13.3 29.7-29.7C448 383.8 368.2 304 269.7 304H178.3z"/></svg>
                    </div>
                    <div class="wrap">
                        <strong>Name</strong>
                        <span><?=$google_name?></span>
                    </div>
                </div>

                <div class="email">
                    <div class="icon">
                        <svg xmlns="http://www.w3.org/2000/svg" height="1em" viewBox="0 0 512 512"><!--! Font Awesome Free 6.4.2 by @fontawesome - https://fontawesome.com License - https://fontawesome.com/license (Commercial License) Copyright 2023 Fonticons, Inc. --><path d="M48 64C21.5 64 0 85.5 0 112c0 15.1 7.1 29.3 19.2 38.4L236.8 313.6c11.4 8.5 27 8.5 38.4 0L492.8 150.4c12.1-9.1 19.2-23.3 19.2-38.4c0-26.5-21.5-48-48-48H48zM0 176V384c0 35.3 28.7 64 64 64H448c35.3 0 64-28.7 64-64V176L294.4 339.2c-22.8 17.1-54 17.1-76.8 0L0 176z"/></svg>
                    </div>
                    <div class="wrap">
                        <strong>Email</strong>
                        <span><?=$google_email?></span>
                    </div>
                </div>

            </div>

            <a href="logout.php" class="logout-btn">
                <span class="icon">
                    <svg xmlns="http://www.w3.org/2000/svg" height="1em" viewBox="0 0 512 512"><!--! Font Awesome Free 6.4.2 by @fontawesome - https://fontawesome.com License - https://fontawesome.com/license (Commercial License) Copyright 2023 Fonticons, Inc. --><path d="M377.9 105.9L500.7 228.7c7.2 7.2 11.3 17.1 11.3 27.3s-4.1 20.1-11.3 27.3L377.9 406.1c-6.4 6.4-15 9.9-24 9.9c-18.7 0-33.9-15.2-33.9-33.9l0-62.1-128 0c-17.7 0-32-14.3-32-32l0-64c0-17.7 14.3-32 32-32l128 0 0-62.1c0-18.7 15.2-33.9 33.9-33.9c9 0 17.6 3.6 24 9.9zM160 96L96 96c-17.7 0-32 14.3-32 32l0 256c0 17.7 14.3 32 32 32l64 0c17.7 0 32 14.3 32 32s-14.3 32-32 32l-64 0c-53 0-96-43-96-96L0 128C0 75 43 32 96 32l64 0c17.7 0 32 14.3 32 32s-14.3 32-32 32z"/></svg>
                </span>
                Logout
            </a>

		</div>

	</body>
</html>
Which will resemble the following:
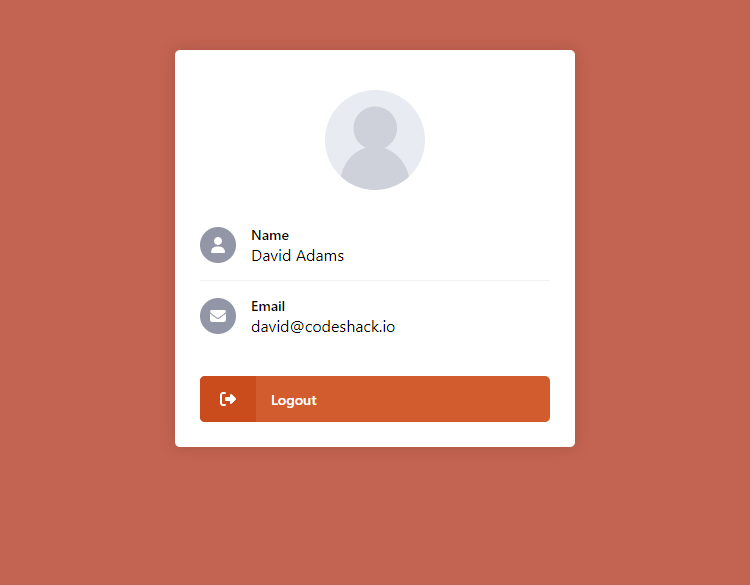
That's basically all we need for the profile page. Feel free to expand the list with additional details.
6. Creating the Logout Script
The entire logout script will only consist of a few lines of code because it's relatively easy to destroy the active session and redirect the user to the login page.
Edit the logout.php file and add:
<?php
// Initialize the session
session_start();
// Destroy the session
session_destroy();
// Redirect to the login page
header('Location: login.php');
exit;
?>
The session_destroy() function will destroy the active session. Once the user selects the logout button on the profile page, they'll be logged out and redirected to the login page.
7. MySQL Database Integration (optional)
Integrating a MySQL database will enable us to store and retrieve the user details using SQL statements. We can utilize the PDO interface to execute our SQL queries with PHP. In our case, we'll be leveraging the INSERT and SELECT SQL statements.
Once we have established a successful connection to the MySQL server, we can execute queries to insert the account details into the database.
Let's start by creating the database along with the accounts table. Follow the below instructions.
- Navigate to phpMyAdmin (localhost/phpMyAdmin).
- Select the SQL tab in the top navigation menu.
- Enter the SQL statement below and select Go.
CREATE DATABASE IF NOT EXISTS `sociallogin` DEFAULT CHARACTER SET utf8 COLLATE utf8_general_ci;
USE `sociallogin`;

CREATE TABLE IF NOT EXISTS `accounts` (
  `id` int(11) NOT NULL AUTO_INCREMENT,
  `name` varchar(50) NOT NULL,
  `email` varchar(100) NOT NULL,
  `picture` varchar(255) NOT NULL,
  `registered` datetime NOT NULL,
  `method` enum('facebook','google','linkedin') NOT NULL,
  PRIMARY KEY (`id`)
) ENGINE=InnoDB DEFAULT CHARSET=utf8 COLLATE=utf8_general_ci;
The accounts table will consist of the following columns:
- id — Each user will have a unique ID. We can use this value to SELECT the user from the database.
- name — The name retrieved from the Google OAuth API endpoint.
- email — The email retrieved from the Google OAuth API endpoint.
- picture — The profile picture retrieved from the Google OAuth API endpoint.
- registered — The date the user registered or the date the record was created.
- method — The social authentication method used (Google, Facebook, LinkedIn, etc.).
Let's go back to our google-oauth.php file and modify it to include the database connection code.
Add the following code after the opening tag (<?php):
// Database connection variables
$db_host = 'localhost';
$db_name = 'sociallogin';
$db_user = 'root';
$db_pass = '';
// Attempt to connect to database
try {
    // Connect to the MySQL database using PDO...
    $pdo = new PDO('mysql:host=' . $db_host . ';dbname=' . $db_name . ';charset=utf8', $db_user, $db_pass);
    $pdo->setAttribute(PDO::ATTR_ERRMODE, PDO::ERRMODE_EXCEPTION);
} catch (PDOException $exception) {
    // Could not connect to the MySQL database, if this error occurs make sure you check your db settings are correct!
    exit('Failed to connect to database!');
}
That will attempt to connect to the MySQL database using the provided credentials. Make sure to update them to reflect your own. If you're using XAMPP, you shouldn't have to change them.
Find the following code:
if (isset($profile['email'])) {
    $google_name_parts = [];
    $google_name_parts[] = isset($profile['given_name']) ? preg_replace('/[^a-zA-Z0-9]/s', '', $profile['given_name']) : '';
    $google_name_parts[] = isset($profile['family_name']) ? preg_replace('/[^a-zA-Z0-9]/s', '', $profile['family_name']) : '';
    // Authenticate the user
    session_regenerate_id();
    $_SESSION['google_loggedin'] = TRUE;
    $_SESSION['google_email'] = $profile['email'];
    $_SESSION['google_name'] = implode(' ', $google_name_parts);
    $_SESSION['google_picture'] = isset($profile['picture']) ? $profile['picture'] : '';
    // Redirect to profile page
    header('Location: profile.php');
    exit;
} else {
    exit('Could not retrieve profile information! Please try again later!');
}
Replace it with:
if (isset($profile['email'])) {
    $google_name_parts = [];
    $google_name_parts[] = isset($profile['given_name']) ? preg_replace('/[^a-zA-Z0-9]/s', '', $profile['given_name']) : '';
    $google_name_parts[] = isset($profile['family_name']) ? preg_replace('/[^a-zA-Z0-9]/s', '', $profile['family_name']) : '';
    // Check if the account exists in the database
    $stmt = $pdo->prepare('SELECT * FROM accounts WHERE email = ?');
    $stmt->execute([ $profile['email'] ]);
    $account = $stmt->fetch(PDO::FETCH_ASSOC);
    // If the account does not exist in the database, insert the account into the database
    if (!$account) {
        $stmt = $pdo->prepare('INSERT INTO accounts (email, name, picture, registered, method) VALUES (?, ?, ?, ?, ?)');
        $stmt->execute([ $profile['email'], implode(' ', $google_name_parts), isset($profile['picture']) ? $profile['picture'] : '', date('Y-m-d H:i:s'), 'google' ]);
        $id = $pdo->lastInsertId();
    } else {
        $id = $account['id'];
    }
    // Authenticate the account
    session_regenerate_id();
    $_SESSION['google_loggedin'] = TRUE;
    $_SESSION['google_id'] = $id;
    // Redirect to profile page
    header('Location: profile.php');
    exit;
} else {
    exit('Could not retrieve profile information! Please try again later!');
}
The above code will execute a query to retrieve the account details based on the email address. If there are no results, we can utilize the INSERT INTO SQL statement to create the account.
Did You Know? Properly preparing SQL statements will prevent SQL injection and therefore prevent the database from being exposed.
We have removed a few session variables because we'll implement a query to retrieve them directly from the database.
Now, let's go back to our profile.php file and replace the following:
// Retrieve session variables
$google_loggedin = $_SESSION['google_loggedin'];
$google_email = $_SESSION['google_email'];
$google_name = $_SESSION['google_name'];
$google_picture = $_SESSION['google_picture'];
With:
// Database connection variables
$db_host = 'localhost';
$db_name = 'sociallogin';
$db_user = 'root';
$db_pass = '';
// Attempt to connect to database
try {
    // Connect to the MySQL database using PDO...
    $pdo = new PDO('mysql:host=' . $db_host . ';dbname=' . $db_name . ';charset=utf8', $db_user, $db_pass);
    $pdo->setAttribute(PDO::ATTR_ERRMODE, PDO::ERRMODE_EXCEPTION);
} catch (PDOException $exception) {
    // Could not connect to the MySQL database, if this error occurs make sure you check your db settings are correct!
    exit('Failed to connect to database!');
}
// Get the account from the database
$stmt = $pdo->prepare('SELECT * FROM accounts WHERE id = ?');
$stmt->execute([ $_SESSION['google_id'] ]);
$account = $stmt->fetch(PDO::FETCH_ASSOC);
// Retrieve session variables
$google_loggedin = $_SESSION['google_loggedin'];
$google_email = $account['email'];
$google_name = $account['name'];
$google_picture = $account['picture'];
Once again, we've included the database connection code to connect to our database as it's required to execute the subsequent queries.
The SELECT query will retrieve the account details from database. We can use the google_id session variable we declared previously to fetch the account.
Finally, the variables we declared before are updated to reflect the details from the database. If later we want to create an Edit Profile page, we can easily do so by modifying the account details in the database.
8. Using the Google API Client Library (alternative)
If you prefer to use the Google API client library as opposed to the cURL method, read on.
Follow the below instructions:
- Head over to the GitHub repostitory.
- Download the latest stable version from Releases section (or use composer).
- Select the version of PHP that you're running and download.
- Once downloaded, extract the contents to a new directory named google-api-client. It should be in the root directory of your project folder.
Now, let's go ahead and replace the entire google-oauth.php contents with:
<?php
// Initialize the session
session_start();
// Include the Facebook SDK
require 'google-api-client/vendor/autoload.php';
// Update the following variables
$google_oauth_client_id = 'YOUR_CLIENT_ID';
$google_oauth_client_secret = 'YOUR_CLIENT_SECRET';
$google_oauth_redirect_uri = 'http://localhost/google-login/google-oauth.php';
$google_oauth_version = 'v3';
// Create the Google Client object
$client = new Google_Client();
$client->setClientId($google_oauth_client_id);
$client->setClientSecret($google_oauth_client_secret);
$client->setRedirectUri($google_oauth_redirect_uri);
$client->addScope("https://www.googleapis.com/auth/userinfo.email");
$client->addScope("https://www.googleapis.com/auth/userinfo.profile");
// If the captured code param exists and is valid
if (isset($_GET['code']) && !empty($_GET['code'])) {
    // Exchange the one-time authorization code for an access token
    $accessToken = $client->fetchAccessTokenWithAuthCode($_GET['code']);
    $client->setAccessToken($accessToken);
    // Make sure access token is valid
    if (isset($accessToken['access_token']) && !empty($accessToken['access_token'])) {
        // Now that we have an access token, we can fetch the user's profile data
        $google_oauth = new Google_Service_Oauth2($client);
        $google_account_info = $google_oauth->userinfo->get();
        // Make sure the profile data exists
        if (isset($google_account_info->email)) {
            // Authenticate the user
            session_regenerate_id();
            $_SESSION['google_loggedin'] = TRUE;
            $_SESSION['google_email'] = $google_account_info->email;
            $_SESSION['google_name'] = $google_account_info->name;
            $_SESSION['google_picture'] = $google_account_info->picture;
            // Redirect to profile page
            header('Location: profile.php');
            exit;
        } else {
            exit('Could not retrieve profile information! Please try again later!');
        }
    } else {
        exit('Invalid access token! Please try again later!');
    }
} else {
    // Redirect to Google Authentication page
    $authUrl = $client->createAuthUrl();
    header('Location: ' . filter_var($authUrl, FILTER_SANITIZE_URL));
    exit;
}
?>
And voila! We are now using the Google API library to execute requests and process the login. However, keep in mind that API libraries tend to be cumbersome, so it may or may not impact performance (especially if you're dealing with a large user base).
If you would like to integrate the MySQL database, you'll need to follow the previous step (again)!
Conclusion
Hopefully, you've grasped the idea of using cURL and executing requests to API endpoints. The whole purpose of the article is to teach you different methods to communicate with API endpoints, particularly the Google OAuth API.
The reason I advocate the cURL method is because it's lightweight and doesn't depend on other third-party libraries or tools (composer, etc.). However, there are disadvantages to using the cURL method. If Google decides to change the API structure, you'll have to update the cURL code to reflect their changes.
If you would like to incorporate your own authentication along with the social methods, you can follow the secure login system tutorial.
Thanks for reading and enjoy coding!
Skip the copy-pasting and get the complete, working project from this tutorial as a free ZIP with a setup guide included. Free for personal and commercial use.
If you would like to support us, consider the advanced secure login & registration system below. It will greatly help us create more tutorials and keep our website up and running. The advanced package includes improved code and more features.
— CSRF Protection
— Brute Force Protection
— reCAPTCHA v3 Protection
— Two-Factor Authentication
— OAuth Login (Google, Facebook, and more)
— View Dashboard
— Create, edit, and delete accounts
— Search, sort, and filter accounts
— Manage Email Templates
— Edit Settings
— Export & Import Accounts (CSV, JSON, etc.)
* Advanced package also includes the tutorial source and basic package.
* Instant download after payment.
To learn more about the advanced package, please visit the Advanced Secure Login & Registration System page.