 Download the full source codeComplete working project · Setup guide included · Free for commercial use
Free ZIP
Download the full source codeComplete working project · Setup guide included · Free for commercial use
Free ZIP
In this tutorial, we'll develop a secure poll and voting system using PHP and MySQL. This system will allow you to interact with your audience and display a collection of polls. You'll learn to create polls, implement a voting system, delete polls, and display the list of published polls.
A poll and voting system lets people share their opinions on a question by choosing from several answer options. Users select their choice, and the system counts all the votes to show the overall results. This is often used in surveys, market research, and online platforms to gather feedback and understand what people think about various topics.
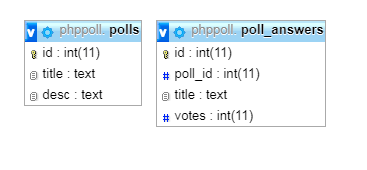
During poll creation, you can specify multiple answers, as they will be stored in a separate database table. One table will store poll-related data (title, description, etc.), while the other will store the answers, linking both to display the poll list.
The Advanced package includes additional features and a download link to the source code.
Contents
1. Getting Started
Before we jump into programming our poll and voting system, there are a few requirements that need to be met. We need to install the development tools and set up the file structure for our app.
1.1. What You Will Learn in this Tutorial
- Form Design — Design a Poll and Voting app with HTML5 and CSS3.
- Poll System — Create a working poll system with PHP & MySQL (create polls, delete polls, and view polls).
- Voting System — Each poll will consist of answers that the user can select to cast a vote and subsequently view the result.
- MySQL Database Interaction — Interact with a MySQL database using the PHP PDO interface. All data entered during the creation phase will be stored in the MySQL database.
- Basic Template System — We'll create a basic template system for our app, which will consist of header and footer functions. Those functions can then be implemented on all the pages we create. It's so we don't have to write the same code over and over.
1.2. Requirements
- Download and install XAMPP — XAMPP is a web server that includes the essential software for web developers (PHP, MySQL, Apache, etc). Skip this step if you already have a development server installed.
1.3. File Structure & Setup
Navigate to your XAMPP htdocs directory (usually located at C:\xampp\htdocs) and create the following files and directories:
File Structure
\-- phppoll
|-- functions.php
|-- index.php
|-- create.php
|-- vote.php
|-- result.php
|-- delete.php
|-- style.css
Each file will contain the following:
- functions.php — The functions file will contain the template and database connection functions.
- index.php — The index page will contain the list of published polls and the navigation buttons.
- create.php — The create page will contain form input fields, which we can use to create new polls.
- vote.php — The vote page will consist of poll answers with the option to cast a vote.
- result.php — The result page will show the results for the specified poll, while each answer will show the number of votes and the percentage bar.
- style.css — The stylesheet (CSS3) for our poll and voting system.
2. Creating the Database and setting-up Tables
If you have installed XAMPP, you can create the MySQL database with phpMyAdmin. Although, you need to make sure you start your web server: open the XAMPP control panel and click the Start button for both Apache and MySQL.
- Navigate to http://localhost/phpmyadmin/ in your browser.
- Click the SQL tab at the top and execute the following SQL statement:
CREATE DATABASE IF NOT EXISTS `phppoll` DEFAULT CHARACTER SET utf8 COLLATE utf8_general_ci;
USE `phppoll`;
CREATE TABLE IF NOT EXISTS `polls` (
`id` int(11) NOT NULL AUTO_INCREMENT,
`title` text NOT NULL,
`description` text NOT NULL,
PRIMARY KEY (`id`)
) ENGINE=InnoDB AUTO_INCREMENT=2 DEFAULT CHARSET=utf8;
INSERT INTO `polls` (`id`, `title`, `description`) VALUES (1, 'What''s your favorite programming language?', '');
CREATE TABLE IF NOT EXISTS `poll_answers` (
`id` int(11) NOT NULL AUTO_INCREMENT,
`poll_id` int(11) NOT NULL,
`title` text NOT NULL,
`votes` int(11) NOT NULL DEFAULT '0',
PRIMARY KEY (`id`)
) ENGINE=InnoDB AUTO_INCREMENT=5 DEFAULT CHARSET=utf8;
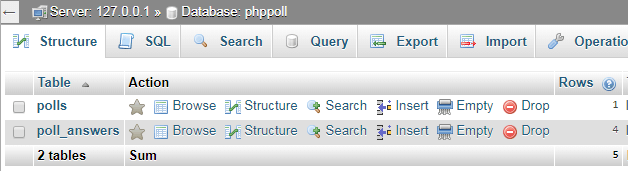
INSERT INTO `poll_answers` (`id`, `poll_id`, `title`, `votes`) VALUES (1, 1, 'PHP', 0), (2, 1, 'Python', 0), (3, 1, 'C#', 0), (4, 1, 'Java', 0);In phpMyAdmin, our database should resemble the following:
A summary of each table and the columns associated with them:
- polls table — This table will contain information related to the polls we create (title and description).
- id — The unique ID for the poll, which will be auto-incremented, meaning the number will increase as more rows are created.
- title — The title of the poll, which could be a question, etc.
- description — The description of the poll, which is optional during the creation phase.
- poll_answers table — This table will contain all the answers for our created polls.
- id — Unique ID, which will be auto incremented.
- poll_id — The poll ID, which will be associated with the id column in the polls table. It's how we can relate both tables.
- title — The title of the poll answer.
- votes — The number of votes the answer has.
To make sure the database has been successfully imported, you can check on phpMyAdmin — click the database name in the left side navigation panel and you should see the following:
3. Creating the Stylesheet (CSS3)
The stylesheet will format the structure of our poll and voting system and make it look more appealing. Add the following CSS code to the style.css file:
* {
    box-sizing: border-box;
    font-family: system-ui, "Segoe UI", Roboto, Helvetica, Arial, sans-serif, "Apple Color Emoji", "Segoe UI Emoji", "Segoe UI Symbol";
    font-size: 16px;
}
body {
    background-color: #FFFFFF;
    margin: 0;
}
.navtop {
    background-color: #313d4e;
    height: 60px;
    width: 100%;
    border: 0;
}
.navtop div {
    display: flex;
    margin: 0 auto;
    width: 900px;
    height: 100%;
}
.navtop div h1, .navtop div a {
    display: inline-flex;
    align-items: center;
}
.navtop div h1 {
    flex: 1;
    font-size: 20px;
    padding: 0;
    margin: 0;
    color: #eaeced;
    font-weight: normal;
}
.navtop div a {
    padding: 0 20px;
    text-decoration: none;
    color: #c1c5ca;
    font-weight: 500;
}
.navtop div a svg {
    fill: #c1c5ca;
    margin: 2px 5px 0 0;
}
.navtop div a:hover {
    color: #eaeced;
}
.content {
    width: 900px;
    margin: 0 auto;
}
.content h2 {
    margin: 0;
    padding: 25px 0 10px 0;
    font-size: 22px;
    font-weight: 600;
    color: #474b50;
}
.home .create-poll {
    display: inline-flex;
    align-items: center;
    justify-content: center;
    text-decoration: none;
    appearance: none;
    cursor: pointer;
    border: 0;
    background: #2873cf;
    color: #FFFFFF;
    padding: 0 14px;
    font-size: 14px;
    font-weight: 600;
    border-radius: 4px;
    height: 35px;
    margin-top: 10px;
    box-shadow: 0px 0px 6px 1px rgba(45, 54, 68, 0.1);
}
.home .create-poll:hover {
    background: #266cc2;
}
.home table {
    width: 100%;
    margin-top: 30px;
    border-collapse: collapse;
}
.home table thead {
    border-bottom: 1px solid #ebedf0;
}
.home table thead td {
    padding: 15px;
    font-weight: 500;
    color: #787a7c;
    font-size: 14px;
}
.home table tbody tr {
    border-bottom: 1px solid #ebedf0;
}
.home table tbody tr:nth-child(odd) {
    background-color: #fafafc;
}
.home table tbody tr td {
    padding: 15px;
}
.home table tbody tr td:nth-child(1) {
    color: #a8aaad;
}
.home table tbody tr td .poll-answer {
    display: inline-flex;
    align-items: center;
    justify-content: center;
    padding: 4px 10px;
    background-color: #f8eabd;
    color: #c99f15;
    border-radius: 15px;
    margin-right: 4px;
    font-size: 12px;
    font-weight: 500;
}
.home table tbody tr td.actions {
    padding: 8px;
    text-align: right;
}
.home table tbody tr td.actions .view, .home table tbody tr td.actions .trash {
    display: inline-flex;
    text-align: right;
    text-decoration: none;
    color: #FFFFFF;
    padding: 7px 9px;
    border-radius: 5px;
    margin-left: 3px;
}
.home table tbody tr td.actions .view svg, .home table tbody tr td.actions .trash svg {
    fill: #fff;
}
.home table tbody tr td.actions .trash {
    background-color: #b73737;
}
.home table tbody tr td.actions .trash:hover {
    background-color: #a33131;
}
.home table tbody tr td.actions .view {
    background-color: #37b770;
}
.home table tbody tr td.actions .view:hover {
    background-color: #31a364;
}
.update form {
    padding: 15px 0;
    display: flex;
    flex-flow: column;
    width: 400px;
}
.update form label {
    display: inline-flex;
    width: 100%;
    padding: 10px 0;
    margin-right: 25px;
    font-weight: 500;
    font-size: 14px;
    color: #474b50;
}
.update form input, .update form textarea {
    padding: 10px;
    width: 100%;
    margin-right: 25px;
    margin-bottom: 15px;
    border: 1px solid #dcdee0;
    border-radius: 5px;
}
.update form input::placeholder, .update form textarea::placeholder {
    color: #999a9e;
}
.update form textarea {
    height: 200px;
}
.update form button {
    display: inline-flex;
    align-items: center;
    justify-content: center;
    text-decoration: none;
    appearance: none;
    cursor: pointer;
    border: 0;
    background: #2873cf;
    color: #FFFFFF;
    padding: 0 14px;
    font-size: 14px;
    font-weight: 600;
    border-radius: 4px;
    height: 35px;
    width: 120px;
    margin-top: 10px;
    box-shadow: 0px 0px 6px 1px rgba(45, 54, 68, 0.1);
}
.update form button:hover {
    background: #266cc2;
}
.delete .yesno {
    display: flex;
}
.delete .yesno a {
    display: inline-flex;
    align-items: center;
    justify-content: center;
    text-decoration: none;
    appearance: none;
    cursor: pointer;
    border: 0;
    background: #2873cf;
    color: #FFFFFF;
    padding: 0 14px;
    font-size: 14px;
    font-weight: 600;
    border-radius: 4px;
    height: 35px;
    width: 70px;
    margin: 10px 10px 10px 0;
    box-shadow: 0px 0px 6px 1px rgba(45, 54, 68, 0.1);
}
.delete .yesno a:hover {
    background: #266cc2;
}
.poll-vote form {
    display: flex;
    flex-flow: column;
}
.poll-vote form label {
    padding-bottom: 12px;
}
.poll-vote form input[type=radio] {
    transform: scale(1.1);
    margin-right: 10px;
}
.poll-vote form button, .poll-vote form a {
    display: inline-flex;
    align-items: center;
    justify-content: center;
    text-decoration: none;
    appearance: none;
    cursor: pointer;
    border: 0;
    background: #2873cf;
    color: #FFFFFF;
    padding: 0 14px;
    font-size: 14px;
    font-weight: 600;
    border-radius: 4px;
    height: 35px;
    width: 120px;
    margin-top: 10px;
    box-shadow: 0px 0px 6px 1px rgba(45, 54, 68, 0.1);
}
.poll-vote form button:hover, .poll-vote form a:hover {
    background: #266cc2;
}
.poll-vote form a {
    text-align: center;
    text-decoration: none;
    background-color: #37afb7;
    margin-left: 6px;
}
.poll-vote form a:hover {
    background-color: #319ca3;
}
.poll-result .wrapper {
    display: flex;
    flex-flow: column;
}
.poll-result .wrapper .poll-question {
    width: 50%;
    padding-bottom: 7px;
}
.poll-result .wrapper .poll-question p {
    margin: 0;
    padding: 7px 0;
}
.poll-result .wrapper .poll-question p span {
    font-size: 14px;
    color: #88898d;
}
.poll-result .wrapper .poll-question .result-bar-wrapper {
    background-color: #f0f3f1;
    border-radius: 15px;
    overflow: hidden;
    max-width: 340px;
}
.poll-result .wrapper .poll-question .result-bar-wrapper .result-bar {
    display: flex;
    height: 25px;
    min-width: 30px;
    background-color: #2bb86c;
    font-size: 12px;
    font-weight: 500;
    color: #FFFFFF;
    justify-content: center;
    align-items: center;
}
Feel free to customize it or use your own stylesheet.
4. Creating the Poll and Voting System with PHP
We can finally start programming our poll and voting system with PHP.
4.1. Functions
The functions.php file will contain the template and database connection functions, which we can implement in all the pages that we create.
Edit the functions.php file and add:
<?php
function pdo_connect_mysql() {
    // Update the details below with your MySQL details
    $DATABASE_HOST = 'localhost';
    $DATABASE_USER = 'root';
    $DATABASE_PASS = '';
    $DATABASE_NAME = 'phppoll';
    try {
        return new PDO('mysql:host=' . $DATABASE_HOST . ';dbname=' . $DATABASE_NAME . ';charset=utf8', $DATABASE_USER, $DATABASE_PASS);
    } catch (PDOException $exception) {
        // If there is an error with the connection, stop the script and display the error.
        exit('Failed to connect to database!');
    }
}
Every time we want to connect to our MySQL database, all we have to do is execute the above function, like the following:
pdo_connect_mysql();If you encounter a connection issue with MySQL, you will most likely have to update the database variables to reflect your MySQL credentials and database name. You shouldn't have to change the variables if you're using XAMPP.
Add after:
// Template header, feel free to customize this
function template_header($title) {
echo '<!DOCTYPE html>
<html>
<head>
<meta charset="utf-8">
<title>' . $title . '</title>
<link href="style.css" rel="stylesheet" type="text/css">
</head>
<body>
<nav class="navtop">
<div>
<h1>Poll & Voting System</h1>
<a href="index.php"><svg width="20" height="20" xmlns="http://www.w3.org/2000/svg" viewBox="0 0 24 24"><path d="M19 3H5C3.9 3 3 3.9 3 5V19C3 20.1 3.9 21 5 21H19C20.1 21 21 20.1 21 19V5C21 3.9 20.1 3 19 3M9 17H7V10H9V17M13 17H11V7H13V17M17 17H15V13H17V17Z" /></svg>Polls</a>
</div>
</nav>';
}The header function for our templates, which includes the head section of the document and the top navigation bar that will appear on every page. We also include the Font Awesome library, which is a free icon library (icons we'll be using in our app).
Add after:
// Template footer
function template_footer() {
echo '</body>
</html>';
}
The template footer function, which is basically the end of the document (closing the HTML tags, etc.).
And now, if we wanted to create a new page, we could implement code like so:
<?php
// examplepage.php
include 'functions.php';
$pdo = pdo_connect_mysql();
?>
<?=template_header('Example Page')?>

<p>Hello World! Welcome to my custom page!</p>

<?=template_footer()?>
Awesome, right? Now, we don't have to include the same template function code and connection function code in all our PHP files, as all we have to do is execute the function.
Take note the following code:
<?=template_footer()?>Is the short version of:
<?php echo template_footer(); ?>That's all the functions created that we're going to be using.
4.2. Index Page
The index page will consist of all the populated lists of polls, along with buttons that we can utilize to view and delete polls.
Edit the index.php file and add:
<?php
include 'functions.php';
// Connect to MySQL
$pdo = pdo_connect_mysql();
// MySQL query that selects all the polls and poll answers
$stmt = $pdo->query('SELECT p.*, GROUP_CONCAT(pa.title ORDER BY pa.id) AS answers FROM polls p LEFT JOIN poll_answers pa ON pa.poll_id = p.id GROUP BY p.id');
$polls = $stmt->fetchAll(PDO::FETCH_ASSOC);
?>
The above code will retrieve all the polls and poll answers from our database tables, which we can then subsequently populate a list in HTML table format.
Add after:
<?=template_header('Polls')?>

<div class="content home">

    <h2>Polls</h2>

    <p>Welcome to the home page! You can view the list of polls below.</p>

    <a href="create.php" class="create-poll">Create Poll</a>

    <table>
        <thead>
            <tr>
                <td>#</td>
                <td>Title</td>
                <td>Answer Options</td>
                <td></td>
            </tr>
        </thead>
        <tbody>
            <?php foreach ($polls as $poll): ?>
            <tr>
                <td><?=$poll['id']?></td>
                <td><?=htmlspecialchars($poll['title'], ENT_QUOTES)?></td>
                <td>
                    <?php foreach (explode(',', $poll['answers']) as $answer): ?>
                    <span class="poll-answer"><?=htmlspecialchars($answer, ENT_QUOTES)?></span>
                    <?php endforeach; ?>
                </td>
                <td class="actions">
                    <a href="vote.php?id=<?=$poll['id']?>" class="view" title="View Poll"><svg width="16" height="16" xmlns="http://www.w3.org/2000/svg" viewBox="0 0 24 24"><path d="M12,9A3,3 0 0,0 9,12A3,3 0 0,0 12,15A3,3 0 0,0 15,12A3,3 0 0,0 12,9M12,17A5,5 0 0,1 7,12A5,5 0 0,1 12,7A5,5 0 0,1 17,12A5,5 0 0,1 12,17M12,4.5C7,4.5 2.73,7.61 1,12C2.73,16.39 7,19.5 12,19.5C17,19.5 21.27,16.39 23,12C21.27,7.61 17,4.5 12,4.5Z" /></svg></a>
                    <a href="delete.php?id=<?=$poll['id']?>" class="trash" title="Delete Poll"><svg width="16" height="16" xmlns="http://www.w3.org/2000/svg" viewBox="0 0 24 24"><path d="M19,4H15.5L14.5,3H9.5L8.5,4H5V6H19M6,19A2,2 0 0,0 8,21H16A2,2 0 0,0 18,19V7H6V19Z" /></svg></a>
                </td>
            </tr>
            <?php endforeach; ?>
        </tbody>
    </table>

</div>

<?=template_footer()?>
First and foremost, we start the above code by executing the template header function (template_header()), and subsequently iterate the polls using a foreach loop and populate them accordingly in an HTML table. Lastly, we end the template with the template footer function (template_footer()) that we defined previously.
With the HTML anchor links in the table, you can see we're going to pass the ID parameter (using a GET request) to the vote.php and delete.php pages. It's how the PHP code will know which poll the user has clicked in the table.
Tip To create a custom GET request in PHP, you can append parameters to the PHP file in the URL, for example: contact.php?name=david&email=david@codeshack.io.
If we navigate to our index page, it will resemble the following:
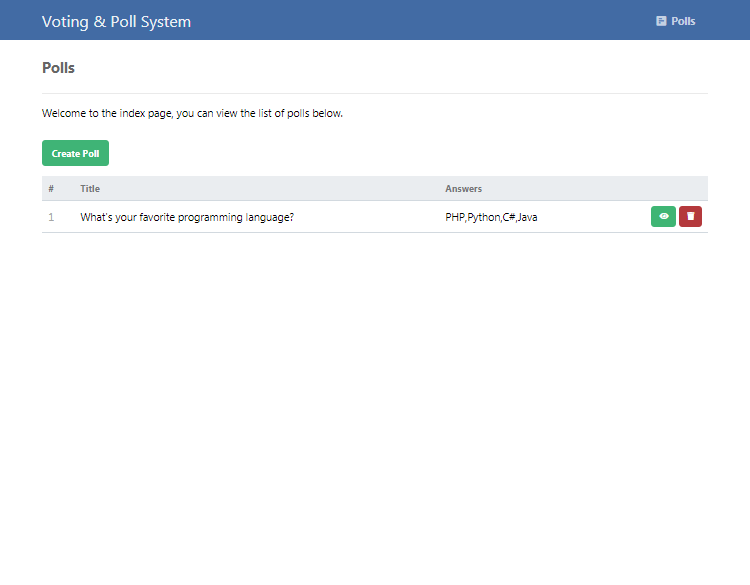
We can now view the list of polls created on the index page. Do not be concerned about the buttons not working, as we have yet to create the pages associated with them.
4.3. Create Page
The create page we can use to create new polls using an HTML form and input fields, and on the server side, we can use PHP and MySQL to insert new records into our database tables. However, for this to happen, we first need to execute a POST request with PHP.
Edit the create.php file and add:
<?php
include 'functions.php';
// Connect to MySQL
$pdo = pdo_connect_mysql();
// Output message
$msg = '';
We're going to need to use MySQL and use the template functions that we created previously. Therefore, we must include the functions.php file. The $msg variable will be the output message to the user.
Add after:
// Check if POST data is not empty
if (!empty($_POST)) {
    // Post data not empty insert a new record
    // Check if POST variable "title" exists, if not default the value to blank, basically the same for all variables
    $title = isset($_POST['title']) ? $_POST['title'] : '';
    $desc = isset($_POST['desc']) ? $_POST['desc'] : '';
    // Insert new record into the "polls" table
    $stmt = $pdo->prepare('INSERT INTO polls (title, description) VALUES (?, ?)');
    $stmt->execute([ $title, $desc ]);
    // Below will get the last insert ID, this will be the poll id
    $poll_id = $pdo->lastInsertId();
    // Get the answers and convert the multiline string to an array, so we can add each answer to the "poll_answers" table
    $answers = isset($_POST['answers']) ? explode(PHP_EOL, $_POST['answers']) : '';
    // Iterate the answers and insert into the "poll_answers" table
    foreach ($answers as $answer) {
        // If the answer is empty there is no need to insert
        if (empty($answer)) continue;
        // Add answer to the "poll_answers" table
        $stmt = $pdo->prepare('INSERT INTO poll_answers (poll_id, title, votes) VALUES (?, ?, 0)');
        $stmt->execute([ $poll_id, $answer ]);
    }
    // Output message
    $msg = 'Created Successfully!';
}
?>
The code above will only execute if the user has clicked the submit button in the HTML form, as it's a POST request. If the POST variable is not empty, insert a new record into both the polls and poll_answers tables — the number of records inserted into the poll_answers table depends on how many answers the user specified.
Not only can we insert new records, but we're also securing the user input as prepared statements will prevent SQL injection. We don't need to escape user input if we're using prepared statements.
Add After:
<?=template_header('Create Poll')?>

<div class="content update">

    <h2>Create Poll</h2>

    <form action="create.php" method="post">

        <label for="title">Title</label>
        <input type="text" name="title" id="title" placeholder="Title">

        <label for="desc">Description</label>
        <input type="text" name="desc" id="desc" placeholder="Description">

        <label for="answers">Answer Options (per line)</label>
        <textarea name="answers" id="answers" placeholder="Option 1<?=PHP_EOL?>Option 2<?=PHP_EOL?>Option 3"></textarea>

        <button type="submit">Create</button>

    </form>
    <?php if ($msg): ?>
    <p><?=$msg?></p>
    <?php endif; ?>
</div>

<?=template_footer()?>
Remember the index template we created earlier? We're technically using the same header and footer functions to structure our HTML template.
The form that we have created above we can use to insert new records into our database tables. The PHP POST variable names reflect the names of the elements in the HTML form. The forms method is set to post because we need to make a POST request.
And now, if we click the Create Poll button on the index page, we'll see the following:
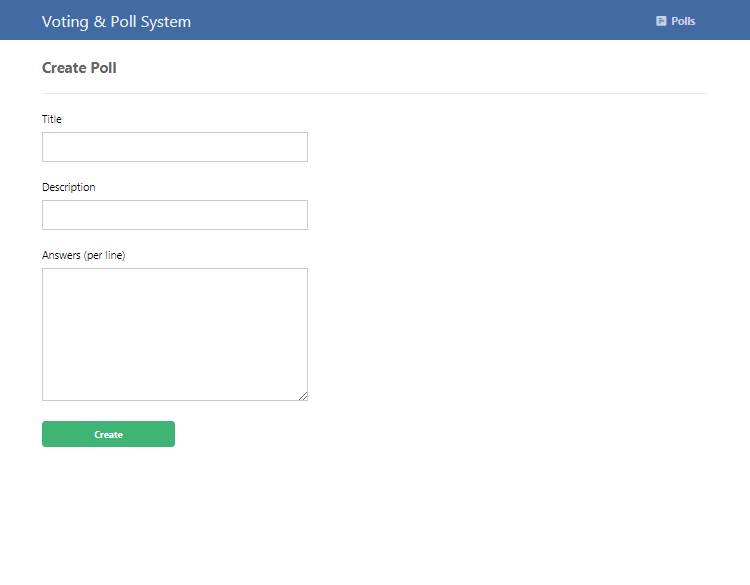
That's essentially all we must do to capture the form data and insert the new poll record into our database tables.
4.4. Vote Page
On the voting page, users will be able to see the populated list of answers for the specified poll and have the option to vote. They can also see the result without voting.
Edit the vote.php file and add:
<?php
include 'functions.php';
// Connect to MySQL
$pdo = pdo_connect_mysql();
// If the GET request "id" exists (poll id)...
if (isset($_GET['id'])) {
    // MySQL query that selects the poll records by the GET request "id"
    $stmt = $pdo->prepare('SELECT * FROM polls WHERE id = ?');
    $stmt->execute([ $_GET['id'] ]);
    // Fetch the record
    $poll = $stmt->fetch(PDO::FETCH_ASSOC);
    // Check if the poll record exists with the id specified
    if ($poll) {
        // MySQL query that selects all the poll answers
        $stmt = $pdo->prepare('SELECT * FROM poll_answers WHERE poll_id = ?');
        $stmt->execute([ $_GET['id'] ]);
        // Fetch all the poll anwsers
        $poll_answers = $stmt->fetchAll(PDO::FETCH_ASSOC);
        // If the user clicked the "Vote" button...
        if (isset($_POST['poll_answer'])) {
            // Update and increase the vote for the answer the user voted for
            $stmt = $pdo->prepare('UPDATE poll_answers SET votes = votes + 1 WHERE id = ?');
            $stmt->execute([ $_POST['poll_answer'] ]);
            // Redirect user to the result page
            header ('Location: result.php?id=' . $_GET['id']);
            exit;
        }
    } else {
        exit('Poll with that ID does not exist.');
    }
} else {
    exit('No poll ID specified.');
}
?>
For the voting page to work correctly, the id parameter must be specified in the URL (vote.php?id=2, etc). If the id parameter exists, we can retrieve the record from our MySQL database by the id column (poll table) and the poll_id column (poll_answers table).
Not only do we make a GET request, but we also make a POST request — only if the user selects an answer and clicks the Vote button, which will subsequently update the votes for that particular answer (MySQL UPDATE query). Upon a successful POST request, the user is redirected to the result page (result.php).
Add after:
<?=template_header('Poll Vote')?>

<div class="content poll-vote">

    <h2><?=htmlspecialchars($poll['title'], ENT_QUOTES)?></h2>

    <p><?=htmlspecialchars($poll['description'], ENT_QUOTES)?></p>

    <form action="vote.php?id=<?=$_GET['id']?>" method="post">
        <?php for ($i = 0; $i < count($poll_answers); $i++): ?>
        <label>
            <input type="radio" name="poll_answer" value="<?=$poll_answers[$i]['id']?>"<?=$i == 0 ? ' checked' : ''?>>
            <?=htmlspecialchars($poll_answers[$i]['title'], ENT_QUOTES)?>
        </label>
        <?php endfor; ?>
        <div>
            <button type="submit">Vote</button>
            <a href="result.php?id=<?=$poll['id']?>">View Result</a>
        </div>
    </form>

</div>

<?=template_footer()?>
The template above will iterate each answer and populate the input radio fields we require for our HTML form.
If we select the eye icon next to the test poll on the index page, we'll see the following:
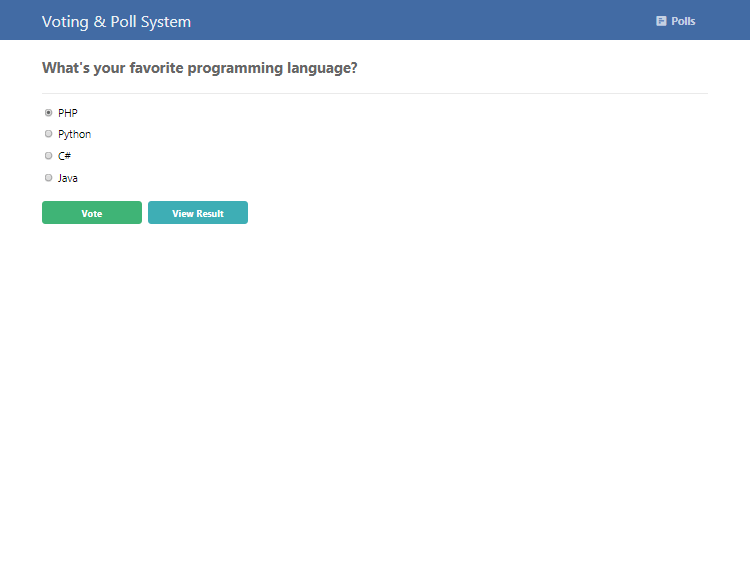
We can now vote on the polls we have created.
4.5. Result Page
On the result page, the user can view the populated list of answers along with the number of votes.
Edit the result.php file and add:
<?php
include 'functions.php';
// Connect to MySQL
$pdo = pdo_connect_mysql();
// If the GET request "id" exists (poll id)...
if (isset($_GET['id'])) {
    // MySQL query that selects the poll records by the GET request "id"
    $stmt = $pdo->prepare('SELECT * FROM polls WHERE id = ?');
    $stmt->execute([ $_GET['id'] ]);
    // Fetch the record
    $poll = $stmt->fetch(PDO::FETCH_ASSOC);
    // Check if the poll record exists with the id specified
    if ($poll) {
        // MySQL Query that will get all the answers from the "poll_answers" table
        $stmt = $pdo->prepare('SELECT * FROM poll_answers WHERE poll_id = ? ORDER BY votes DESC');
        $stmt->execute([ $_GET['id'] ]);
        // Fetch all poll answers
        $poll_answers = $stmt->fetchAll(PDO::FETCH_ASSOC);
        // Total number of votes, will be used to calculate the percentage
        $total_votes = 0;
        foreach ($poll_answers as $poll_answer) {
            // Every poll answers votes will be added to total votes
            $total_votes += $poll_answer['votes'];
        }
    } else {
        exit('Poll with that ID does not exist.');
    }
} else {
    exit('No poll ID specified.');
}
?>
Similar to the voting page, we need to retrieve the ID GET parameter (result.php?id=2, etc.), and with that, we can retrieve the poll results from our database — ordered by the number of votes (descending). The answers are iterated using a foreach loop, and the total votes are counted accordingly.
Add after:
<?=template_header('Poll Results')?>

<div class="content poll-result">

    <h2><?=htmlspecialchars($poll['title'], ENT_QUOTES)?></h2>

    <p><?=htmlspecialchars($poll['description'], ENT_QUOTES)?></p>

    <div class="wrapper">
        <?php foreach ($poll_answers as $poll_answer): ?>
        <div class="poll-question">
            <p><?=htmlspecialchars($poll_answer['title'], ENT_QUOTES)?> <span>(<?=$poll_answer['votes']?> Votes)</span></p>
            <div class="result-bar-wrapper">
                <div class="result-bar" style="width:<?=$poll_answer['votes'] ? (($poll_answer['votes']/$total_votes)*100) : 0?>%">
                    <?=$poll_answer['votes'] ? round(($poll_answer['votes']/$total_votes)*100) : 0?>%
                </div>
            </div>
        </div>
        <?php endforeach; ?>
    </div>

</div>

<?=template_footer()?>
The above template will iterate the answers and populate them in HTML format along with the number of votes and a percentage bar.
Navigate to the test poll, and you can either select Vote or select the View Results button, which you should subsequently see something like the following:
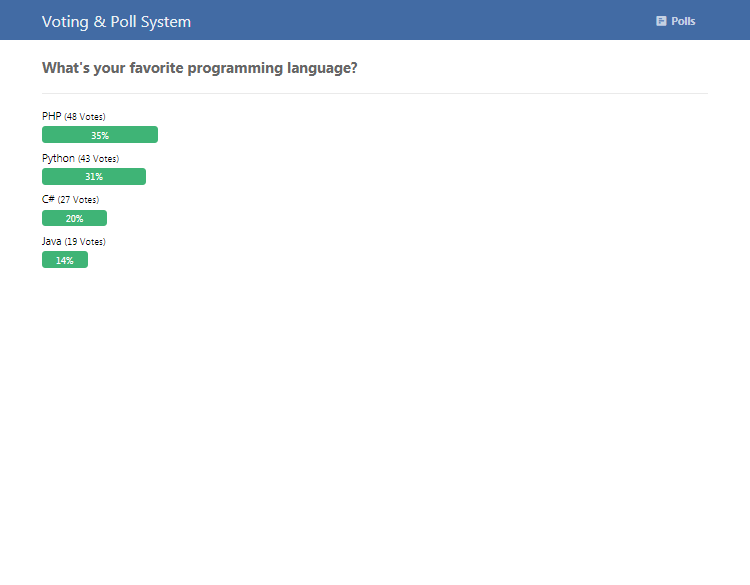
That's basically how you populate the poll results and using a bit of CSS magic to create the percentage bar.
4.6. Delete Page
On the delete page, we'll be able to delete polls — we'll include a confirmation so the user doesn't accidentally delete the wrong poll.
Edit the delete.php file and add:
<?php
include 'functions.php';
// Connect to MySQL
$pdo = pdo_connect_mysql();
// Output message
$msg = '';
// Check that the poll ID exists
if (isset($_GET['id'])) {
    // Select the record that is going to be deleted
    $stmt = $pdo->prepare('SELECT * FROM polls WHERE id = ?');
    $stmt->execute([ $_GET['id'] ]);
    $poll = $stmt->fetch(PDO::FETCH_ASSOC);
    // Check if the poll record exists with the id specified
    if (!$poll) {
        exit('Poll doesn\'t exist with that ID!');
    }
    // Make sure the user confirms before deletion
    if (isset($_GET['confirm'])) {
        // If the user clicked the "Yes" button, delete the record
        if ($_GET['confirm'] == 'yes') {
            // Prepare statement and delete poll & answers
            $stmt = $pdo->prepare('DELETE p, pa FROM polls p LEFT JOIN poll_answers pa ON pa.poll_id = p.id WHERE p.id = ?');
            $stmt->execute([ $_GET['id'] ]);
            // Output msg
            $msg = 'You have deleted the poll!';
        } else {
            // User clicked the "No" button, redirect them back to the home/index page
            header('Location: index.php');
            exit;
        }
    }
} else {
    exit('No ID specified!');
}
?>
If the poll ID is specified and exists in our polls table, we can prompt the user whether they would like to delete the poll or not. If they choose Yes, the poll will be permanently deleted along with the poll answers. The data will be deleted from both the polls and poll_answers database tables using the DELETE statement.
Add after:
<?=template_header('Delete')?>
<div class="content delete">
<h2>Delete Poll #<?=$poll['id']?></h2>
<?php if ($msg): ?>
<p><?=$msg?></p>
<?php else: ?>
<p>Are you sure you want to delete poll #<?=$poll['id']?>?</p>
<div class="yesno">
<a href="delete.php?id=<?=$poll['id']?>&confirm=yes">Yes</a>
<a href="delete.php?id=<?=$poll['id']?>&confirm=no">No</a>
</div>
<?php endif; ?>
</div>
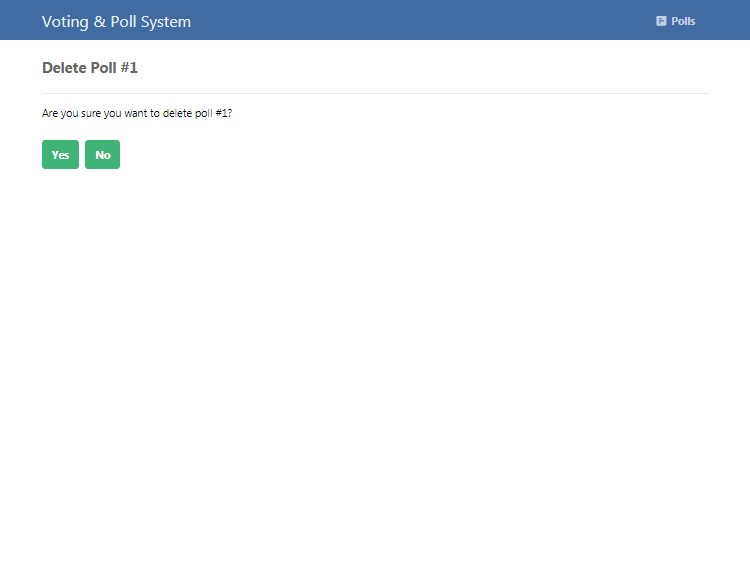
<?=template_footer()?>The above code is the template for the delete page. If we navigate to the index page and select the trash icon next to one of our polls, it will resemble the following:
Conclusion
Great job! You have built a simple yet powerful poll and voting system using PHP and MySQL. This system lets users create polls, vote on them, and manage their polls with ease.
Now that you have the basics down, you can add more features. For example, you could add user login to make sure only certain people can create or delete polls. You could also add more options for the polls or make the results update in real-time.
If you enjoyed this tutorial, please share it with your friends or on social media. Your support helps us create more helpful content.
Happy coding, and thanks for reading!
Skip the copy-pasting and get the complete, working project from this tutorial as a free ZIP with a setup guide included. Free for personal and commercial use.
If you would like to support us, consider the advanced poll and voting system below. It will greatly help us create more tutorials and keep our website up and running. The advanced package includes improved code and more features.
— View Dashboard
— Manage Polls
— Configure Settings
— And more!
* Advanced package also includes the tutorial source and basic package.
* Instant download after payment.
To learn more about the advanced package, please visit the Advanced Poll and Voting System page.