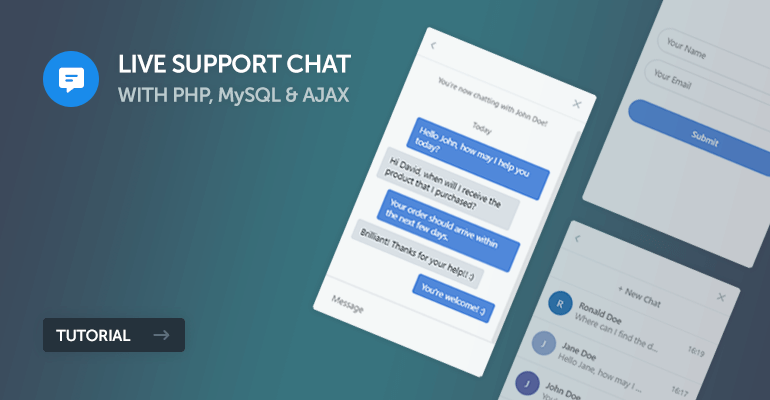
In this tutorial, we'll be developing an interactive and fluid live support chat app with AJAX (JavaScript), PHP, and MySQL. We'll leverage AJAX to receive and send messages in real-time without reloading the page.
Have you ever seen the chat icon that appears on many websites in the bottom-right corner? We'll be developing a live support chat app identical to what you'll find on those websites.
The Advanced package includes additional features and a download link to the source code.
Contents
1. Introduction
In this day and age, implementing live support into your website is essential as it will provide a sense of trust between the consumer and business, whether you sell physical or virtual goods. For a business to build integrity, it must provide solid support to its consumers, which is a basic fundamental for any business.
Furthermore, when consumers inquire about products they're hesitant on purchasing, it could potentially lead to sales and therefore increasing business profit because with the live chat support, you can respond to inquiries promptly. Providing support to consumers is highly likely to lead to conversations.
With the advancement of web technology, we can leverage modern methods to develop a real-time and fluid chat app.
2. Getting Started
Before we start coding our live support chat app, we need a working web server and install tools that will help us develop the app.
2.1. Requirements
- I highly recommend you download and install XAMPP on your development environment. However, keep in mind that XAMPP is designed for development purposes and isn't recommended to be used for production.
- Ensure your web server is running PHP >= 5.5 and MySQL >= 5.6. The latest version of XAMPP will come pre-built with the latest components and therefore shouldn't be an issue.
- Download and install a code editor. You can use Notepad to edit the files, but I don't recommend it. Instead, install one of the following: Notepad++, Visual Studio Code, or Atom.
2.2. What You Will Learn in this Tutorial
- AJAX Implementation — Leverage AJAX to update conversations in real-time.
- Populate SQL Records — Retrieve messages from the database and populate them accordingly.
- Fluid Design with CSS3 — Transition between chat tabs seamlessly.
- Authentication — Authenticate operators and create accounts for guests.
- Smart Search — Automatically find operators and guests with intelligent algorithms.
2.3. File Structure & Setup
We need to start our web server and create the directories and files we're going to use for our live support chat app. If you've installed XAMPP, follow the instructions below.
- Open XAMPP Control Panel
- Next to the Apache module, click Start
- Next to the MySQL module, click Start
- Navigate to XAMPP's installation directory (C:\xampp)
- Open the htdocs directory
- Create the following directories and files:
File Structure
\-- livesupportchat
|-- style.css
|-- authenticate.php
|-- conversation.php
|-- conversations.php
|-- find_conversation.php
|-- main.php
|-- post_message.php
|-- index.html
Each file will consist of the following:
- style.css — The stylesheet (CSS3) for our live support chat app, which is used to format our structured (HTML) content.
- authenticate.php — Will be used in conjunction with the login form, which will authenticate the user based on the email address provided.
- conversation.php — The conversation file will retrieve messages from the MySQL database that are associated with the sender and receiver.
- conversations.php — The conversations file will retrieve all the conversations associated with the user and populate them based on the date.
- find_conversation.php — The find conversation file will connect the user with an operator, but only if both users select the "New Chat" button.
- main.php — The main file will contain global functions that we'll use throughout our other files, such as database connection code, is_loggedin function, and more.
- post_message.php — The post message file will be used to submit messages and insert them into the database.
3. Creating the Database
The MySQL database will store all our messages, conversations, accounts, and other app-related data. We can use the database to store, update, insert, and retrieve data.
To get started, follow the below instructions.
- Navigate to phpMyAdmin in your browser: http://localhost/phpmyadmin/
- Click the Databases tab in the top navigation menu
- Under the Create Database section, enter phpsupportchat as the database name and utf8_general_ci as the collation
- Click the Create button
- Select the newly created database in the left-side panel
- Click the SQL tab
- Execute the below SQL statement
CREATE TABLE IF NOT EXISTS `accounts` (
  `id` int(11) NOT NULL AUTO_INCREMENT,
  `email` varchar(255) NOT NULL,
  `password` varchar(255) NOT NULL,
  `full_name` varchar(255) NOT NULL,
  `role` enum('Guest','Operator') NOT NULL,
  `secret` varchar(255) NOT NULL DEFAULT '',
  `last_seen` datetime NOT NULL,
  `status` enum('Occupied','Waiting','Idle') NOT NULL DEFAULT 'Idle',
  PRIMARY KEY (`id`)
) ENGINE=InnoDB AUTO_INCREMENT=2 DEFAULT CHARSET=utf8;

INSERT INTO `accounts` (`id`, `email`, `password`, `full_name`, `role`, `secret`, `last_seen`, `status`) VALUES
(1, 'operator@example.com', '$2y$10$thE7hIJF/EJvKjmJy7hd5uH3a/BNgSUepkYoES0q80YEzi7VqWsRG', 'Operator', 'Operator', '', '2022-05-03 14:14:35', 'Idle');

CREATE TABLE IF NOT EXISTS `conversations` (
  `id` int(11) NOT NULL AUTO_INCREMENT,
  `account_sender_id` int(11) NOT NULL,
  `account_receiver_id` int(11) NOT NULL,
  `submit_date` datetime NOT NULL,
  PRIMARY KEY (`id`)
) ENGINE=InnoDB DEFAULT CHARSET=utf8;

CREATE TABLE IF NOT EXISTS `messages` (
  `id` int(11) NOT NULL AUTO_INCREMENT,
  `conversation_id` int(11) NOT NULL,
  `account_id` int(11) NOT NULL,
  `msg` varchar(255) NOT NULL,
  `submit_date` datetime NOT NULL,
  PRIMARY KEY (`id`)
) ENGINE=InnoDB DEFAULT CHARSET=utf8;
The above SQL statement will create the following tables:
- accounts — this table will store all our guests and operators.
- id — The ID column will auto-increment, and therefore, each new column will have a unique integer.
- email — The email address associated with the user.
- password — The password field required for operators.
- full_name — The full name associated with the user.
- role — The role column will determine whether the user is a guest or operator.
- secret — A secret unique code which is required to automatically authenticate guests and operators.
- last_seen — The last date the user triggered an action.
- status — The status of the user, which can either be Occupied (chatting with user), Waiting (finding a new conversation), or Idle.
- conversations — this table will store all the vital information related to the conversation.
- id — Unique ID.
- account_sender_id — The account ID of the sender, which will be associated with the accounts table.
- account_receiver_id — The account ID of the receiver, which will be associated with the accounts table.
- submit_date — The date the conversation was created.
- messages — this table will stored all the submitted messages.
- id — Unique ID.
- conversation_id — The conversation ID, which will be associated with the conversations table.
- account_id — The account ID of the sender, which will be associated with the accounts table.
- msg — The submitted message.
- submit_date — The date the message was created.
In addition to the above, the SQL statement will create an operator account, which we can later use when testing the chat widget.
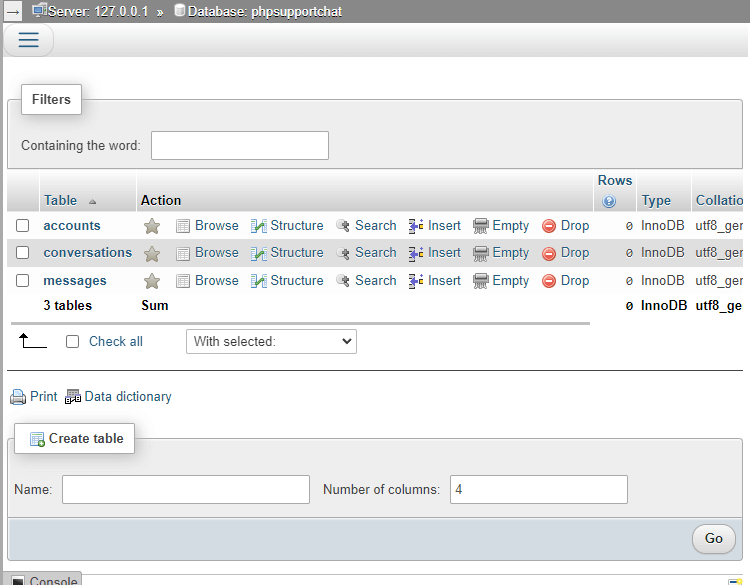
In phpMyAdmin, the database structure should look like the following:
4. Creating the Stylesheet (CSS3)
The CSS file will style and layout our live support chat app. With stylesheets, we can apply styles to particular elements, such as changing the font size, colors, animations, and anything design related.
Edit the style.css file and add:
* {
  box-sizing: border-box;
  font-family: -apple-system, BlinkMacSystemFont, "segoe ui", roboto, oxygen, ubuntu, cantarell, "fira sans", "droid sans", "helvetica neue", Arial, sans-serif;
  font-size: 16px;
}
body {
  background-color: #FFFFFF;
  margin: 0;
}
.open-chat-widget {
  text-decoration: none;
  position: fixed;
  display: flex;
  justify-content: center;
  align-items: center;
  width: 60px;
  height: 60px;
  border-radius: 50%;
  color: #fff;
  right: 28px;
  bottom: 28px;
  background-color: #4488dc;
  box-shadow: 0px 0px 5px 1px rgba(0, 0, 0, 0.1);
  z-index: 999998;
}
.open-chat-widget:hover {
  background-color: #3780da;
}
.chat-widget {
  position: fixed;
  display: none;
  right: 25px;
  bottom: 25px;
  box-shadow: 0px 0px 25px 2px rgba(0, 0, 0, 0.1);
  z-index: 999999;
  opacity: 0;
  transform: translateY(100px);
  border-radius: 5px;
  background-color: #fff;
  width: 300px;
  height: 500px;
  visibility: hidden;
  transition: all .2s ease;
  flex-flow: column;
  overflow: hidden;
}
.chat-widget.open {
  visibility: visible;
  opacity: 1;
  transform: translateY(0);
}
.chat-widget .chat-widget-header {
  display: flex;
  width: 100%;
  height: 50px;
  align-items: center;
  border-bottom: 1px solid #eef0f2;
}
.chat-widget .chat-widget-header .close-chat-widget-btn {
  display: block;
  text-decoration: none;
  font-size: 28px;
  margin-left: auto;
  padding: 0 15px;
  margin-bottom: 5px;
  color: #b4bdc6;
}
.chat-widget .chat-widget-header .close-chat-widget-btn:hover {
  color: #a6b0bb;
}
.chat-widget .chat-widget-header .previous-chat-tab-btn {
  display: none;
  text-decoration: none;
  font-size: 32px;
  padding: 0 15px;
  margin-bottom: 7px;
  color: #b4bdc6;
}

.chat-widget .chat-widget-header .previous-chat-tab-btn:hover {
  color: #a6b0bb;
}
.chat-widget .chat-widget-content {
  display: flex;
  flex-grow: 1;
}
.chat-widget .chat-widget-tabs {
  display: flex;
  height: 100%;
  width: 100%;
  overflow: hidden;
}
.chat-widget .chat-widget-tabs .chat-widget-tab {
  display: flex;
  flex-flow: column;
  width: 100%;
  min-width: 100%;
  max-width: 100%;
  overflow: hidden;
  transition: all ease .2s;
}
.chat-widget .chat-widget-tabs .chat-widget-tab.chat-widget-login-tab {
  justify-content: center;
}
.chat-widget .chat-widget-tabs .chat-widget-tab.chat-widget-login-tab form {
  display: flex;
  flex-flow: column;
  justify-content: center;
  padding: 15px;
  width: 100%;
}
.chat-widget .chat-widget-tabs .chat-widget-tab.chat-widget-login-tab form input,
.chat-widget .chat-widget-tabs .chat-widget-tab.chat-widget-login-tab form button {
  border-radius: 25px;
  padding: 10px 15px;
  margin-bottom: 15px;
  font-size: 14px;
}
.chat-widget .chat-widget-tabs .chat-widget-tab.chat-widget-login-tab form input {
  border: 1px solid #e0e3e7;
}
.chat-widget .chat-widget-tabs .chat-widget-tab.chat-widget-login-tab form button {
  appearance: none;
  color: #fff;
  font-weight: 500;
  background-color: #4488dc;
  border: 0;
  cursor: pointer;
}
.chat-widget .chat-widget-tabs .chat-widget-tab.chat-widget-login-tab form button:hover {
  background-color: #2f7ad8;
}
.chat-widget .chat-widget-tabs .chat-widget-tab.chat-widget-login-tab form .msg {
  font-weight: 500;
  margin: 0;
  padding-bottom: 15px;
  font-size: 14px;
}
.chat-widget .chat-widget-tabs .chat-widget-tab.chat-widget-conversations-tab .chat-widget-conversations {
  display: flex;
  flex-flow: column;
  flex-grow: 1;
  flex-basis: 0;
  overflow-y: auto;
  scrollbar-width: thin;
}
.chat-widget .chat-widget-tabs .chat-widget-tab.chat-widget-conversations-tab .chat-widget-conversations .chat-widget-new-conversation {
  text-decoration: none;
  display: flex;
  align-items: center;
  justify-content: center;
  padding: 15px;
  border-bottom: 1px solid #eef0f2;
  font-weight: 500;
  color: #888b8f;
  font-size: 14px;
}
.chat-widget .chat-widget-tabs .chat-widget-tab.chat-widget-conversations-tab .chat-widget-conversations .chat-widget-new-conversation:hover {
  background-color: #f7f8f9;
}
.chat-widget .chat-widget-tabs .chat-widget-tab.chat-widget-conversations-tab .chat-widget-conversations .chat-widget-conversation {
  display: flex;
  text-decoration: none;
  border-bottom: 1px solid #eef0f2;
  padding: 15px;
  width: 100%;
}
.chat-widget .chat-widget-tabs .chat-widget-tab.chat-widget-conversations-tab .chat-widget-conversations .chat-widget-conversation .icon {
  display: flex;
  align-items: center;
  justify-content: center;
  width: 40px;
  min-width: 40px;
  height: 40px;
  min-height: 40px;
  color: #fff;
  background-color: #3b4656;
  border-radius: 50%;
  text-transform: uppercase;
}
.chat-widget .chat-widget-tabs .chat-widget-tab.chat-widget-conversations-tab .chat-widget-conversations .chat-widget-conversation .details {
  padding: 0 10px;
}
.chat-widget .chat-widget-tabs .chat-widget-tab.chat-widget-conversations-tab .chat-widget-conversations .chat-widget-conversation .details .title {
  font-size: 14px;
  color: #5f6061;
  font-weight: 500;
}
.chat-widget .chat-widget-tabs .chat-widget-tab.chat-widget-conversations-tab .chat-widget-conversations .chat-widget-conversation .details .msg {
  font-size: 14px;
  overflow: hidden;
  white-space: nowrap;
  text-overflow: ellipsis;
  width: 150px;
  color: #8f9091;
}
.chat-widget .chat-widget-tabs .chat-widget-tab.chat-widget-conversations-tab .chat-widget-conversations .chat-widget-conversation .date {
  flex: 1;
  text-align: right;
  font-size: 12px;
  color: #8f9091;
}
.chat-widget .chat-widget-tabs .chat-widget-tab.chat-widget-conversations-tab .chat-widget-conversations .chat-widget-conversation:hover {
  background-color: #f7f8f9;
}
.chat-widget .chat-widget-tabs .chat-widget-tab.chat-widget-conversation-tab .chat-widget-messages {
  display: flex;
  flex-flow: column;
  padding: 15px;
  flex-grow: 1;
  flex-basis: 0;
  overflow-y: auto;
  scrollbar-width: thin;
}
.chat-widget .chat-widget-tabs .chat-widget-tab.chat-widget-conversation-tab .chat-widget-messages .date {
  margin: 0;
  padding: 15px;
  text-align: center;
  font-size: 12px;
  color: #8f9091;
  font-weight: 500;
}
.chat-widget .chat-widget-tabs .chat-widget-tab.chat-widget-conversation-tab .chat-widget-messages .chat-widget-message {
  align-self: flex-end;
  background-color: #4488dc;
  color: #fff;
  padding: 8px 12px;
  border-radius: 4px;
  max-width: 90%;
  margin-bottom: 10px;
  font-size: 14px;
}
.chat-widget .chat-widget-tabs .chat-widget-tab.chat-widget-conversation-tab .chat-widget-messages .chat-widget-message.alt {
  align-self: flex-start;
  background-color: #e2e6eb;
  color: #000;
}
.chat-widget .chat-widget-tabs .chat-widget-tab.chat-widget-conversation-tab .chat-widget-input-message {
  height: 60px;
  padding: 10px;
  border-top: 1px solid #e0e3e7;
}
.chat-widget .chat-widget-tabs .chat-widget-tab.chat-widget-conversation-tab .chat-widget-input-message input {
  width: 100%;
  padding: 10px 15px;
  font-size: 14px;
  border: 0;
  outline: 0;
}
.chat-widget-messages::-webkit-scrollbar,
.chat-widget-conversations::-webkit-scrollbar {
  width: 8px;
}
.chat-widget-messages::-webkit-scrollbar-track,
.chat-widget-conversations::-webkit-scrollbar-track {
  background: transparent;
}
.chat-widget-messages::-webkit-scrollbar-thumb,
.chat-widget-conversations::-webkit-scrollbar-thumb {
  background-color: #cdd0d380;
  border-radius: 15px;
  border: transparent;
}
That should be enough to make our app look elegant. The transitions added to the stylesheet will modernize our app and will enable the user to navigate between chat widget tabs seamlessly.
5. Creating the Index File
Do not consider the index file a fundamental part of the live support chat app because the JS code we add to this file can be implemented to any file or webpage. We'll be using this file as a base to work with.
Edit the index.html file and add:
<!DOCTYPE html>
<html>
	<head>
		<meta charset="utf-8">
		<title>Live Support Chat</title>
		<link href="style.css" rel="stylesheet" type="text/css">
        <link rel="stylesheet" href="https://use.fontawesome.com/releases/v6.1.1/css/all.css">
	</head>
	<body>
	    <h1>Live Support Chat</h1>
		<p>The live support chat icon will appear in the bottom-right corner.</p>
        <!-- add your HTML code here -->
        <script>
        // Place the JS code here
		</script>
	</body>
</html>
We'll implement the JS and AJAX code at a later stage. The FontAwesome library is included to add the messages icon to our chat widget.
Before we implement the JS code, we need to add the button that will open our chat widget.
After:
<!-- add your HTML code here -->Add:
<a href="#" class="open-chat-widget"><i class="fa-solid fa-comment-dots fa-lg"></i></a>The button will appear in the bottom-right corner. As you can see, we use the Font Awesome library to display the icon.
Add after:
<div class="chat-widget">
<div class="chat-widget-header">
<a href="#" class="previous-chat-tab-btn">‹</a>
<a href="#" class="close-chat-widget-btn">×</a>
</div>
<div class="chat-widget-content">
<div class="chat-widget-tabs">
<div class="chat-widget-tab chat-widget-login-tab">
<form action="authenticate.php" method="post">
<input type="text" name="name" placeholder="Your Name">
<input type="email" name="email" placeholder="Your Email" required>
<div class="msg"></div>
<button type="submit">Submit</button>
</form>
</div>
<div class="chat-widget-tab chat-widget-conversations-tab"></div>
<div class="chat-widget-tab chat-widget-conversation-tab"></div>
</div>
</div>
</div>The above code will be the template for our chat widget, which will subsequently open when the button declared previously is clicked.
The chat widget will consist of three tabs:
- Tab 1 — Will be used to display the authentication form (name, email, password, etc.).
- Tab 2 — Will contain the list of conversations associated with the user.
- Tab 3 — Will be the conversation containing messages from the sender and receiver.
Each tab will contain a transition that will animate the direction on the X-axis. It's so we can switch between tabs smoothly.
6. Creating the Main File
The main file will contain functions and database connection code that will be required in our other PHP files. There is no need to implement the same code in every file.
Edit the main.php file and add:
<?php
// Initialize sessions
session_start();
// Database connection varibles. Change them to reflect your own.
$db_host = 'localhost';
$db_name = 'phpsupportchat';
$db_user = 'root';
$db_pass = '';
try {
    // Attempt to connect to our MySQL database
	$pdo = new PDO('mysql:host=localhost;dbname=' . $db_name . ';charset=utf8', $db_user, $db_pass);
    // Output all connection errors. We want to know what went wrong...
	$pdo->setAttribute(PDO::ATTR_ERRMODE, PDO::ERRMODE_EXCEPTION);
} catch (PDOException $exception) {
    // Failed to connect! Check the database variables and ensure your database exists with all tables.
	exit('Failed to connect to database!');
}
// The following function will check whether the user is logged-in or not.
function is_loggedin($pdo) {
    // Session loggedin?
    if (isset($_SESSION['account_loggedin'])) {
        // Update the last seed date
        $stmt = $pdo->prepare('UPDATE accounts SET last_seen = ? WHERE id = ?');
        $stmt->execute([ date('Y-m-d H:i:s'), $_SESSION['account_id'] ]);
        return TRUE;
    }
    // Check if the secret cookie is declared in the browser cookies
    if (isset($_COOKIE['chat_secret']) && !empty($_COOKIE['chat_secret'])) {
        $stmt = $pdo->prepare('SELECT * FROM accounts WHERE secret = ?');
        $stmt->execute([ $_COOKIE['chat_secret'] ]);
        $account = $stmt->fetch(PDO::FETCH_ASSOC);
        // Does the account exist?
        if ($account) {
            // Yes it does... Authenticate the user
            $_SESSION['account_loggedin'] = TRUE;
            $_SESSION['account_id'] = $account['id'];
            $_SESSION['account_role'] = $account['role'];
            return TRUE;
        }
    }
    // User isn't logged-in!
    return FALSE;
}
// The following function will update the user's secret code in the databse
function update_secret($pdo, $id, $email, $current_secret = '') {
    // Generate the code using the password hash function. Make sure you change 'yoursecretkey'.
    $cookiehash = !empty($current_secret) ? $current_secret : password_hash($id . $email . 'yoursecretkey', PASSWORD_DEFAULT);
    // The number of days the secret cookie will be remembered
    $days = 30;
    // Create the new cookie
    setcookie('chat_secret', $cookiehash, (int)(time()+60*60*24*$days));
    // Update the secret code in the databse
    $stmt = $pdo->prepare('UPDATE accounts SET secret = ? WHERE id = ?');
    $stmt->execute([ $cookiehash, $id ]);
}
// The following function will be used to assign a unique icon color to our users
function color_from_string($string) {
    // The list of hex colors
    $colors = ['#34568B','#FF6F61','#6B5B95','#88B04B','#F7CAC9','#92A8D1','#955251','#B565A7','#009B77','#DD4124','#D65076','#45B8AC','#EFC050','#5B5EA6','#9B2335','#DFCFBE','#BC243C','#C3447A','#363945','#939597','#E0B589','#926AA6','#0072B5','#E9897E','#B55A30','#4B5335','#798EA4','#00758F','#FA7A35','#6B5876','#B89B72','#282D3C','#C48A69','#A2242F','#006B54','#6A2E2A','#6C244C','#755139','#615550','#5A3E36','#264E36','#577284','#6B5B95','#944743','#00A591','#6C4F3D','#BD3D3A','#7F4145','#485167','#5A7247','#D2691E','#F7786B','#91A8D0','#4C6A92','#838487','#AD5D5D','#006E51','#9E4624'];
    // Find color based on the string
    $colorIndex = hexdec(substr(sha1($string), 0, 10)) % count($colors);
    // Return the hex color
    return $colors[$colorIndex];
}
?>
We'll be leveraging sessions to determine whether our users are logged-in or not. In addition, the secret cookie will automatically authenticate our users if it's declared.
Did you know?The password_hash() function is a strong one-way hashing algorithm and therefore is extremely difficult for an attacker to try and decrypt the hashed string.
Make sure to update the database variables to reflect your own. If you encounter a database connection error, it's most likely due to incorrect credentials provided.
7. Implementing Authentication
In this section, we'll implement code that will validate the user, whether it be a guest or operator, and provide a response on the front end with AJAX.
Edit the authenticate.php file and add:
<?php
// include the main file
include 'main.php';
// Validate the form data
if (!isset($_POST['name'], $_POST['email'])) {
    exit('Please enter a valid name and email address!');
}
if (!filter_var($_POST['email'], FILTER_VALIDATE_EMAIL)) {
	exit('Please enter a valid email address!');
}
The above code will validate the captured form data, which is sent from the client as a POST request. POST requests enable us to transfer data from the client to the server using input elements.
Add after:
// Select account from the database based on the email address
$stmt = $pdo->prepare('SELECT * FROM accounts WHERE email = ?');
$stmt->execute([ $_POST['email'] ]);
// Fetch the results and return them as an associative array
$account = $stmt->fetch(PDO::FETCH_ASSOC);
The above code will retrieve the account associated with the captured email address. To prevent SQL injection, we leverage prepared statements.
Add after:
// Does the account exist?
if ($account) {
    // Yes, it does... Check whether the user is an operator or guest
} else {
    // Accounts doesn't exist, so create one
}
That will check whether the account exists or not. Now, we must add code that will authenticate the user and provide a response.
After:
// Yes, it does... Check whether the user is an operator or guestAdd:
if (isset($_POST['password']) && $account['role'] == 'Operator') {
    // User is an operator and provided a password
    if (password_verify($_POST['password'], $account['password'])) {
        // Password is correct! Authenticate the operator
        $_SESSION['account_loggedin'] = TRUE;
        $_SESSION['account_id'] = $account['id'];
        $_SESSION['account_role'] = $account['role'];
        // Update the secret code
        update_secret($pdo, $account['id'], $account['email'], $account['secret']);
        // Ouput: success
        exit('success');
    } else {
        // Invalid password
        exit('Invalid credentials!');
    }
} else if ($account['role'] == 'Operator') {
    // User is operator, so show the password input field on the front-end
    exit('operator');
} else if ($account['role'] == 'Guest') {
    // User is a guest
    // Authenticate the guest
    // Guest don't need a password
    $_SESSION['account_loggedin'] = TRUE;
    $_SESSION['account_id'] = $account['id'];
    $_SESSION['account_role'] = $account['role'];
    // Update secret code
    update_secret($pdo, $account['id'], $account['email'], $account['secret']);
    // Output: success
    exit('success');
}
The above code will authenticate the user, but only if the user meets one of the specified conditions. The session variables will be remembered on the server and will basically act like browser cookies — all variables are associated with a session ID.
As mentioned before, we created two roles for our users:
- Operator — they are required to enter a password as their data will need to be preserved in the database.
- Guest — password is not essential as it will be too tedious for the user and they'll feel reluctant to use the live support chat app.
PHP TipThe exit() function will stop the script and prevent further execution. If the param is specified, it will output the string to the browser.
After:
// Accounts doesn't exist, so create oneAdd:
$stmt = $pdo->prepare('INSERT INTO accounts (email, password, full_name, role, last_seen) VALUES (?, ?, ?, ?, ?)');
$stmt->execute([ $_POST['email'], '', $_POST['name'] ? $_POST['name'] : 'Guest', 'Guest', date('Y-m-d H:i:s') ]);
// Retrieve the account ID
$id = $pdo->lastInsertId();
// Authenticate the new user
$_SESSION['account_loggedin'] = TRUE;
$_SESSION['account_id'] = $id;
$_SESSION['account_role'] = 'Guest';
// Update secret code
update_secret($pdo, $id, $_POST['email']);
// Output: success
exit('success');
Finally, the above code will create an account if one doesn't exist in the database. In addition, the user will be automatically authenticated.
The output responses will be used in our AJAX code to determine the authentication state.
Now, we can go back to our index file and implement the AJAX code for the login form.
Edit the index.html file and after:
// Place the JS code hereAdd:
// Variables we will use in our app
let currentChatTab = 1;
let conversationId = null;
let status = 'Idle';
The code above will declare the variables we're going to use in our script. The currentChatTab variable will update when the user navigates between the chat widget tabs, which we can subsequently leverage to update the active tab in real time. The converstaionId variable is the ID of the conversation and will update when the user engages in a new conversation. The status variable is the user's current status, which also updates when the user navigates between tabs.
Add after:
// OnClick event handler for our open chat button
document.querySelector('.open-chat-widget').onclick = event => {
    event.preventDefault();
    // Execute the initialize chat function
    initChat();
};
// Intialize chat function - handle all aspects of the chat widget
const initChat = () => {
    // Add init code here

};
The above code will add the OnClick event handler to the open chat widget button we declared earlier and will execute the initChat function when it's clicked.
The initChat function will consist of event handlers and AJAX code that will authenticate the user and fetch the conversations list.
After:
// Add init code hereAdd:
// Show the chat widget
document.querySelector('.chat-widget').style.display = 'flex';
// Animate the chat widget
document.querySelector('.chat-widget').getBoundingClientRect();
document.querySelector('.chat-widget').classList.add('open');
// Close button OnClick event handler
document.querySelector('.close-chat-widget-btn').onclick = event => {
    event.preventDefault();
    // Close the chat
    document.querySelector('.chat-widget').classList.remove('open');
};
// Login form submit event handler
document.querySelector('.chat-widget-login-tab form').onsubmit = event => {
    event.preventDefault();
    // Declare form related variables
    let formEle = document.querySelector('.chat-widget-login-tab form');
    let formData = new FormData(formEle);
    // Execute POST AJAX request and attempt to authenticate the user
    fetch(formEle.action, {
        cache: 'no-store',
        method: 'POST',
        body: formData
    }).then(response => response.text()).then(data => {
        // If the response includes the "operator" string
        if (data.includes('operator')) {
            // Show the password field
            document.querySelector('.chat-widget-login-tab .msg').insertAdjacentHTML('beforebegin', '<input type="password" name="password" placeholder="Your Password" required>');
        } else if (data.includes('success')) {
            // Authentication success! Execute AJAX request to retrieve the user's conversations

            document.querySelector('.chat-widget-login-tab .msg').innerHTML = 'Success!';

        } else {
            // Authentication failed! Show the error message on the form
            document.querySelector('.chat-widget-login-tab .msg').innerHTML = data;
        }
    });
};
Initially, we add code that will open the chat widget and subsequently add code that will initiate a new POST AJAX request when the user submits the login form. In the AJAX code, we retrieve the response in the callback and determine what should happen next.
In addition, if the user is an operator, the password field will be appended to the login form because operators are required to enter a password.
So now, if we navigate to the index page over localhost and click the open chat widget button in the bottom-right corner, we should see the following:
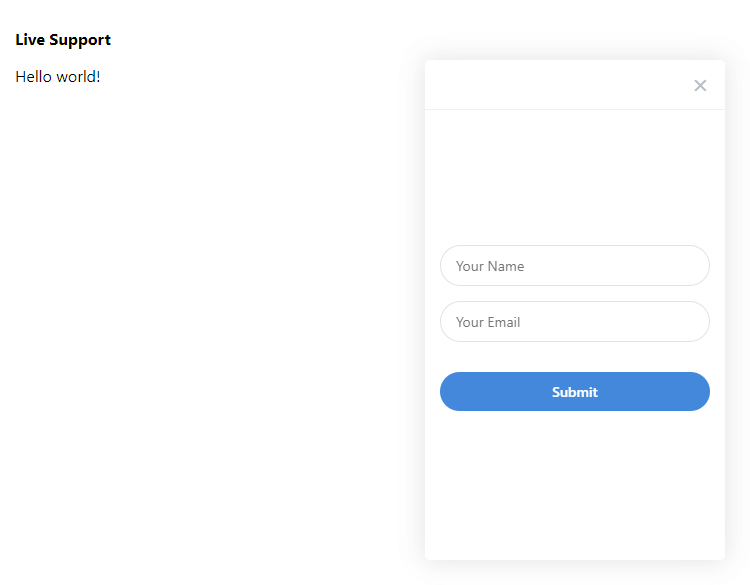
If we input both fields, we should encounter a successful response that will be displayed on the login form. If you receive no response, check the browser developer console for errors and ensure you haven't missed any of the code.
8. Populating Conversations
Now that we've implemented the authentication, we can implement AJAX code that will populate conversations retrieved from the database, which are associated with the account ID.
The conversations tab will enable the user to see all the conversations they've exchanged between the operator/guest. We'll populate the list based on the most recent message, so the conversation with the most recent message will always appear at the top.
Edit the conversations.php file and add:
// Include the main file
include 'main.php';
// Check if the user is logged-in
if (!is_loggedin($pdo)) {
    // User isn't logged-in
    exit('error');
}
// Update the account status to Idle
$stmt = $pdo->prepare('UPDATE accounts SET status = "Idle" WHERE id = ?');
$stmt->execute([ $_SESSION['account_id'] ]);
Like before, we need to make sure the user is authenticated before they can proceed. The user status is updated to Idle, which basically means the user isn't doing anything.
Add after:
// Retrieve all the conversations associated with the user along with the most recent message
$stmt = $pdo->prepare('SELECT c.*, (SELECT msg FROM messages WHERE conversation_id = c.id ORDER BY submit_date DESC LIMIT 1) AS msg, (SELECT submit_date FROM messages WHERE conversation_id = c.id ORDER BY submit_date DESC LIMIT 1) AS msg_date, a.full_name AS account_sender_full_name, a2.full_name AS account_receiver_full_name FROM conversations c JOIN accounts a ON a.id = c.account_sender_id JOIN accounts a2 ON a2.id = c.account_receiver_id WHERE c.account_sender_id = ? OR c.account_receiver_id = ? GROUP BY c.id');
$stmt->execute([ $_SESSION['account_id'], $_SESSION['account_id'] ]);
$conversations = $stmt->fetchAll(PDO::FETCH_ASSOC);
// Sort the conversations by the most recent message date
usort($conversations, function($a, $b) {
    $date_a = strtotime($a['msg_date'] ? $a['msg_date'] : $a['submit_date']);
    $date_b = strtotime($b['msg_date'] ? $b['msg_date'] : $b['submit_date']);
    return $date_b - $date_a;
});
// Conversations template below
?>
With the above code, we execute a query to retrieve all the conversations that are associated with the user's account ID. After, we leverage the usort function to sort the retrieved results by the most recent message date.
Add after:
<div class="chat-widget-conversations">
<a href="#" class="chat-widget-new-conversation" data-id="<?=$conversation['id']?>">+ New Chat</a>
<?php foreach ($conversations as $conversation): ?>
<a href="#" class="chat-widget-conversation" data-id="<?=$conversation['id']?>">
<div class="icon" <?='style="background-color: ' . color_from_string($conversation['account_sender_id'] != $_SESSION['account_id'] ? $conversation['account_sender_full_name'] : $conversation['account_receiver_full_name']) . '"'?>><?=substr($conversation['account_sender_id'] != $_SESSION['account_id'] ? $conversation['account_sender_full_name'] : $conversation['account_receiver_full_name'], 0, 1)?></div>
<div class="details">
<div class="title"><?=htmlspecialchars($conversation['account_sender_id'] != $_SESSION['account_id'] ? $conversation['account_sender_full_name'] : $conversation['account_receiver_full_name'], ENT_QUOTES)?></div>
<div class="msg"><?=htmlspecialchars($conversation['msg'], ENT_QUOTES)?></div>
</div>
<?php if ($conversation['msg_date']): ?>
<div class="date"><?=date('Y/m/d') == date('Y/m/d', strtotime($conversation['msg_date'])) ? date('H:i', strtotime($conversation['msg_date'])) : date('d/m/y', strtotime($conversation['msg_date']))?></div>
<?php else: ?>
<div class="date"><?=date('Y/m/d') == date('Y/m/d', strtotime($conversation['submit_date'])) ? date('H:i', strtotime($conversation['submit_date'])) : date('d/m/y', strtotime($conversation['submit_date']))?></div>
<?php endif; ?>
</a>
<?php endforeach; ?>
</div>The above code is the template for our conversations list. We use a foreach function to iterate the results and output them accordingly.
PHP TipThe htmlspecialchars() function will escape HTML entities and therefore prevent XSS attacks.
Now, we need to return to our index page and implement the AJAX code to retrieve the conversations from the above file.
Edit the index.html file and add the following function to the JS script:
// Select chat tab - it will be used to smoothly transition between tabs
const selectChatTab = value => {
    // Update the current tab variable
    currentChatTab = value;
    // Select all tab elements and add the CSS3 property transform
    document.querySelectorAll('.chat-widget-tab').forEach(element => element.style.transform = `translateX(-${(value-1)*100}%)`);
    // If the user is on the first tab, hide the prev tab button element
    document.querySelector('.previous-chat-tab-btn').style.display = value > 1 ? 'block' : 'none';
    // Update the conversation ID variable if the user is on the first or second tab
    if (value == 1 || value == 2) {
        conversationId = null;
    }
    // If the user is on the login form tab (tab 1), remove the secret code cookie (logout)
    if (value == 1) {
        document.cookie = 'chat_secret=;expires=Thu, 01 Jan 1970 00:00:01 GMT;';
    }
};
The above function will select the specified chat widget tab and update the global variables we declared earlier on. If the user is on the login form tab, we add code that will remove the authenticated cookie, which is the chat_secret cookie we declared in the update_secret PHP function.
The next function we need to add to the JS script is the conversationHandler function, which will add the event handlers to the conversations.
Add below the above function:
// Conversation handler function - will add the event handlers to the conversations list and new chat button
const conversationHandler = () => {
    // New chat button OnClick event handler
    document.querySelector('.chat-widget-new-conversation').onclick = event => {
        event.preventDefault();
        // Update the status
        status = 'Waiting';
        // Notify the user
        document.querySelector('.chat-widget-conversation-tab').innerHTML = `
        <div class="chat-widget-messages">
            <div class="chat-widget-message">Please wait...</div>
        </div>
        `;
        // Transition to the conversation tab (tab 3)
        selectChatTab(3);
    };
    // Iterate the conversations and add the OnClick event handler to each element
    document.querySelectorAll('.chat-widget-conversation').forEach(element => {
        element.onclick = event => {
            event.preventDefault();
            // Get the conversation
            // Execute the getConversation function here
        };
    });
};
And now we can go back to the code that handles the login responses and replace the following line:
document.querySelector('.chat-widget-login-tab .msg').innerHTML = 'Success!';With:
fetch('conversations.php', { cache: 'no-store' }).then(response => response.text()).then(data => {
    // Update the status
    status = 'Idle';
    // Update the conversations tab content
    document.querySelector('.chat-widget-conversations-tab').innerHTML = data;
    // Execute the conversation handler function
    conversationHandler();
    // Transition to the conversations tab
    selectChatTab(2);
});
So now, when the user successfully logs in, they're transitioned to the conversations tab, which will populate all the conversations the user is associated with.
But wait! What if the user reloads the page? Will they need to be re-authenticated? Right now, yes, but if we add the following code to the initChat function:
// If the secret code cookie exists, attempt to automatically authenticate the user
if (document.cookie.match(/^(.*;)?\s*chat_secret\s*=\s*[^;]+(.*)?$/)) {
    // Execute GET AJAX request to retireve the conversations
    fetch('conversations.php', { cache: 'no-store' }).then(response => response.text()).then(data => {
        // If respone not equals error
        if (data != 'error') {
            // User is authenticated! Update the status and conversations tab content
            status = 'Idle';
            document.querySelector('.chat-widget-conversations-tab').innerHTML = data;
            // Execute the conversation handler function
            conversationHandler();
            // Transition to the conversations tab
            selectChatTab(2);
        }
    });
}
They will be automatically authenticated and transitioned to the conversations tab, but only if the user is logged in. We have implemented the Regex code to determine whether the secret authentication code exists or not. If it exists, execute the AJAX request.
To navigate back to a previous tab, we can leverage the selectChatTab we implemented. Add the following code to the initChat function:
// Previous tab button OnClick event handler
document.querySelector('.previous-chat-tab-btn').onclick = event => {
    event.preventDefault();
    // Transition to the respective page
    selectChatTab(currentChatTab-1);
};
When the user clicks the previous button in the chat widget header, they're transitioned to the login form tab.
If we log in to the chat widget using the operator credentials we included in the SQL statement (email: operator@example.com, password: operator), we should see the following:
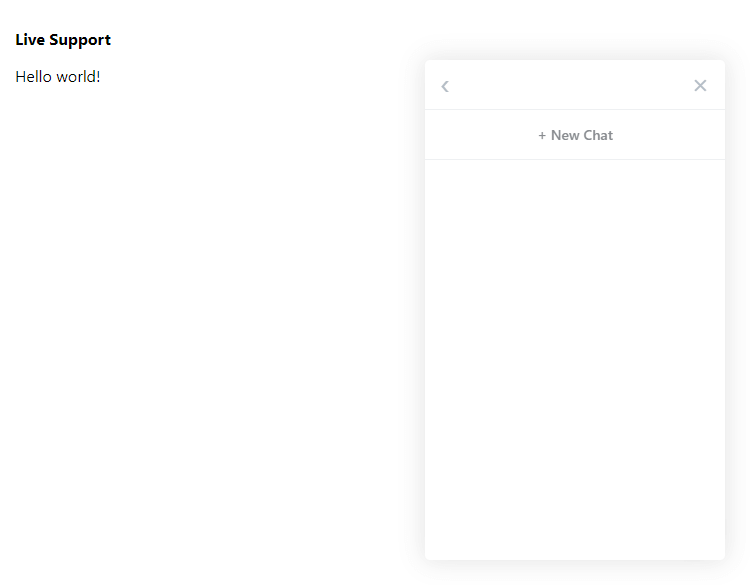
We have yet to initiate a conversation with a guest and therefore no conversations will appear in the tab. We'll do that in the next section when we implement the conversation code.
9. Conversation Handling
In this section, we'll implement code that will populate all the messages between the receiver and sender and include the form that will enable the user to send messages. In addition, we'll add validation to ensure the user belongs to the correct conversation — we wouldn't want the user to hijack a conversation.
9.1. Retrieve Conversation and Implement Validation
Edit the conversation.php file and add:
<?php
// Include the main file
include 'main.php';
// Check if the user is logged-in
if (!is_loggedin($pdo)) {
    // User isn't logged-in
    exit('error');
}
// Ensure the GET ID param exists
if (!isset($_GET['id'])) {
    exit('error');
}
// Update the account status to Occupied
$stmt = $pdo->prepare('UPDATE accounts SET status = "Occupied" WHERE id = ?');
$stmt->execute([ $_SESSION['account_id'] ]);
// Retrieve the conversation based on the GET ID param and account ID
$stmt = $pdo->prepare('SELECT c.*, m.msg, a.full_name AS account_sender_full_name, a2.full_name AS account_receiver_full_name FROM conversations c JOIN accounts a ON a.id = c.account_sender_id JOIN accounts a2 ON a2.id = c.account_receiver_id LEFT JOIN messages m ON m.conversation_id = c.id WHERE c.id = ? AND (c.account_sender_id = ? OR c.account_receiver_id = ?)');
$stmt->execute([ $_GET['id'], $_SESSION['account_id'], $_SESSION['account_id'] ]);
$conversation = $stmt->fetch(PDO::FETCH_ASSOC);
// If the conversation doesn't exist
if (!$conversation) {
    exit('error');
}
In the above code, we ensure the user is logged in, and the GET ID parameter exists because without the ID parameter, how will we know which conversation to retrieve from the database?
Subsequently, the conversation is retrieved from the database based on the ID parameter and the session account ID. The session account ID will ensure the conversation belongs to that user. If the conversation doesn't exist, end the script and output an error.
9.2. Populating Messages
To populate the messages accordingly, we need to retrieve them from the database based on the GET ID param and use a foreach loop to sort the messages by the submission date.
Add the following to the conversation.php file:
// Retrieve all messages based on the conversation ID
$stmt = $pdo->prepare('SELECT * FROM messages WHERE conversation_id = ? ORDER BY submit_date ASC');
$stmt->execute([ $_GET['id'] ]);
$results = $stmt->fetchAll(PDO::FETCH_ASSOC);
// Group all messages by the submit date
$messages = [];
foreach ($results as $result) {
    $messages[date('y/m/d', strtotime($result['submit_date']))][] = $result;
}
// Conversation template below
?>
Finally, we can add the template that will populate the messages:
<div class="chat-widget-messages">
    <p class="date">You're now chatting with <?=htmlspecialchars($_SESSION['account_id']==$conversation['account_sender_id']?$conversation['account_receiver_full_name']:$conversation['account_sender_full_name'], ENT_QUOTES)?>!</p>
    <?php foreach ($messages as $date => $array): ?>
    <p class="date"><?=$date==date('y/m/d')?'Today':$date?></p>
    <?php foreach ($array as $message): ?>
    <div class="chat-widget-message<?=$_SESSION['account_id']==$message['account_id']?'':' alt'?>" title="<?=date('H:i\p\m', strtotime($message['submit_date']))?>"><?=htmlspecialchars($message['msg'], ENT_QUOTES)?></div>
    <?php endforeach; ?>
    <?php endforeach; ?>
</div>
<form action="post_message.php" method="post" class="chat-widget-input-message" autocomplete="off">
    <input type="text" name="msg" placeholder="Message">
    <input type="hidden" name="id" value="<?=$conversation['id']?>">
</form>
In the above code, we iterate the messages and output them accordingly, along with the date that will appear above the grouped messages. In addition, we have included the input message that will submit messages to the post_message.php file, which we will create later on.
9.3. Capturing Messages
Capturing messages will enable us to submit messages and store them in our MySQL database.
Edit the post_message.php file and add:
<?php
// Include the main file
include 'main.php';
// Check if the user is logged-in
if (!is_loggedin($pdo)) {
    // User isn't logged-in
    exit('error');
}
// Ensure the GET ID and msg params exists
if (!isset($_POST['id'], $_POST['msg'])) {
    exit('error');
}
// Make sure the user is associated with the conversation
$stmt = $pdo->prepare('SELECT id FROM conversations WHERE id = ? AND (account_sender_id = ? OR account_receiver_id = ?)');
$stmt->execute([ $_POST['id'], $_SESSION['account_id'], $_SESSION['account_id'] ]);
$conversation = $stmt->fetch(PDO::FETCH_ASSOC);
if (!$conversation) {
    // The user isn't not associated with the conversation, output error
    exit('error');
}
In the above code, we add validation to ensure the user is associated with the conversation they're submitting the message. Like before, we're leveraging the isset() function to ensure the GET request data exists.
Add after:
// Insert the new message into the database
$stmt = $pdo->prepare('INSERT INTO messages (conversation_id,account_id,msg,submit_date) VALUES (?,?,?,?)');
$stmt->execute([ $_POST['id'], $_SESSION['account_id'], $_POST['msg'], date('Y-m-d H:i:s') ]);
// Output success
exit('success');
?>
Finally, if the user manages to get past the validation, the message will be inserted into the database.
9.4. Connecting Users
Now, this is where it can get sophisticated because we need to implement code that connects two users, one being the guest and the other being an operator. In this case, we can leverage the last_seen and status columns to determine if the user is eligible.
Edit the find_conversation.php file and add:
<?php
// Include the main file
include 'main.php';
// Check if the user is logged-in
if (!is_loggedin($pdo)) {
    // User isn't logged-in
    exit('error');
}
// Update the account status to Waiting
$stmt = $pdo->prepare('UPDATE accounts SET status = "Waiting" WHERE id = ?');
$stmt->execute([ $_SESSION['account_id'] ]);
// Check if the conversation was already created
$stmt = $pdo->prepare('SELECT * FROM conversations WHERE (account_sender_id = ? OR account_receiver_id = ?) AND submit_date > date_sub(?, interval 1 minute)');
$stmt->execute([ $_SESSION['account_id'], $_SESSION['account_id'], date('Y-m-d H:i:s') ]);
$conversation = $stmt->fetch(PDO::FETCH_ASSOC);
// If the conversation exists, output the ID
if ($conversation) {
    exit($conversation['id']);
}
First, we update the status to Waiting as it will be a key factor in finding a connection. After, we check whether a conversation was already created within the last minute and, if so, output the conversation ID, which will later be used to connect the user with a guest/operator.
Add after:
// If the user is an Operator, find guest accounts that have their status set to Waiting
if ($_SESSION['account_role'] == 'Operator') {
    $stmt = $pdo->prepare('SELECT * FROM accounts WHERE role != "Operator" AND status = "Waiting" AND last_seen > date_sub(?, interval 1 minute)');
// If the user is an Guest, find operator accounts that have their status set to Waiting
} else {
    $stmt = $pdo->prepare('SELECT * FROM accounts WHERE role = "Operator" AND status = "Waiting" AND last_seen > date_sub(?, interval 1 minute)');
}
// Make sure to retrieve all accounts active in the last minute
$stmt->execute([ date('Y-m-d H:i:s') ]);
$account = $stmt->fetch(PDO::FETCH_ASSOC);
The above query will be the most important factor in finding a new connection and therefore we need to set important conditions. We only want to find users online within the last minute and have their status set to Waiting. Also, the above code will only connect users with the role of Guest with Operators and vice-versa.
Add after:
// If account exists
if ($account) {
    // Check if conversation exists between user1 and user2
    $stmt = $pdo->prepare('SELECT * FROM conversations WHERE (account_sender_id = ? OR account_receiver_id = ?) AND (account_sender_id = ? OR account_receiver_id = ?)');
    $stmt->execute([ $_SESSION['account_id'], $_SESSION['account_id'], $account['id'], $account['id'] ]);
    // Conversation doesn't exist, so create one
    if (!$stmt->fetch(PDO::FETCH_ASSOC)) {
        // Insert the new conversation
        $stmt = $pdo->prepare('INSERT INTO conversations (account_sender_id,account_receiver_id,submit_date) VALUES (?,?,?)');
        $stmt->execute([ $_SESSION['account_id'], $account['id'], date('Y-m-d H:i:s')]);
        // Output conversation ID
        echo $pdo->lastInsertId();
        exit;
    }
}
exit('error');
?>
The final step to connecting users is to check whether a conversation already exists between the users. If the conversation doesn't exist, create one and output the conversation ID.
9.5. Implementing the JS Code
In this part, we're going to implement AJAX code to handle each file accordingly, so we'll need to go back to our index file.
Edit the index.html file and add the following function to the JS script:
// Get conversation function - execute an AJAX request that will retrieve the conversation based on the conversation ID column
const getConversation = id => {
    // Execute GET AJAX request
    fetch(`conversation.php?id=${id}`, { cache: 'no-store' }).then(response => response.text()).then(data => {
        // Update conversation ID variable
        conversationId = id;
        // Update the status
        status = 'Occupied';
        // Update the converstaion tab content
        document.querySelector('.chat-widget-conversation-tab').innerHTML = data;
        // Transition to the conversation tab (tab 3)
        selectChatTab(3);
        // Retrieve the input message form element
        let chatWidgetInputMsg = document.querySelector('.chat-widget-input-message');
        // If the element exists
        if (chatWidgetInputMsg) {
            // Scroll to the bottom of the messages container
            if (document.querySelector('.chat-widget-messages').lastElementChild) {
                document.querySelector('.chat-widget-messages').scrollTop = document.querySelector('.chat-widget-messages').lastElementChild.offsetTop;
            }
            // Message submit event handler
            chatWidgetInputMsg.onsubmit = event => {
                event.preventDefault();
                // Execute POST AJAX request that will send the captured message to the server and insert it into the database
                fetch(chatWidgetInputMsg.action, {
                    cache: 'no-store',
                    method: 'POST',
                    body: new FormData(chatWidgetInputMsg)
                });
                // Create the new message element
                let chatWidgetMsg = document.createElement('div');
                chatWidgetMsg.classList.add('chat-widget-message');
                chatWidgetMsg.textContent = chatWidgetInputMsg.querySelector('input').value;
                // Add it to the messages container, right at the bottom
                document.querySelector('.chat-widget-messages').insertAdjacentElement('beforeend', chatWidgetMsg);
                // Reset the message element
                chatWidgetInputMsg.querySelector('input').value = '';
                // Scroll to the bottom of the messages container
                document.querySelector('.chat-widget-messages').scrollTop = chatWidgetMsg.offsetTop;
            };
        }
    });
};
With the above function, we now have the ability to retrieve a conversation along with its messages based on the ID of the conversation. Furthermore, we have included the AJAX code that will submit a message and append it to the conversation.
When the user submits a message, the input element will reset, and the scrollbar will always start from the bottom.
And now we can replace the following line in the conversationHandler function:
// Execute the getConversation function hereWith:
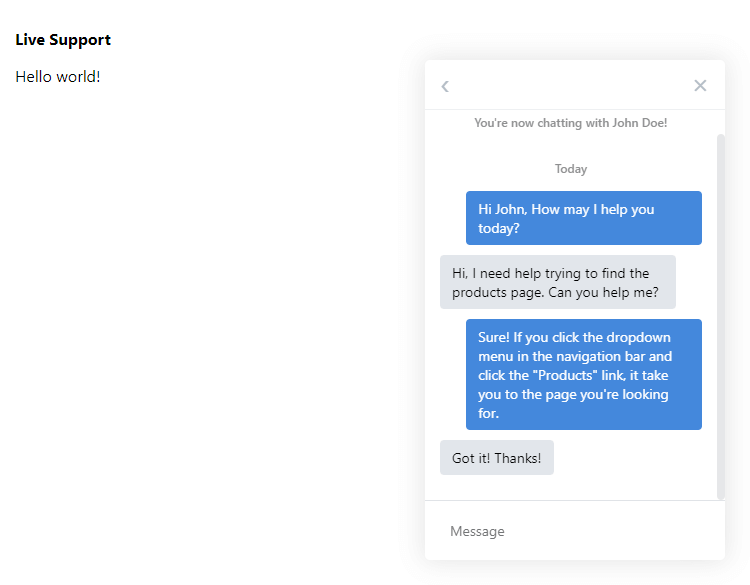
getConversation(element.dataset.id);When navigating to the conversation tab (assuming you're connected with someone), it will look similar to the following:
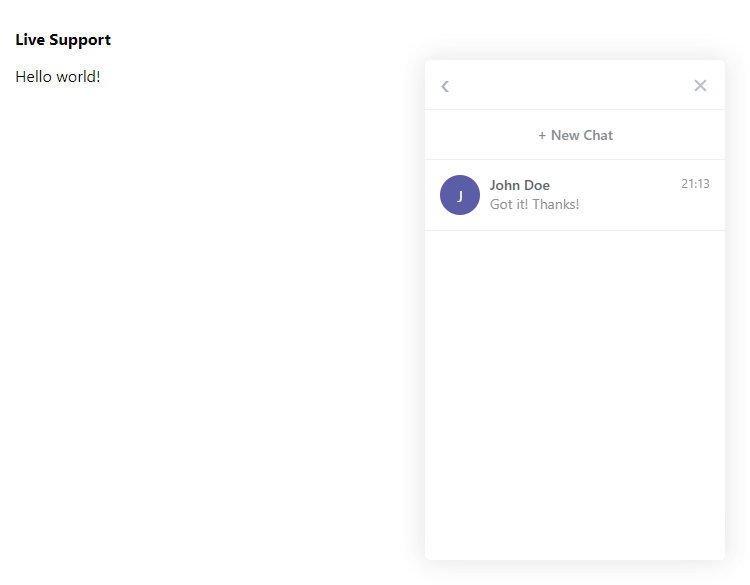
In the conversations tab, it will appear as the following:
You're probably thinking — that's great, David! But how do we update the chat widget in real time? I will show you exactly how in the next section.
10. Real-time Communication
Finally (and thank goodness!), we are going to implement code that will execute AJAX requests at a particular interval. What we set the interval to depends entirely on how much bandwidth we're willing to allocate to the chat widget. We can execute AJAX requests at 100 milliseconds, but if our server cannot handle the requests, it will slow down dramatically, so always be cautious and experiment.
Edit the index.html file and add the following to the JS script:
// Update the conversations and messages in real-time
setInterval(() => {
    // If the current tab is 2
    if (currentChatTab == 2) {
        // Use AJAX to update the conversations list
        fetch('conversations.php', { cache: 'no-store' }).then(response => response.text()).then(html => {
            let doc = (new DOMParser()).parseFromString(html, 'text/html');
            document.querySelector('.chat-widget-conversations').innerHTML = doc.querySelector('.chat-widget-conversations').innerHTML;
            conversationHandler();
        });
    // If the current tab is 3 and the conversation ID variable is not NUll
    } else if (currentChatTab == 3 && conversationId != null) {
        // Use AJAX to update the conversation
        fetch('conversation.php?id=' + conversationId, { cache: 'no-store' }).then(response => response.text()).then(html => {
            // The following variable will prevent the messages container from automatically scrolling to the bottom if the user previously scrolled up in the chat list
            let canScroll = true;
            if (document.querySelector('.chat-widget-messages').lastElementChild && document.querySelector('.chat-widget-messages').scrollHeight - document.querySelector('.chat-widget-messages').scrollTop != document.querySelector('.chat-widget-messages').clientHeight) {
                canScroll = false;
            }
            let doc = (new DOMParser()).parseFromString(html, 'text/html');
            // Update content
            document.querySelector('.chat-widget-messages').innerHTML = doc.querySelector('.chat-widget-messages').innerHTML;
            if (canScroll && document.querySelector('.chat-widget-messages').lastElementChild) {
                // Scroll to the bottom of the container
                document.querySelector('.chat-widget-messages').scrollTop = document.querySelector('.chat-widget-messages').lastElementChild.offsetTop;
            }
        });
    // If the current tab is 3 and the status is Waiting
    } else if (currentChatTab == 3 && status == 'Waiting') {
        // Attempt to find a new conversation between the user and operator (or vice-versa)
        fetch('find_conversation.php', { cache: 'no-store' }).then(response => response.text()).then(data => {
            if (data != 'error') {
                // Success! Two users are now connected! Retrieve the new conversation
                getConversation(data);
            }
        });
    }
}, 5000); // 5 seconds (5000ms) - the lower the number, the more demanding it is on your server.
We're taking advantage of the setInterval function to execute the AJAX requests and update the chat widget content. The callback function bound to setInterval will execute every 5 seconds — feel free to lower the number, but please experiment before doing so.
Which content we update depends on the current chat tab, so if the user is on tab 2 (conversations list), it's unnecessary to update the content on tab three and will save us a lot of bandwidth.
The setInterval approach is much slower than WebSockets, which are used in traditional messaging applications, but it doesn't require any dependencies and will work on any website with PHP and MySQL support out-of-the-box, so it's much more convenient.
Conclusion
If you've made it to the end, congratulations! There are many fundamentals involved when developing a chat application, and therefore, it is imperative to understand all aspects outlined in the tutorial. Fortunately, we've implemented conventional methods to tackle the major security concerns in modern web apps (prepared statements, XSS prevention, etc.).
If you've enjoyed reading the article, hit the share buttons below and help our website strive for success! The more exposure we receive, the more quality content we can release.
Thanks for reading, and have fun coding! :-)
If you would like to support us, consider the advanced live support chat system below. It will greatly help us create more tutorials and keep our website up and running. The advanced package includes improved code and more features.