 Download the full source codeComplete working project · Setup guide included · Free for commercial use
Free ZIP
Download the full source codeComplete working project · Setup guide included · Free for commercial use
Free ZIP
People are prioritizing social logins to authenticate their users, which has become fundamental on modern websites — targeting a larger audience can only be achieved by providing more login options to your users and therefore it's imperative for long-term growth.
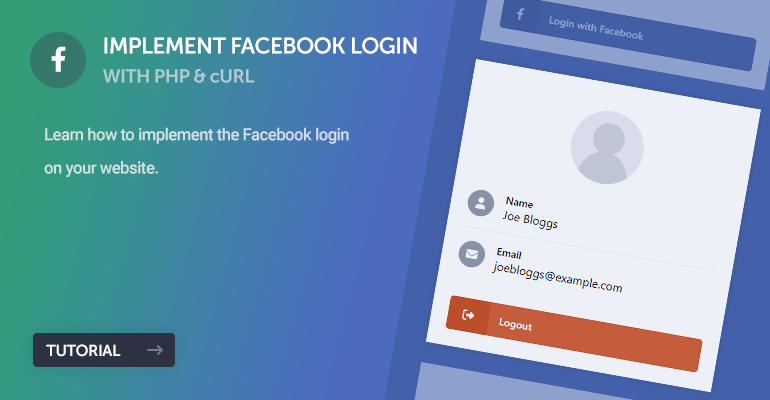
In this tutorial, I'll teach you how to implement the Facebook login on your website with PHP and cURL without the need for cumbersome libraries such as the Facebook SDK, but I'll provide it as an alternative solution if you want to be coherent with the Facebook principles.
We can utilize the Facebook OAuth API to connect the users with the website and/or app.
Why should I implement the Facebook login on my website?
Over the last few decades, Facebook has become increasingly popular among the World Wide Web and shares a big percentage of all web users. Therefore, implementing the Facebook login on your website and/or app can open doors to a large group of users, especially if they're reluctant to use other forms of login.
Contents
1. Prerequisites
Let's get started with creating the Facebook app that's required to access the Facebook API interface. In addition, we'll need to retrieve the app keys that we can assign to our API requests later on.
1.1. Create a Facebook App
To create a Facebook app, follow these steps to set up a new app in the Facebook Developer portal.
-
Head over to the Facebook Developers Apps page.
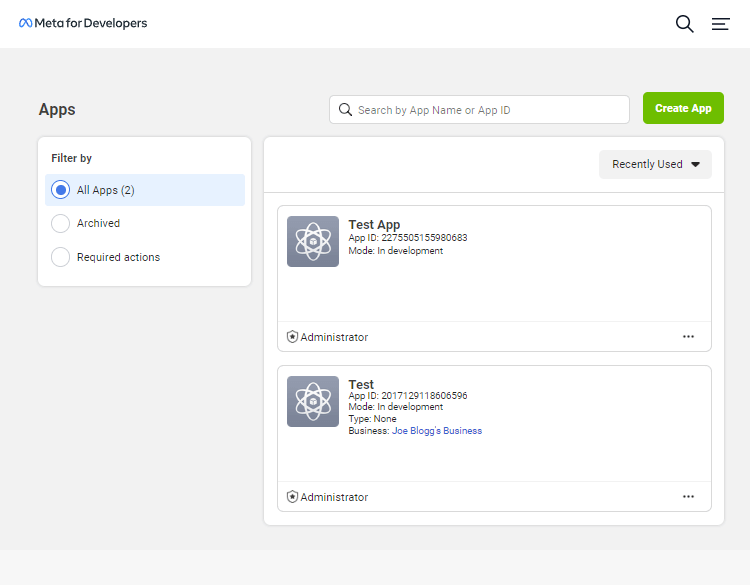
- Select the Create App button in the top-right corner.
-
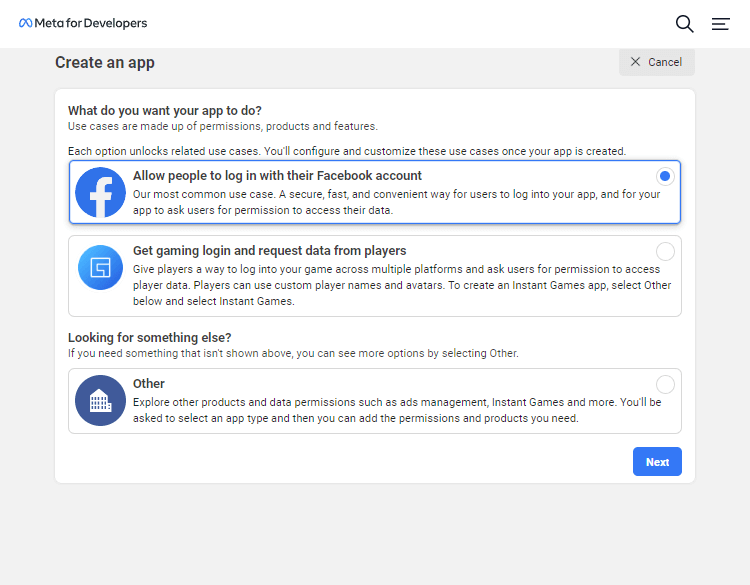
Under the Create an app section, select the Allow people to log in with their Facebook account option.
- Enter the app details on the subsequent page.
- Select the Create app button.
-
Once the app has been created, you'll be redirected to the app dashboard.
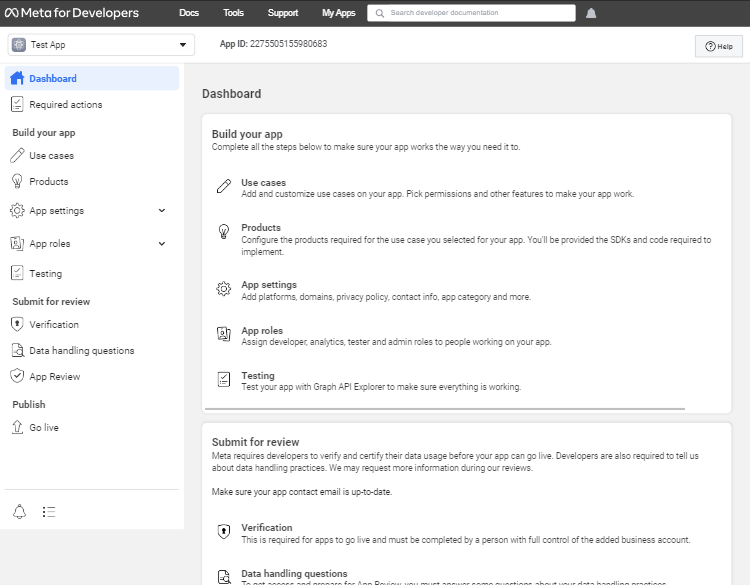
- Select Use cases in the navigation menu.
-
Next to Authentication and account creation section, select Edit.
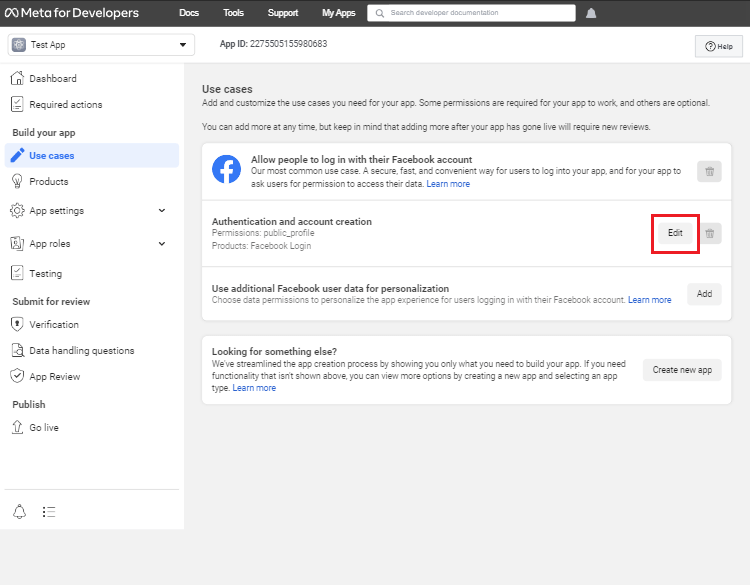
- From here, we can change the use case permissions.
-
Next to the email permission, select Add.

- Once you're ready for production, you can submit your app for review, but for now, we can test it using the Facebook account we're logged in with.
That's essentially all we need to do for the Facebook app creation. Once your app has been approved, you can add more permissions such as gender, user link, and other personal details.
1.2. Retrieve the App ID and App Secret
The Facebook app ID and app secret are absolutely vital to connect our app to the API endpoints — when we execute a request to one of the endpoints using PHP and cURL, we have to specify a valid app ID and secret, otherwise we would encounter the Facebook error page.
- While on the Facebook App dashboard, select App settings » Basic.
-
Take note of the App ID and App Secret input fields.
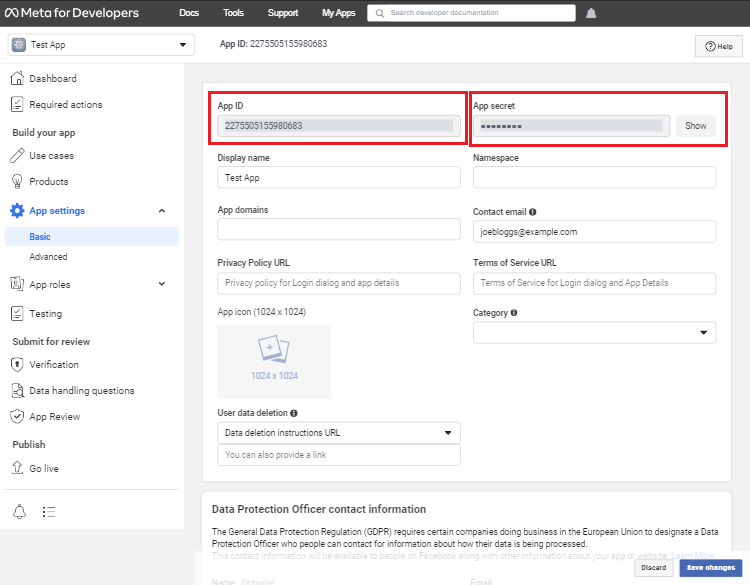
- These values will be required later on. We strongly advise you not to share your secret key.
Once we implement the OAuth code, we can utilize the keys to form a connection with the Facebook API endpoints.
1.3. Install a Web Development Server (optional)
A web server is required to execute the PHP scripts and connect our login page with the Facebook APIs.
If you already have a web development server installed, you can skip this section. If not, follow the below instructions.
- Navigate to the XAMPP website.
- Select the Download button next to the operating system of your choosing.
- Once downloaded and installed, open the XAMPP Control Panel.
- Next to the Apache module, select Start.
- Next to the MySQL module, select Start.
- If successful, both modules will be highlighted in green.
1.4. File Structure
The following is the file structure for our PHP Facebook login project.
\-- facebook-login
|-- style.css
|-- login.php
|-- logout.php
|-- profile.php
|-- facebook-oauth.php
If you're using the XAMPP web server, you can create the directory (along with the files) in the htdocs directory, which is located in your XAMPP installation directory.
2. Stylesheet (CSS3)
Before we delve into developing the login page with PHP, we should implement the CSS code to structure our app and make it look elegant.
Edit the style.css file and add the following:
* {
  box-sizing: border-box;
  font-family: system-ui, "Segoe UI", Roboto, Helvetica, Arial, sans-serif, "Apple Color Emoji", "Segoe UI Emoji", "Segoe UI Symbol";
  font-size: 16px;
}
body {
  background-color: #4a67a7;
  margin: 0;
}
.content {
  max-width: 400px;
  width: 100%;
  margin: 50px auto 15px auto;
  border-radius: 5px;
  background-color: #fff;
  box-shadow: 0 0 15px rgba(0, 0, 0, 0.15);
  padding: 25px;
}
.content h1 {
  text-align: center;
  font-size: 24px;
  font-weight: 500;
  margin: 0 0 15px 0;
  color: #3b4252;
}
.content h1 .icon {
  display: inline-flex;
  align-items: center;
  justify-content: center;
  width: 28px;
  height: 28px;
  border-radius: 50%;
  background-color: #9196a5;
  margin-left: 5px;
  font-size: 14px;
}
.content h1 .icon svg {
  fill: #fff;
}
.content .login-txt {
  margin: 0;
  padding: 15px 0 25px 0;
  color: #3b4252;
}
.content .facebook-login-btn {
  display: flex;
  align-items: center;
  text-decoration: none;
  font-size: 14px;
  font-weight: 500;
  color: #fff;
  width: 100%;
  overflow: hidden;
  border-radius: 5px;
  background-color: #3b5998;
  cursor: pointer;
}
.content .facebook-login-btn .icon {
  display: inline-flex;
  height: 100%;
  padding: 15px 20px;
  align-items: center;
  justify-content: center;
  background-color: #344e86;
  margin-right: 15px;
}
.content .facebook-login-btn .icon svg {
  fill: #fff;
}
.content .facebook-login-btn:hover {
  background-color: #385591;
}
.content .facebook-login-btn:hover .icon {
  background-color: #314a7e;
}
.content .profile-picture {
  display: flex;
  align-items: center;
  justify-content: center;
  margin: 15px 0 25px 0;
}
.content .profile-picture img {
  width: 100%;
  max-width: 100px;
  border-radius: 50%;
}
.content .profile-details {
  display: flex;
  flex-flow: column;
  padding: 10px 0;
}
.content .profile-details > div {
  display: flex;
  align-items: center;
  border-bottom: 1px solid #f1f2f5;
  margin-bottom: 15px;
  padding-bottom: 15px;
}
.content .profile-details > div .icon {
  display: inline-flex;
  align-items: center;
  justify-content: center;
  width: 36px;
  height: 36px;
  border-radius: 50%;
  background-color: #9196a5;
  margin-right: 15px;
  font-size: 14px;
}
.content .profile-details > div .icon svg {
  fill: #fff;
}
.content .profile-details > div strong {
  display: block;
  font-size: 14px;
  font-weight: 500;
}
.content .profile-details > div:last-child {
  border-bottom: none;
}
.content .logout-btn {
  display: flex;
  align-items: center;
  text-decoration: none;
  font-size: 14px;
  font-weight: 500;
  color: #fff;
  width: 100%;
  overflow: hidden;
  border-radius: 5px;
  background-color: #db5d36;
  cursor: pointer;
}
.content .logout-btn .icon {
  display: inline-flex;
  height: 100%;
  padding: 15px 20px;
  align-items: center;
  justify-content: center;
  background-color: #d24e26;
  margin-right: 15px;
}
.content .logout-btn .icon svg {
  fill: #fff;
}
.content .logout-btn:hover {
  background-color: #d9562d;
}
.content .logout-btn:hover .icon {
  background-color: #c94b24;
}
So now, we can focus less on the design aspect of our project and more on the server-side programming.
3. Create the Login Page with HTML
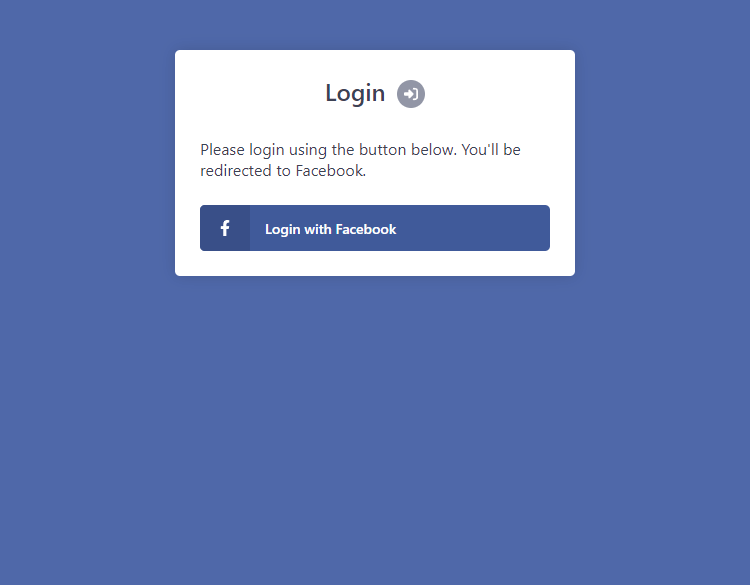
The login page will consist of a button that'll basically redirect the user to the Facebook OAuth page. We can consider it as the gateway to our other pages (profile page, etc.).
Edit the login.php file and add the following:
<!DOCTYPE html>
<html>
	<head>
		<meta charset="utf-8">
		<meta name="viewport" content="width=device-width,minimum-scale=1">
		<title>Login with Facebook</title>
		<link href="style.css" rel="stylesheet" type="text/css">
	</head>
	<body>

		<div class="content home">

			<h1>
                Login
                <span class="icon">
                    <svg xmlns="http://www.w3.org/2000/svg" height="0.875em" viewBox="0 0 512 512"><!--! Font Awesome Free 6.4.2 by @fontawesome - https://fontawesome.com License - https://fontawesome.com/license (Commercial License) Copyright 2023 Fonticons, Inc. --><path d="M217.9 105.9L340.7 228.7c7.2 7.2 11.3 17.1 11.3 27.3s-4.1 20.1-11.3 27.3L217.9 406.1c-6.4 6.4-15 9.9-24 9.9c-18.7 0-33.9-15.2-33.9-33.9l0-62.1L32 320c-17.7 0-32-14.3-32-32l0-64c0-17.7 14.3-32 32-32l128 0 0-62.1c0-18.7 15.2-33.9 33.9-33.9c9 0 17.6 3.6 24 9.9zM352 416l64 0c17.7 0 32-14.3 32-32l0-256c0-17.7-14.3-32-32-32l-64 0c-17.7 0-32-14.3-32-32s14.3-32 32-32l64 0c53 0 96 43 96 96l0 256c0 53-43 96-96 96l-64 0c-17.7 0-32-14.3-32-32s14.3-32 32-32z"/></svg>
                </span>
            </h1>

            <p class="login-txt">Please login using the button below. You'll be redirected to Facebook.</p>

            <a href="facebook-oauth.php" class="facebook-login-btn">
                <span class="icon">
                    <svg xmlns="http://www.w3.org/2000/svg" height="1em" viewBox="0 0 320 512"><!--! Font Awesome Free 6.4.2 by @fontawesome - https://fontawesome.com License - https://fontawesome.com/license (Commercial License) Copyright 2023 Fonticons, Inc. --><path d="M279.14 288l14.22-92.66h-88.91v-60.13c0-25.35 12.42-50.06 52.24-50.06h40.42V6.26S260.43 0 225.36 0c-73.22 0-121.08 44.38-121.08 124.72v70.62H22.89V288h81.39v224h100.17V288z"/></svg>
                </span>
                Login with Facebook
            </a>

		</div>

	</body>
</html>
The button href value reflects the URL to our Facebook OAuth file, which we will develop in the next section. The PHP extension is not required for the login page because it doesn't actually contain any PHP code, but to be coherent with our other pages, it will suffice.
If we navigate to the file over localhost, it will resemble the following:
That's essentially all we need for the login page. We can move on to implementing the Facebook API endpoints with our project.
4. Implement the Facebook API with PHP and cURL
The Facebook OAuth page will leverage cURL to process requests to various Facebook API endpoints, meaning if we want to retrieve additional user details, we must implement a request to the Facebook Graph API endpoint.
But before we do that, let's declare some variables in our facebook-oauth.php file:
<?php
// Initialize the session
session_start();
// Update the following variables
$facebook_oauth_app_id = 'YOUR_FACEBOOK_APP_ID';
$facebook_oauth_app_secret = 'YOUR_FACEBOOK_APP_SECRET';
// Must be the direct URL to the facebook-oauth.php file
$facebook_oauth_redirect_uri = 'YOUR_REDIRECT_URI';
$facebook_oauth_version = 'v18.0';
First and foremost, we declare the PHP opening tag and initialize the session with the session_start function — it will be a fundamental part of our script as it will store all the user details that are retrieved from the API endpoints.
Don't forget to update the variables to reflect your Facebook App details, which I outlined how to retrieve earlier. If one or more values are invalid, you'll encounter the Facebook error page.
Add after the above code:
// If the captured code param exists and is valid
if (isset($_GET['code']) && !empty($_GET['code'])) {
    // Execute cURL request to retrieve the access token

} else {
    // Define params and redirect to Facebook OAuth page
    $params = [
        'client_id' => $facebook_oauth_app_id,
        'redirect_uri' => $facebook_oauth_redirect_uri,
        'response_type' => 'code',
        'scope' => 'email'
    ];
    header('Location: https://www.facebook.com/dialog/oauth?' . http_build_query($params));
    exit;
}
To execute requests to the API endpoints, we initially require an access code from the Facebook consent page, so to do that, we can bind a number of parameters (client ID, redirect URI, response type, and scope) to the Facebook OAuth URL, which will subsequently open the consent dialog where the user will need to approve the app.
Because we're handling both the initial phase of Facebook OAuth and API endpoints, we've included a GET request parameter named code, which will be the access code for the endpoints (but only if the user approved the app).
After:
// Execute cURL request to retrieve the access tokenAdd the following:
$params = [
    'client_id' => $facebook_oauth_app_id,
    'client_secret' => $facebook_oauth_app_secret,
    'redirect_uri' => $facebook_oauth_redirect_uri,
    'code' => $_GET['code']
];
$ch = curl_init();
curl_setopt($ch, CURLOPT_URL, 'https://graph.facebook.com/oauth/access_token');
curl_setopt($ch, CURLOPT_POST, true);
curl_setopt($ch, CURLOPT_POSTFIELDS, http_build_query($params));
curl_setopt($ch, CURLOPT_RETURNTRANSFER, true);
$response = curl_exec($ch);
curl_close($ch);
$response = json_decode($response, true);
Now, we're utilizing cURL to retrieve the access token from the Facebook Graph API endpoint, and as we can see, we're binding those variables we declared earlier to the request. Like most API requests, the response will usually be in JSON format.
Although very unlikely, if somehow the code doesn't execute, ensure you have cURL enabled in your PHP configuration file.
PHP Tip The json_decode function converts a JSON string to an associative array, but only if the second parameter is set to true, otherwise it will convert it to an object.
Once we've retrieved the access token, we can begin to execute additional cURL requests to the other endpoints, which is essential to retrieve the user details (email, picture, name, etc.).
After the above code, add the following:
// Make sure access token is valid
if (isset($response['access_token']) && !empty($response['access_token'])) {
    // Execute cURL request to retrieve the user info associated with the Facebook account
    $ch = curl_init();
    curl_setopt($ch, CURLOPT_URL, 'https://graph.facebook.com/' . $facebook_oauth_version . '/me?fields=name,email,picture');
    curl_setopt($ch, CURLOPT_RETURNTRANSFER, true);
    curl_setopt($ch, CURLOPT_HTTPHEADER, ['Authorization: Bearer ' . $response['access_token']]);
    $response = curl_exec($ch);
    curl_close($ch);
    $profile = json_decode($response, true);
        // Make sure the profile data exists
    if (isset($profile['email'])) {
        // Authenticate the user
        session_regenerate_id();
        $_SESSION['facebook_loggedin'] = TRUE;
        $_SESSION['facebook_email'] = $profile['email'];
        $_SESSION['facebook_name'] = $profile['name'];
        $_SESSION['facebook_picture'] = $profile['picture']['data']['url'];
        // Redirect to profile page
        header('Location: profile.php');
        exit;
    } else {
        exit('Could not retrieve profile information! Please try again later!');
    }
} else {
    exit('Invalid access token! Please try again later!');
}
Initially, we're validating the response to ensure the access token parameter exists, and if it does, we're executing a new request to the /me endpoint to retrieve the following fields:
- name — The user's Facebook name.
- email — The email associated with the user's Facebook account.
- picture — The main display picture of the user's Facebook profile.
However, to execute a request to the said endpoint, we require a valid access token, which is why we executed a request to retrieve the access token previously.
Once again, the response is in JSON format, which we can use to extract the fields and declare the session variables — the session will preserve the data until it expires (usually around 30 minutes), and therefore we can utilize it to determine the logged-in state and store all the relevant details.
PHP Tip Session handling will enable you to store data that can be accessed between requests.
If successful, you'll be redirected to the profile.php page, or if you encounter any error messages, you'll need to ensure you have the correct permissions set in your Facebook App page (email field is required but isn't enabled by default).
5. Develop the Profile Page with PHP
In this section, we'll create the profile page that's restricted to logged-in users. We can effectively utilize IF statements to determine whether the user is logged in or not, so without further ado, let's get started.
Edit the profile.php file and add the following:
<?php
// Initialize the session - is required to check the login state.
session_start();
// Check if the user is logged in, if not then redirect to login page
if (!isset($_SESSION['facebook_loggedin'])) {
    header('Location: login.php');
    exit;
}
// Retrieve session variables
$facebook_loggedin = $_SESSION['facebook_loggedin'];
$facebook_email = $_SESSION['facebook_email'];
$facebook_name = $_SESSION['facebook_name'];
$facebook_picture = $_SESSION['facebook_picture'];
?>
Surprisingly, determining whether the user is logged in only requires a few lines of code. In our case, we can leverage the isset() function to achieve the task, which basically checks if the variable exists.
The session_start() function is required on all pages that contain session variables. Without it, the session variables will return empty values.
Add after:
<!DOCTYPE html>
<html>
	<head>
		<meta charset="utf-8">
		<meta name="viewport" content="width=device-width,minimum-scale=1">
		<title>Profile</title>
		<link href="style.css" rel="stylesheet" type="text/css">
	</head>
	<body>

		<div class="content home">

			<div class="profile-picture">
                <img src="<?=$facebook_picture?>" alt="<?=$facebook_name?>" width="100" height="100">
            </div>

            <div class="profile-details">

                <div class="name">
                    <div class="icon">
                        <svg xmlns="http://www.w3.org/2000/svg" height="1em" viewBox="0 0 448 512"><!--! Font Awesome Free 6.4.2 by @fontawesome - https://fontawesome.com License - https://fontawesome.com/license (Commercial License) Copyright 2023 Fonticons, Inc. --><path d="M224 256A128 128 0 1 0 224 0a128 128 0 1 0 0 256zm-45.7 48C79.8 304 0 383.8 0 482.3C0 498.7 13.3 512 29.7 512H418.3c16.4 0 29.7-13.3 29.7-29.7C448 383.8 368.2 304 269.7 304H178.3z"/></svg>
                    </div>
                    <div class="wrap">
                        <strong>Name</strong>
                        <span><?=$facebook_name?></span>
                    </div>
                </div>

                <div class="email">
                    <div class="icon">
                        <svg xmlns="http://www.w3.org/2000/svg" height="1em" viewBox="0 0 512 512"><!--! Font Awesome Free 6.4.2 by @fontawesome - https://fontawesome.com License - https://fontawesome.com/license (Commercial License) Copyright 2023 Fonticons, Inc. --><path d="M48 64C21.5 64 0 85.5 0 112c0 15.1 7.1 29.3 19.2 38.4L236.8 313.6c11.4 8.5 27 8.5 38.4 0L492.8 150.4c12.1-9.1 19.2-23.3 19.2-38.4c0-26.5-21.5-48-48-48H48zM0 176V384c0 35.3 28.7 64 64 64H448c35.3 0 64-28.7 64-64V176L294.4 339.2c-22.8 17.1-54 17.1-76.8 0L0 176z"/></svg>
                    </div>
                    <div class="wrap">
                        <strong>Email</strong>
                        <span><?=$facebook_email?></span>
                    </div>
                </div>

            </div>

            <a href="logout.php" class="logout-btn">
                <span class="icon">
                    <svg xmlns="http://www.w3.org/2000/svg" height="1em" viewBox="0 0 512 512"><!--! Font Awesome Free 6.4.2 by @fontawesome - https://fontawesome.com License - https://fontawesome.com/license (Commercial License) Copyright 2023 Fonticons, Inc. --><path d="M377.9 105.9L500.7 228.7c7.2 7.2 11.3 17.1 11.3 27.3s-4.1 20.1-11.3 27.3L377.9 406.1c-6.4 6.4-15 9.9-24 9.9c-18.7 0-33.9-15.2-33.9-33.9l0-62.1-128 0c-17.7 0-32-14.3-32-32l0-64c0-17.7 14.3-32 32-32l128 0 0-62.1c0-18.7 15.2-33.9 33.9-33.9c9 0 17.6 3.6 24 9.9zM160 96L96 96c-17.7 0-32 14.3-32 32l0 256c0 17.7 14.3 32 32 32l64 0c17.7 0 32 14.3 32 32s-14.3 32-32 32l-64 0c-53 0-96-43-96-96L0 128C0 75 43 32 96 32l64 0c17.7 0 32 14.3 32 32s-14.3 32-32 32z"/></svg>
                </span>
                Logout
            </a>

		</div>

	</body>
</html>
The template code consists of various elements that represent the user's details. As we can see, we've implemented the PHP variables we declared previously.
Once we've logged in, the profile page will resemble the following:
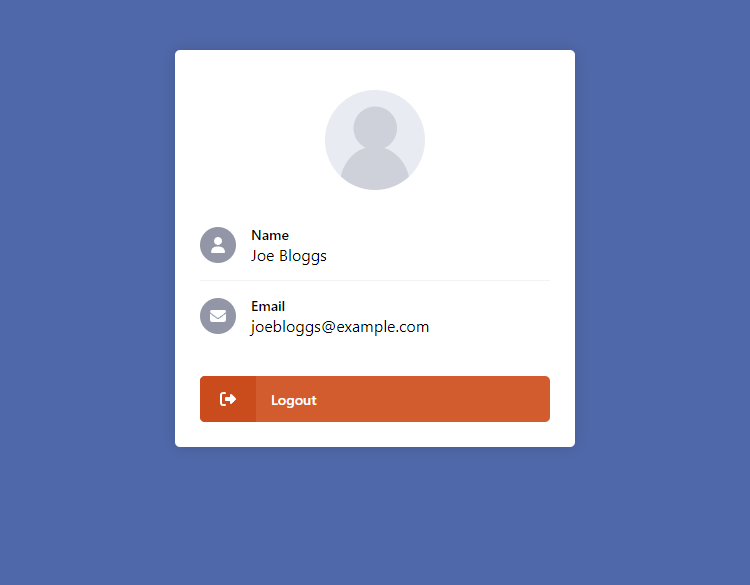
Again, you can add additional details to the profile, but you'll need to add the permissions to your Facebook app.
6. Logout with PHP
Logging the user out from the current session is relatively easy to implement — it only requires a few lines of code. Fortunately, we can execute the session_destroy() function to initiate the logout process.
Edit the logout.php file and add:
<?php
// Initialize the session
session_start();
// Destroy the session
session_destroy();
// Redirect to the login page
header('Location: login.php');
exit;
?>
And finally, if we navigate to this page (or select the logout button on the profile page), the session will be destroyed, and we'll be redirected to the login page.
7. Database Integration (MySQL)
While this is not an essential step, if you would like to know how to integrate the Facebook AOuth with a MySQL database, read on.
In this section, we shall refactor the code we've already implemented to store the account details in a database. But initially, we must create our database and implement code to establish a connection.
Follow the below instructions:
- Navigate to phpMyAdmin in your browser (localhost/phpmyadmin).
- Login with your database credentials (if required).
- In the top navigation bar, select the Import tab.
- Execute the SQL statement below.
CREATE DATABASE IF NOT EXISTS `sociallogin` DEFAULT CHARACTER SET utf8 COLLATE utf8_general_ci;
USE `sociallogin`;

CREATE TABLE IF NOT EXISTS `accounts` (
  `id` int(11) NOT NULL AUTO_INCREMENT,
  `name` varchar(50) NOT NULL,
  `email` varchar(100) NOT NULL,
  `picture` varchar(255) NOT NULL,
  `registered` datetime NOT NULL,
  `method` enum('facebook','google','linkedin') NOT NULL,
  PRIMARY KEY (`id`)
) ENGINE=InnoDB DEFAULT CHARSET=utf8 COLLATE=utf8_general_ci;
That will create the sociallogin database along with the accounts table and its columns, which will represent the following
- id — an integer that will grant the user a unique number.
- name — the name associated with the Facebook account.
- email — the email associated with the Facebook account.
- registered — the date and time the user registered.
- method — the method used to login to the system (Facebook, etc.).
Now that we've deployed our database, we can establish a connection using the PDO interface.
Edit the facebook-oauth.php file and add the following after the PHP opening tag:
// Database connection variables
$db_host = 'localhost';
$db_name = 'sociallogin';
$db_user = 'root';
$db_pass = '';
// Attempt to connect to database
try {
    // Connect to the MySQL database using PDO...
    $pdo = new PDO('mysql:host=' . $db_host . ';dbname=' . $db_name . ';charset=utf8', $db_user, $db_pass);
    $pdo->setAttribute(PDO::ATTR_ERRMODE, PDO::ERRMODE_EXCEPTION);
} catch (PDOException $exception) {
    // Could not connect to the MySQL database, if this error occurs make sure you check your db settings are correct!
    exit('Failed to connect to database!');
}
That'll connect to our database, so we can create or retrieve the account.
Find the following line of code:
if (isset($response['access_token']) && !empty($response['access_token'])) {Replace the entire code within the IF statement block with:
// Execute cURL request to retrieve the user info associated with the Facebook account
$ch = curl_init();
curl_setopt($ch, CURLOPT_URL, 'https://graph.facebook.com/' . $facebook_oauth_version . '/me?fields=name,email,picture');
curl_setopt($ch, CURLOPT_RETURNTRANSFER, true);
curl_setopt($ch, CURLOPT_HTTPHEADER, ['Authorization: Bearer ' . $response['access_token']]);
$response = curl_exec($ch);
curl_close($ch);
$profile = json_decode($response, true);
    // Make sure the profile data exists
if (isset($profile['email'])) {
    // Check if the account exists in the database
    $stmt = $pdo->prepare('SELECT * FROM accounts WHERE email = ?');
    $stmt->execute([ $profile['email'] ]);
    $account = $stmt->fetch(PDO::FETCH_ASSOC);
    // If the account does not exist in the database, insert the account into the database
    if (!$account) {
        $stmt = $pdo->prepare('INSERT INTO accounts (email, name, picture, registered, method) VALUES (?, ?, ?, ?, ?)');
        $stmt->execute([ $profile['email'], $profile['name'], $profile['picture']['data']['url'], date('Y-m-d H:i:s'), 'facebook' ]);
        $id = $pdo->lastInsertId();
    } else {
        $id = $account['id'];
    }
    // Authenticate the account
    session_regenerate_id();
    $_SESSION['facebook_loggedin'] = TRUE;
    $_SESSION['facebook_id'] = $id;
    // Redirect to profile page
    header('Location: profile.php');
    exit;
} else {
    exit('Could not retrieve profile information! Please try again later!');
}
You may have noticed we've removed a few session variables — that's because we're storing the user details in the database, so it's unnecessary to store them in the session. We can retrieve the user details directly from the database.
Finally, let's go back to our profile.php file and replace the entire PHP code with:
<?php
// Initialize the session - is required to check the login state.
session_start();
// Check if the user is logged in, if not then redirect to login page
if (!isset($_SESSION['facebook_loggedin'])) {
    header('Location: login.php');
    exit;
}
// Database connection variables
$db_host = 'localhost';
$db_name = 'sociallogin';
$db_user = 'root';
$db_pass = '';
// Attempt to connect to database
try {
    // Connect to the MySQL database using PDO...
    $pdo = new PDO('mysql:host=' . $db_host . ';dbname=' . $db_name . ';charset=utf8', $db_user, $db_pass);
    $pdo->setAttribute(PDO::ATTR_ERRMODE, PDO::ERRMODE_EXCEPTION);
} catch (PDOException $exception) {
    // Could not connect to the MySQL database! Check db credentials...
    exit('Failed to connect to database!');
}
// Get the account from the database
$stmt = $pdo->prepare('SELECT * FROM accounts WHERE id = ?');
$stmt->execute([ $_SESSION['facebook_id'] ]);
$account = $stmt->fetch(PDO::FETCH_ASSOC);
// Retrieve session variables
$facebook_loggedin = $_SESSION['facebook_loggedin'];
$facebook_email = $account['email'];
$facebook_name = $account['name'];
$facebook_picture = $account['picture'];
?>
That'll effectively execute a query to our accounts table to retrieve the user fields using the account ID session variable that we declared in the previous snippet.
Preparing the statement will prevent SQL injection and therefore protect the queries. If the queries rely on user input variables (GET and POST requests), then preparing the queries is imperative.
8. Alternative Method: Facebook SDK
If you would prefer to use the Facebook SDK library to authenticate your users as opposed to the cURL method, then follow the below instructions.
- Download the Facebook SDK library.
- Create a new directory in your project directory called facebook-sdk.
- Extract the contents of the SDK library to the new directory.
- Replace the entire code in the facebook-oauth.php file with the following:
<?php
// Initialize the session
session_start();
// Include the Facebook SDK
require 'facebook-sdk/src/Facebook/autoload.php';
// Update the following variables
$facebook_oauth_app_id = 'YOUR_FACEBOOK_APP_ID';
$facebook_oauth_app_secret = 'YOUR_FACEBOOK_APP_SECRET';
// Must be the direct URL to the facebook-oauth.php file
$facebook_oauth_redirect_uri = 'YOUR_REDIRECT_URI';
$facebook_oauth_version = 'v18.0';
// Initialize the Facebook PHP SDK object
$fb = new Facebook\Facebook([
    'app_id' => $facebook_oauth_app_id,
    'app_secret' => $facebook_oauth_app_secret,
    'default_graph_version' => $facebook_oauth_version,
]);
// Create the login helper object
$helper = $fb->getRedirectLoginHelper();
// If the state param exists, set it
if (isset($_GET['state'])) {
    $helper->getPersistentDataHandler()->set('state', $_GET['state']);
}
// If the captured code param exists and is valid
try {
    // Get the access token
    $accessToken = $helper->getAccessToken();
} catch (Facebook\Exceptions\FacebookResponseException $e) {
    // Handle error
    echo 'Graph returned an error: ' . $e->getMessage();
    exit;
} catch (Facebook\Exceptions\FacebookSDKException $e) {
    // Handle error
    echo 'Facebook SDK returned an error: ' . $e->getMessage();
    exit;
}
// If the access token is not set, redirect to the login page
if (!isset($accessToken)) {
    // Define params and redirect to Facebook OAuth page
    $loginUrl = $helper->getLoginUrl($facebook_oauth_redirect_uri, ['email']);
    header('Location: ' . $loginUrl);
    exit;
}
// If the access token is set, the user is logged in
try {
    // Get user data from Facebook
    $response = $fb->get('/me?fields=name,email,picture', $accessToken);
    $userData = $response->getGraphUser();
    // Get user data from Facebook
    $fbEmail = $userData->getEmail();
    $fbName = $userData->getName();
    $fbPictureUrl = $userData->getPicture()->getUrl();
    // Store user data in your database or use it as needed
    // Declare session variables
    $_SESSION['facebook_loggedin'] = true;
    $_SESSION['facebook_email'] = $fbEmail;
    $_SESSION['facebook_name'] = $fbName;
    $_SESSION['facebook_picture'] = $fbPictureUrl;
    // Redirect to the profile page
    header('Location: profile.php');
    exit;
} catch (Facebook\Exceptions\FacebookResponseException $e) {
    // Handle error
    echo 'Graph returned an error: ' . $e->getMessage();
} catch (Facebook\Exceptions\FacebookSDKException $e) {
    // Handle error
    echo 'Facebook SDK returned an error: ' . $e->getMessage();
}
?>
However, the database integration is not included with the above script, so you'd have to go back to step 7 if you want to integrate it.
With the Facebook SDK, we can execute various methods to retrieve responses from the API endpoints. There are benefits to using the Facebook SDK, but for a more lightweight solution, the cURL approach is the way to go.
Conclusion
Incorporating a social login can be quite a tedious process because it involves a great deal of trial and error, but with the help of this tutorial, it should be a seamless transition.
It's down to personal preference which method you choose to use — I personally prefer the cURL method because libraries can be quite cumbersome and require dependencies (composer, etc.).
If you would like to implement your own authentication that connects to a MySQL database, you can follow the secure login system tutorial.
Drop a comment below and hit the share buttons if you've enjoyed this tutorial! It will definitely help us write more detailed tutorials!
Skip the copy-pasting and get the complete, working project from this tutorial as a free ZIP with a setup guide included. Free for personal and commercial use.
If you would like to support us, consider the advanced secure login & registration system below. It will greatly help us create more tutorials and keep our website up and running. The advanced package includes improved code and more features.
— CSRF Protection
— Brute Force Protection
— reCAPTCHA v3 Protection
— Two-Factor Authentication
— OAuth Login (Google, Facebook, and more)
— View Dashboard
— Create, edit, and delete accounts
— Search, sort, and filter accounts
— Manage Email Templates
— Edit Settings
— Export & Import Accounts (CSV, JSON, etc.)
* Advanced package also includes the tutorial source and basic package.
* Instant download after payment.
To learn more about the advanced package, please visit the Advanced Secure Login & Registration System page.