 Download the full source codeComplete working project · Setup guide included · Free for commercial use
Free ZIP
Download the full source codeComplete working project · Setup guide included · Free for commercial use
Free ZIP
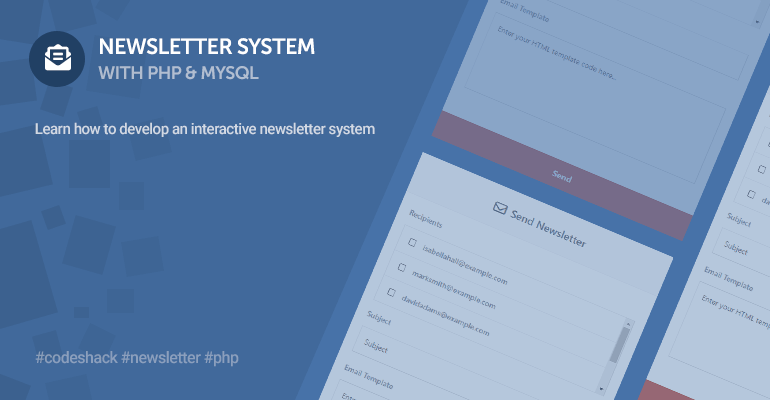
This tutorial guides you through building your own newsletter system from scratch using PHP and MySQL. We'll create interactive subscription widgets, manage a mailing list, and develop an intuitive interface for sending newsletters to your subscribers.
A newsletter system is a great way to connect with your audience. Send out product news, event details, or useful content right to their inboxes. Whether you're a solo entrepreneur or part of a large organization, this system will help you grow your subscriber base and boost engagement with your audience.
The Advanced package includes additional features and a download link to the source code.
Contents
1. Introduction
Adding an interactive subscription widget to your website is a powerful way to grow your audience and boost engagement. This kind of tool is key for any website aiming to grow its audience and build lasting relationships.
By utilizing PHP's mail functionality, you can easily send newsletters directly to your subscribers' inboxes. This allows them to engage with your content, stay updated, and take action, helping you build stronger connections with your audience.
We'll cover everything from the database setup to sending your first PHP email newsletter.
2. Getting Started
Before diving into the code, let's lay out the groundwork and the tools needed for our PHP newsletter project. Good planning now helps prevent headaches later, so let's cover the essentials first.
2.1. Requirements
To start building your PHP and MySQL newsletter system, you'll need a few things set up. While a simple text editor can open PHP files, for this project, you'll benefit from a more robust setup. We'll need a proper web server environment and a code editor to get everything set up correctly.
Here's what you'll need for this project:
- Web Server Solution Stack Package — We recommend downloading and installing XAMPP, which includes everything you need.
- PHP >= 5.5 — The latest version of PHP is bundled with XAMPP, so no additional downloads are required.
- MySQL >= 5.6 — Also included with XAMPP, so you're covered here as well.
- Code Editor — We recommend using Visual Studio Code for a more efficient coding experience.
WarningXAMPP is intended for development purposes only and should not be used in a production environment.
2.2. What You Will Learn in this Tutorial
Below will give you an idea of what you will accomplish while reading this article.
- Form Handling — Design a form and process requests with PHP, while capturing data and storing it in our MySQL database.
- Interactive Widget Creation with JS — Design and develop an interactive subscription widget with JavaScript.
- AJAX Implementation — Implement code to process the subscription form in the background using AJAX.
- Utilizing PHP Mail — Design a user interface for our newsletters and send captured form data to a specified email address.
- Layout Design with CSS3 — Design multiple layouts with stylesheets.
2.3. File Structure & Setup
Let's start by creating all the files we will use for our project. Navigate to your webroot directory (c:\xampp\htdocs, etc.) and create the below directory along with the files.
File Structure
\-- phpnewsletter
|-- style.css
|-- index.html
|-- newsletter.php
|-- subscribe.php
|-- unsubscribe.php
|-- main.php
Here's a brief overview of each file's role in our newsletter system:
- style.css — The stylesheet (CSS3) for our newsletter system, which is used to format our structured content (HTML).
- index.html — The index file will contain the chat widget implementation and AJAX code to process the subscription form.
- newsletter.php — Will contain the newsletter interface used by webmasters to send out newsletters to specified subscribers.
- subscribe.php — The subscribe file will insert a new subscriber in to our MySQL database. Validation will be in place to ensure the subscriber doesn't already exist.
- unsubscribe.php — The unsubscribe file will delete the subscriber from the database.
- main.php — The main file will contain the database connection code.
After, we can go ahead and start XAMPP — follow the below instructions.
- Open the XAMPP Control Panel
- Next to the Apache module, click Start
- Next to the MySQL module, click Start
- If successful, the background color will change to green. If not, you might want to check your port numbers to ensure they don't conflict with the module ports.
- Navigate to localhost in your browser — the XAMPP welcome page should appear.
With XAMPP running, you have a local web server ready for PHP and MySQL development.
3. Creating the Database
In this section, we'll create the MySQL database with phpMyAdmin (included with XAMPP) and execute a SQL statement to create all the tables and columns.
The database will enable us to store all our subscribers and retrieve them when sending out newsletters.
Follow the below instructions:
- Navigate to localhost/phpmyadmin/ in your browser
- Click the Databases tab in the top navigation bar
- Under the Create Database section, enter phpnewsletters as the database name
- Select the utf8_general_ci collation
- Click Create
- Select the newly created database in the left-side panel
- Click the SQL tab in the top navigation bar
- Execute the below SQL statement
CREATE TABLE `subscribers` (
  `id` int(11) NOT NULL AUTO_INCREMENT,
  `email` varchar(255) NOT NULL,
  `date_subbed` datetime NOT NULL,
  PRIMARY KEY (`id`)
) ENGINE=InnoDB AUTO_INCREMENT=1 DEFAULT CHARSET=utf8;
If we click the subscribers table, it will look like the following in phpMyAdmin:

That's all we need to do for the database creation. If you would like to check the list of subscribers, you can navigate to the Browse tab while viewing the subscribers table.
This simple table structure is the heart of our mailing list management.
4. Creating the Stylesheet (CSS3)
Our stylesheet (CSS3) will define how our newsletter system looks, making it visually appealing.
Edit the style.css file and add:
* {
  box-sizing: border-box;
  font-family: -apple-system, BlinkMacSystemFont, "segoe ui", roboto, oxygen, ubuntu, cantarell, "fira sans", "droid sans", "helvetica neue", Arial, sans-serif;
  font-size: 16px;
}
body {
  margin: 0;
  padding: 15px;
  height: 3000px;
}
.newsletter-popup {
  display: none;
  justify-content: center;
  align-items: center;
  background-color: transparent;
  position: fixed;
  top: 0;
  left: 0;
  width: 100%;
  height: 100%;
  z-index: 999999;
  transition: all .3s ease;
}
.newsletter-popup .newsletter-popup-container {
  position: relative;
  display: flex;
  flex-flow: column;
  padding: 30px;
  background-color: #fff;
  box-shadow: 0 0 10px 0 rgba(0, 0, 0, 0.1);
  width: 500px;
  transform: scale(0.3);
  transition: all .3s ease;
}
.newsletter-popup .newsletter-popup-container.open {
  transform: scale(1);
}
.newsletter-popup .newsletter-popup-container h3 {
  font-size: 20px;
  font-weight: 500;
  margin: 0;
  padding: 10px 0 10px;
  color: #4d5561;
}
.newsletter-popup .newsletter-popup-container h3 i {
  display: inline-flex;
  justify-content: center;
  align-items: center;
  width: 35px;
  height: 35px;
  border-radius: 50%;
  background-color: #4d5561;
  color: #fff;
  margin-right: 10px;
}
.newsletter-popup .newsletter-popup-container p {
  margin: 0;
  padding: 15px 0;
  color: #8d9092;
}
.newsletter-popup .newsletter-popup-container form {
  display: flex;
  padding: 15px 0 10px;
}
.newsletter-popup .newsletter-popup-container form input {
  width: 100%;
  padding: 10px;
  border: 1px solid #ddd;
  outline: none;
}
.newsletter-popup .newsletter-popup-container form input::placeholder {
  color: #8d9092;
}
.newsletter-popup .newsletter-popup-container form button {
  width: 200px;
  appearance: none;
  background-color: #4d5561;
  font-weight: 500;
  font-size: 14px;
  color: #fff;
  border: 0;
  cursor: pointer;
}
.newsletter-popup .newsletter-popup-container form button:hover {
  background-color: #424953;
}
.newsletter-popup .newsletter-popup-container .newsletter-popup-close-btn {
  position: absolute;
  right: 20px;
  top: 20px;
  text-decoration: none;
  color: #ddd;
  font-size: 30px;
  line-height: 20px;
}
.newsletter-popup .newsletter-popup-container .newsletter-popup-close-btn:hover {
  color: #c4c4c4;
}
.newsletter-popup .newsletter-popup-container .newsletter-msg {
  padding: 5px 0;
}
.newsletter-popup.open {
  display: flex;
  background-color: rgba(0, 0, 0, 0.4);
}
.send-newsletter-form {
  background-color: #fff;
  width: 500px;
  margin: 0 auto;
  box-shadow: 0px 0px 5px 0px rgba(0, 0, 0, 0.2);
}
.send-newsletter-form h1 {
  display: flex;
  justify-content: center;
  align-items: center;
  margin: 0;
  padding: 25px;
  font-size: 20px;
  text-align: center;
  border-bottom: 1px solid #eceff2;
  color: #6a737f;
  font-weight: 600;
  background-color: #f9fbfc;
}
.send-newsletter-form h1 i {
  padding-right: 10px;
  font-size: 24px;
}
.send-newsletter-form .fields {
  position: relative;
  padding: 20px;
}
.send-newsletter-form input[type="text"] {
  margin-top: 15px;
  padding: 15px;
  border: 1px solid #dfe0e0;
  width: 100%;
  outline: 0;
  font-size: 14px;
}
.send-newsletter-form input[type="text"]:focus {
  border: 1px solid #c6c7c7;
}
.send-newsletter-form textarea {
  resize: none;
  margin-top: 15px;
  padding: 15px;
  border: 1px solid #dfe0e0;
  width: 100%;
  height: 150px;
  outline: 0;
  font-size: 14px;
}
.send-newsletter-form textarea:focus {
  border: 1px solid #c6c7c7;
}
.send-newsletter-form input[type="submit"] {
  display: block;
  margin-top: 15px;
  padding: 15px;
  border: 0;
  background-color: #cb5f51;
  font-weight: bold;
  color: #fff;
  cursor: pointer;
  width: 100%;
}
.send-newsletter-form input[type="submit"]:hover {
  background-color: #c15b4d;
}
.send-newsletter-form input[type="submit"]:disabled {
  background-color: #999999;
}
.send-newsletter-form .field {
  display: inline-flex;
  position: relative;
  width: 100%;
  padding-bottom: 20px;
}
.send-newsletter-form label {
  font-size: 14px;
  font-weight: 600;
  color: #8e939b;
}
.send-newsletter-form .responses {
  padding: 0;
  margin: 0;
}
.send-newsletter-form .multi-select-list {
  border: 1px solid #dfe0e0;
  margin: 15px 0;
  overflow-y: auto;
  max-height: 150px;
}
.send-newsletter-form .multi-select-list label {
  display: flex;
  align-items: center;
  padding: 15px;
  border-bottom: 1px solid #f3f3f3;
}
.send-newsletter-form .multi-select-list label input {
  margin-right: 15px;
}
.send-newsletter-form .multi-select-list label:last-child {
  border-bottom: 0;
}
Feel free to customize the stylesheet to your own satisfaction. Good styling makes your subscription forms and newsletter interface more user-friendly.
5. Creating the Interactive Widget with JS
Now, let's use JavaScript to build an interactive popup subscription widget and handle form submissions smoothly with AJAX.
One challenge with popup widgets is making them helpful, not annoying. We're building a newsletter widget, not a chat one, but the principle is the same. You wouldn't want your visitors to come to your website and be instantly bombarded with a newsletter popup widget. Therefore, a better solution is to seamlessly open the popup when the user reaches a specific point when scrolling down the page, which is what we'll implement shortly.
This approach makes the subscription prompt feel less intrusive and more like a helpful invitation.
Edit the index.html file and add:
<!DOCTYPE html>
<html>
	<head>
		<meta charset="utf-8">
        <meta name="viewport" content="width=device-width,minimum-scale=1">
		<title>Newsletter</title>
		<link href="style.css" rel="stylesheet" type="text/css">
        <link rel="stylesheet" href="https://use.fontawesome.com/releases/v6.1.1/css/all.css">
	</head>
	<body>

	    <h1>Newsletter</h1>

		<p>Hello world!</p>

	</body>
</html>
The above page is just a base for us to work with. You can add the widget to any webpage. The Font Awesome library will enable us to add icons to the subscription widget.
After:
<p>Hello world!</p>Add:
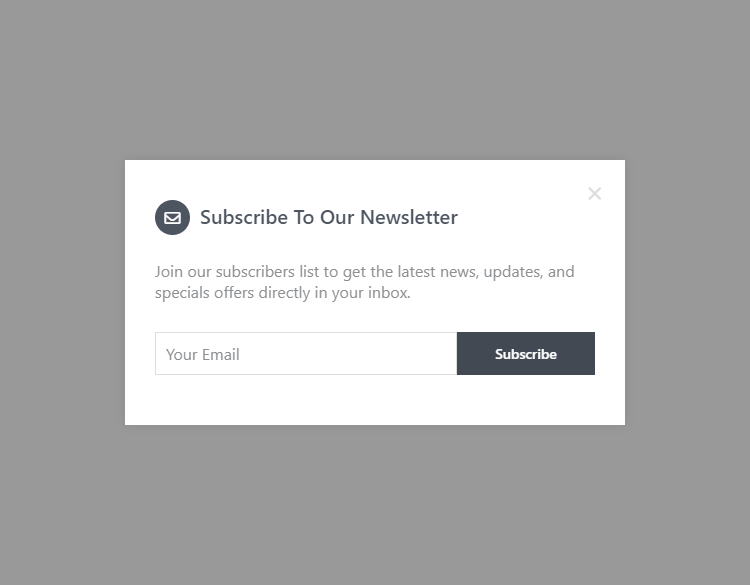
<div class="newsletter-popup">
<div class="newsletter-popup-container">
<a href="#" class="newsletter-popup-close-btn">×</a>
<h3><i class="fa-regular fa-envelope"></i>Subscribe To Our Newsletter</h3>
<p>Join our subscribers list to get the latest news, updates, and special offers directly in your inbox.</p>
<form action="subscribe.php" method="post">
<input type="email" name="email" placeholder="Your Email" required>
<button type="submit">Subscribe</button>
</form>
<p class="newsletter-msg"></p>
</div>
</div>The above code is the template for our popup widget, which contains the subscription form that's associated with the subscribe.php file. In addition, we have included the email input element and submit button.
The name attribute attached to the email input element will reflect the POST variables we declare in the subscribe.php file. We will use it to capture the subscriber's email address.
Responses retrieved from the AJAX request will be stored in the newsletter-msg element.
Next up, we'll implement the AJAX code, so after the above code, add the following:
<script>
// Will prevent the popup from reopening when the close button is clicked
let keepClosed = false;
// Open the newsletter subscription popup
const openNewsletterPopup = () => {
    // Update the style and element properties
    document.querySelector('.newsletter-popup').style.display = 'flex';
    document.querySelector('.newsletter-popup').getBoundingClientRect();
    document.querySelector('.newsletter-popup').classList.add('open');
    document.querySelector('.newsletter-popup-container').getBoundingClientRect();
    document.querySelector('.newsletter-popup-container').classList.add('open');
};
const closeNewsletterPopup = () => {
    // Revert the element properties
    document.querySelector('.newsletter-popup').style.display = 'none';
    document.querySelector('.newsletter-popup').classList.remove('open');
    document.querySelector('.newsletter-popup-container').classList.remove('open');
    // Keep it closed!
    keepClosed = true;
};
// Get the subscription form
const newsletterForm = document.querySelector('.newsletter-popup form');
// On submit event handler (submit button is pressed)
newsletterForm.onsubmit = event => {
    event.preventDefault();
    // Bind the subscription form and execute AJAX request
    fetch(newsletterForm.action, {
        method: 'POST',
        body: new FormData(newsletterForm)
    }).then(response => response.text()).then(data => {
        // Output the response
        document.querySelector('.newsletter-msg').innerHTML = data;
    });
};
// Close button onclick event handler
document.querySelector('.newsletter-popup-close-btn').onclick = event => {
    event.preventDefault();
    // CLose the popup widget
    closeNewsletterPopup();
};
// Open the popup widget when the user reaches a specific point while scrolling down
document.addEventListener('scroll', () => {
    // If you want to open the widget further down the page, increase the 400 value
    if (window.scrollY >= 400 && !keepClosed) {
        // Open the widget
        openNewsletterPopup();
    }
});
</script>
When the user reaches a specific point while scrolling down, the newsletter subscription popup will appear, which will enable the user to input their email address and submit their details to the subscribe.php file. To do that, we can leverage the scroll event handler and attach it to our document.
Upon form submission, we utilize the fetch() API to execute an AJAX request, meaning the form will process in the background as opposed to being redirected to a new page. The former is more convenient in modern web apps.
JS TipYou can easily bind an HTML form element to the fetch API using the FormData interface.
The openNewsletterPopup() and closeNewsletterPopup() functions are self-explanatory, one will open the newsletter widget, and the other will close it.
If we navigate to our index.html file in the browser and scroll down to the near bottom, the newsletter subscription widget should popup, like so:
However, don't expect it to be fully functional as we have yet to implement the PHP code to process the form, which we will do in the next section.
6. Subscription Handling with PHP
Now that we have created our subscription form, we need to implement server-side code to process it, which is where PHP comes into play. Without PHP, our subscription form is redundant because PHP will enable us to validate the email address and insert it into our MySQL database using the PDO interface.
6.1. Database Connection with PDO
Before we start coding the subscribe and unsubscribe files, we require a file that connects to our MySQL database using the PDO interface. We'll connect to the database in all our other files, therefore it's convenient to create an independent file and add the connection code.
Edit the main.php file and add:
<?php
// Update the details below with your MySQL details
$DATABASE_HOST = 'localhost';
$DATABASE_USER = 'root';
$DATABASE_PASS = '';
$DATABASE_NAME = 'phpnewsletter';
try {
    $pdo = new PDO('mysql:host=' . $DATABASE_HOST . ';dbname=' . $DATABASE_NAME . ';charset=utf8', $DATABASE_USER, $DATABASE_PASS);
    // Output all connection errors. We want to know what went wrong...
	$pdo->setAttribute(PDO::ATTR_ERRMODE, PDO::ERRMODE_EXCEPTION);
} catch (PDOException $exception) {
    // If there is an error with the connection, stop the script and display the error.
    exit('Failed to connect to database!');
}
?>
Make sure to update the database variables to reflect your MySQL details.
6.2. Subscribe
The subscription process is fairly simple — we validate the captured email address and insert it into the database, but only if it doesn't already exist. If we don't check that it exists, we would have multiple records for the same subscriber and therefore wouldn't be coherent with our database structure.
Edit the subscribe.php file and add:
<?php
include 'main.php';
// Ensure post variable exists
if (isset($_POST['email'])) {
    // Validate email address
    if (!filter_var($_POST['email'], FILTER_VALIDATE_EMAIL)) {
        exit('Please provide a valid email address!');
    }
    // Check if email exists in the database
    $stmt = $pdo->prepare('SELECT * FROM subscribers WHERE email = ?');
    $stmt->execute([ $_POST['email'] ]);
    if ($stmt->fetch(PDO::FETCH_ASSOC)) {
        exit('You\'re already a subscriber!');
    }
    // Insert email address into the database
    $stmt = $pdo->prepare('INSERT INTO subscribers (email,date_subbed) VALUES (?,?)');
    $stmt->execute([ $_POST['email'], date('Y-m-d\TH:i:s') ]);
    // Output success response
    exit('Thank you for subscribing!');
} else {
    // No post data specified
    exit('Please provide a valid email address!');
}
?>
As we can see, we first include our main file (which contains our database connection code), and then we check whether the captured email variable exists or not. If it does, we can validate it and finally insert it into our database using the PDO interface.
PHP TipThe PDO prepare method will prevent SQL injection but only if used correctly.
The whole concept is to add our subscribers to the database, so we can later retrieve them and send them newsletters. Why manually input email addresses when we can retrieve them from the database and populate a list? Therefore, the database is practical in such scenarios — it will save us valuable time and effort.
6.3. Unsubscribe
The unsubscribe file will do the complete opposite of what we've just done with the subscribe file. Instead of inserting a new subscriber into the database, we're deleting the subscriber.
Edit the unsubscribe.php file and add:
<?php
include 'main.php';
// Ensure post variable exists
if (isset($_GET['email'], $_GET['code'])) {
    // Validate email address
    if (!filter_var($_GET['email'], FILTER_VALIDATE_EMAIL)) {
        exit('Please provide a valid email address!');
    }
    // Check if email exists in database
    $stmt = $pdo->prepare('SELECT * FROM subscribers WHERE email = ?');
    $stmt->execute([ $_GET['email'] ]);
    $subscriber = $stmt->fetch(PDO::FETCH_ASSOC);
    if ($subscriber) {
        // Verify code
        if (sha1($subscriber['id'] . $subscriber['email']) == $_GET['code']) {
            // Delete the email from the subscribers list
            $stmt = $pdo->prepare('DELETE FROM subscribers WHERE email = ?');
            $stmt->execute([ $_GET['email'] ]);
            // Output success response
            exit('You\'ve successfully unsubscribed!');
        } else {
            exit('Incorrect code provided!');
        }
    } else {
        exit('You\'re not a subscriber or you\'ve already unsubscribed!');
    }
} else {
    exit('No email address and/or code specified!');
}
?>
In the above code, we're checking if an additional parameter has been specified, which is the code parameter. The code parameter will add an extra layer of security when removing the subscriber from the database as it requires a unique hashed string based on the email and ID columns in the database.
We're leveraging GET requests as opposed to POST requests because it enables us to specify parameters in the URL. It's essential because we'll include the unsubscribe link in the newsletter template.
We will implement code to automatically generate the unsubscribe URL in the next section.
7. Developing the Newsletter Interface
The newsletter sending interface is a bit more involved. It includes creating the HTML form, using AJAX for sending, and PHP for the backend processing.
The interface will enable us to send a newsletter (in HTML format) to selected recipients (subscribers). We wouldn't want to burden our mail server, and therefore we'll implement tactics to send the newsletter to individual recipients at a set interval, for example, every 5 seconds. This method helps avoid overloading your mail server and can improve deliverability for your PHP email campaigns.
7.1. Creating the Form
We need to create a layout that we can use to send newsletters to our subscribers, so let's get started!
Edit the newsletter.php file and add:
<?php
include 'main.php';
// NOTICE: THE FOLLOWING PAGE IS UNRESTRICTED AND THEREFORE WE SUGGEST YOU IMPLEMENT RESTRICTIONS BEFORE GOING PRODUCTION
// Get all subscribers from the database
$stmt = $pdo->prepare('SELECT * FROM subscribers');
$stmt->execute();
$subscribers = $stmt->fetchAll(PDO::FETCH_ASSOC);
?>
<!DOCTYPE html>
<html lang="en">
	<head>
		<meta charset="utf-8">
		<meta name="viewport" content="width=device-width,minimum-scale=1">
		<title>Send Newsletter</title>
        <link href="style.css" rel="stylesheet" type="text/css">
		<link rel="stylesheet" href="https://use.fontawesome.com/releases/v6.1.1/css/all.css">
		<style>
        html {
            background-color: #F8F9F9;
            background: linear-gradient(0deg, #f9f8f8 0%, #f9f8f8 80%, #cb5f51 80%, #cb5f51 100%);
            padding: 30px;
            height: 100%;
        }
        </style>
	</head>
	<body>

		<form class="send-newsletter-form" method="post" action="">

			<h1><i class="fa-regular fa-envelope"></i>Send Newsletter</h1>

			<div class="fields">

                <label for="recipients">Recipients</label>
                <div class="multi-select-list">
                    <?php foreach ($subscribers as $subscriber): ?>
                    <label>
                        <input type="checkbox" class="recipient" name="recipients[]" value="<?=$subscriber['email']?>"> <?=$subscriber['email']?>
                    </label>
                    <?php endforeach; ?>
                </div>

                <label for="subject">Subject</label>
                <div class="field">
                    <input type="text" id="subject" name="subject" placeholder="Subject" required>
                </div>

                <label for="template">Email Template</label>
                <div class="field">
                    <textarea id="template" name="template" placeholder="Enter your HTML template code here..." required></textarea>
                </div>

                <div class="responses"></div>

			</div>

			<input id="submit" type="submit" value="Send">

		</form>

	</body>
</html>
First and foremost, we execute code to retrieve all our subscribers from the database and subsequently populate them using the foreach loop.
The sending form has three main parts: a list of subscribers (with checkboxes to select recipients), a field for the newsletter subject, and a textarea for your HTML email template. In addition, we have the form method set to POST, so we can capture the form data upon submission.
If we navigate to the newsletter.php file, we should see the following form:
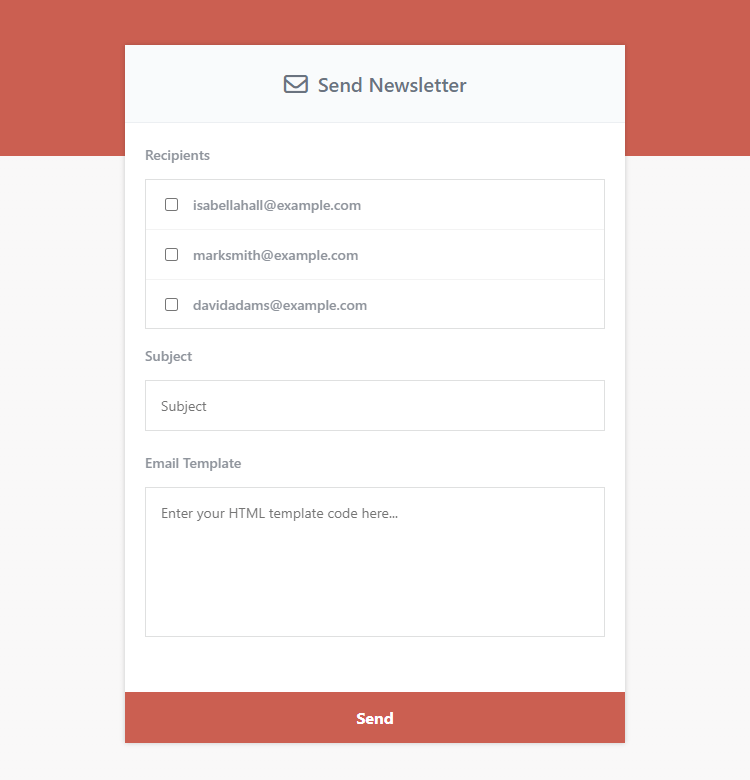
You can ignore the list of recipients as they're added for testing purposes, but you can get a general idea of what to expect.
7.2. Implementing AJAX to Process the Form
We can leverage AJAX to send our newsletter to selected recipients at a set interval. We have already covered the basics of AJAX requests, and therefore you should have a basic understanding of what's going on.
After:
</form>Add:
<script>
// Retrieve the form element
const newsletterForm = document.querySelector('.send-newsletter-form');
// Declare variables
let recipients = [], totalRecipients = 0, recipientsProcessed = 0;
// Form submit event
newsletterForm.onsubmit = event => {
    event.preventDefault();
    // Retrieve all recipients and delcare as an array
    recipients = [...document.querySelectorAll('.recipient:checked')];
    // Total number of selected recipients
    totalRecipients = recipients.length;
    // Total number of recipients processed
    recipientsProcessed = 0;
    // Clear the responses (if any)
    document.querySelector('.responses').innerHTML = '';
    // Temporarily disable the submit button
    document.querySelector('#submit').disabled = true;
    // Update the button value
    document.querySelector('#submit').value = `(1/${totalRecipients}) Processing...`;
};
// The below code will send a new email every 3 seconds, but only if the form has been processed
setInterval(() => {
    // If there are recipients...
    if (recipients.length > 0) {
        // Create form data
        let formData = new FormData();
        // Append essential data
        formData.append('recipient', recipients[0].value);
        formData.append('template', document.querySelector('#template').value);
        formData.append('subject', document.querySelector('#subject').value);
        // Use AJAX to process the form
        fetch(newsletterForm.action, {
            method: 'POST',
            body: formData
        }).then(response => response.text()).then(data => {
            // If success
            if (data.includes('success')) {
                // Increment variables
                recipientsProcessed++;
                // Update button value
                document.querySelector('#submit').value = `(${recipientsProcessed}/${totalRecipients}) Processing...`;
                // When all recipients have been processed...
                if (recipientsProcessed == totalRecipients) {
                    // Reset everything
                    newsletterForm.reset();
                    document.querySelector('#submit').disabled = false;
                    document.querySelector('#submit').value = `Submit`;
                    document.querySelector('.responses').innerHTML = 'Newsletter sent successfully!';
                }
            } else {
                // Error
                document.querySelector('.responses').innerHTML = data;
            }
        });
        // Remove the first item from array
        recipients.shift();
    }
}, 3000); // 3000 ms = 3 seconds
</script>
This JavaScript code loops through your selected recipients. It sends an AJAX request for each one every 3 seconds, but only after you've hit submit. To do that, we select all the recipients with the :selected selector and subsequently remove the recipient from the array when it has been processed.
JS TipThe setInterval() method executes a function at specified intervals, meaning the code will be repeatedly executed every X milliseconds. In our case, the function will execute every 3 seconds.
The recipientsProcessed variable will determine how many recipients have been processed and we can update the label accordingly, but only if the response from the AJAX request is successful. This provides real-time feedback to the user about the sending process, enhancing usability.
7.3. Form Handling with PHP
In the final step, we will implement code to process the form and utilize the mail function to send our newsletter to selected recipients.
Prepend the following code to the newsletter.php file (placed at the top):
<?php
include 'main.php';
// NOTICE: THE FOLLOWING PAGE IS UNRESTRICTED AND THEREFORE WE SUGGEST YOU IMPLEMENT RESTRICTIONS BEFORE GOING PRODUCTION
// Get all subscribers from the database
$stmt = $pdo->prepare('SELECT * FROM subscribers');
$stmt->execute();
$subscribers = $stmt->fetchAll(PDO::FETCH_ASSOC);
// Process form
if (isset($_POST['recipient'], $_POST['subject'], $_POST['template'])) {
    // From address
    $from = 'Your Company Name <noreply@yourdomain.com>';
	// Email Headers
	$headers = 'From: ' . $from . "\r\n" . 'Reply-To: ' . $from . "\r\n" . 'Return-Path: ' . $from . "\r\n" . 'X-Mailer: PHP/' . phpversion() . "\r\n" . 'MIME-Version: 1.0' . "\r\n" . 'Content-Type: text/html; charset=UTF-8' . "\r\n";
	// Determine the subscriber
    $subscriber = null;
    foreach ($subscribers as $s) {
        if ($s['email'] == $_POST['recipient']) {
            $subscriber = $s;
        }
    }
    // Make sure subscriber exists
    if ($subscriber) {
        // Update the unsubscribe link
        $unsubscribe_link = 'https://example.com/unsubscribe.php?email=' . $subscriber['email'] . '&code=' . sha1($subscriber['id'] . $subscriber['email']);
        // Replace the placeholder
        $template = str_replace('%unsubscribe_link%', $unsubscribe_link, $_POST['template']);
        // Send email to user
        if (mail($_POST['recipient'], $_POST['subject'], $template, $headers)) {
            exit('success');
        } else {
            exit('Failed to send newsletter! Please check your SMTP mail server!');
        }
    } else {
        exit('Invalid recipient!');
    }
}
?>
The $subscribers associative array will populate the list of recipients using the foreach loop that we implemented previously.
Because we're going to submit the form data to the same file, we have implemented the isset() function to check whether the captured data exists or not. If it exists, we can process the form and send the newsletter using the mail() function.
Did You Know?For the mail() function to work correctly, you need a working SMTP mail server.
Don't forget to update the $from variable to reflect your business name and email address. Do NOT remove the symbols next to the email address. Also, the $unsubscribe_link variable must reflect your domain name and point to your unsubscribe file. To add the unsubscribe link to the template, simply place %unsubscribe_link% in your newsletter HTML template.
We can finally test the implementation — if all goes well, the number of recipients processed will appear above the form button. If not, you might want to check that you have a working SMTP mail server installed and configured correctly.
Conclusion
You've now learned the core steps to build a newsletter system with PHP and MySQL. The main idea was to show you how to manage a subscriber list and send HTML emails using PHP's mail function.
However, it's important to note that the current code is not production-ready. You'll need to implement security measures to restrict access to the newsletter file, as leaving it exposed could allow unauthorized users to execute form requests via a browser.
If you found this tutorial helpful, please consider sharing it on social media. Your support helps us continue creating high-quality content!
Happy coding!
Skip the copy-pasting and get the complete, working project from this tutorial as a free ZIP with a setup guide included. Free for personal and commercial use.
If you would like to support us, consider the advanced newsletter & mailing system below. It will greatly help us create more tutorials and keep our website up and running. The advanced package includes improved code and more features.