 Download the full source codeComplete working project · Setup guide included · Free for commercial use
Free ZIP
Download the full source codeComplete working project · Setup guide included · Free for commercial use
Free ZIP
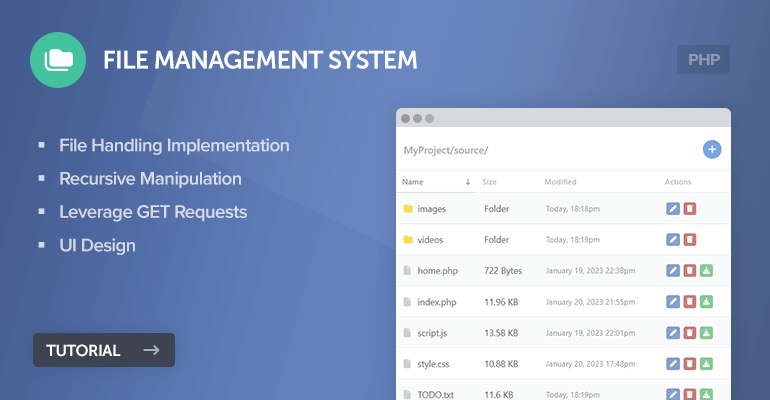
In this tutorial, we'll be developing an elegant file management system that'll enable us to create, rename, delete, and download files while implementing modern interfaces and utilizing the best coding practices.
Do NOT upload the code to a public network, otherwise your server files will be at risk of exposure, and therefore anyone with access can manipulate your files and directories.
The Advanced Package includes additional features and a download link to the source code. In addition, it includes the complete tutorial source code.
I've been contemplating whether I should write a file management system tutorial or not due to the risks that are involved, such as I wouldn't want your server to be compromised because you accidentally uploaded the source code to a public network. However, because the demand is high, I've decided to proceed.
Contents
1. Introduction
The file management system includes many functionalities that'll enable us to manipulate files, but why use PHP as the core programming language? PHP includes an abundance of methods that can range from manipulating, retrieving (including subdirectories), and reading the metadata of our files and directories.
In addition, we can leverage GET requests to determine the selected directory and/or file, and subsequently populate the listing based on such data. Utilizing the best practices can help us create a modern file management system.
1.1. What's a File Management System?
A file management system provides a user-friendly interface for creating, editing, and deleting files and/or directories on your server.
2. Getting Started
We'll be developing our project with PHP, so we'll need a web server stack package. In addition, we'll create the structure for our project.
2.1. Setting Up a Local Web Server
The local web server is required to execute our PHP files and therefore an essential part of our project. Follow the below instructions.
- Download and install XAMPP.
- Once installed, open the XAMPP Control Panel as Administrator.
- Next to the Apache module, click the Start button.
- If successful, the background will appear green and therefore our local web server is ready to be used.
Go ahead and navigate to your XAMPP installation directory (e.g. C:\xampp), and navigate to the htdocs directory, which is the root directory for all our website-related apps.
Warning XAMPP should NOT be installed on a public network because it's designed to be used for development purposes only.
2.2. Project File Structure
While in our htdocs directory, create the following directories and files:
File Structure
\-- phpfilemanager
|-- style.css
|-- index.php
|-- create.php
|-- delete.php
|-- rename.php
Each file will consist of the following:
- style.css — The stylesheet for our file management system will structure our layout and make our UI look more appealing.
- index.php — The index file is the main file we'll use to populate all the files and directories. In addition, we'll handle the GET requests and declare essential functions.
- create.php — This file will provide a UI form for creating new files and directories.
- delete.php — This file will be responsible for deleting files and empty directories.
- rename.php — Rename existing files and directories.
Even though you can use Notepad to edit the PHP files (no pun intended), I highly recommend using a code editor with syntax highlighting. My personal preference is Visual Studio Code but you can use whichever you prefer.
3. Creating the UI Interface with CSS
The UI is a fundamental part of our project as it will provide a modern look to our file management system. We can seamlessly style our HTML elements with CSS.
In this section, we'll be creating the stylesheet for our project. I'm not going to go into extensive details with the stylesheet because you should already have a basic understanding of CSS and HTML.
That being said, edit the style.css file with your favorite code editor and add:
* {
  box-sizing: border-box;
  font-family: -apple-system, BlinkMacSystemFont, "segoe ui", roboto, oxygen, ubuntu, cantarell, "fira sans", "droid sans", "helvetica neue", Arial, sans-serif;
  font-size: 16px;
}
html {
  margin: 0;
  background: #f8f9f9 linear-gradient(0deg, #f8f9f9 0%, #f8f9f9 83%, #4b82c5 83%, #4b82c5 100%) no-repeat;
  padding: 30px;
  height: 100%;
}
h1, h2, h3, h4, h5 {
  color: #4a5361;
  margin: 0;
  padding: 0;
}
.file-manager {
  background: #fff;
  width: 600px;
  margin: 0 auto;
  margin-top: 30px;
  box-shadow: 0px 0px 5px 0px rgba(0, 0, 0, 0.2);
}
.file-manager form {
  display: flex;
  flex-flow: column;
  padding: 0 15px;
}
.file-manager form label {
  padding: 10px 0;
}
.file-manager form input, .file-manager form select {
  border: 1px solid #c4c7cf;
  padding: 10px;
  border-radius: 4px;
}
.file-manager form button {
  display: inline-flex;
  align-items: center;
  justify-content: center;
  width: 100px;
  appearance: none;
  cursor: pointer;
  border: 0;
  border-radius: 4px;
  margin: 15px 0;
  padding: 10px;
  background-color: #4a79b4;
  color: #fff;
  font-weight: 500;
  font-size: 14px;
}
.file-manager form button:hover {
  background-color: #4672a9;
}
.file-manager-header {
  display: flex;
  align-items: center;
  width: 100%;
  padding: 20px 0;
}
.file-manager-header h1 {
  display: inline-flex;
  align-items: center;
  margin: 0;
  padding: 0 15px;
  font-size: 18px;
  font-weight: 600;
  color: #7f828a;
  flex: 1;
}
.file-manager-header a {
  display: inline-flex;
  text-decoration: none;
  color: #fff;
  background-color: #397ed3;
  justify-content: center;
  align-items: center;
  border-radius: 50px;
  width: 34px;
  height: 34px;
  margin-right: 15px;
}
.file-manager-header a:hover {
  background-color: #2e76cf;
}
.file-manager-table {
  border-collapse: collapse;
  width: 100%;
}
.file-manager-table thead tr td {
  position: relative;
  border-top: 1px solid #dbdde0;
  border-bottom: 1px solid #dbdde0;
  padding: 10px 12px;
  font-size: 14px;
  font-weight: 500;
  text-decoration: none;
  color: #9a9ea7;
}
.file-manager-table thead tr td.selected-column {
  border-bottom: 1px solid #a4a9b1;
  color: #52565c;
}
.file-manager-table thead tr td.selected-column i {
  display: inline-block;
}
.file-manager-table thead tr td i {
  display: none;
  position: absolute;
  right: 10px;
  top: 21px;
}
.file-manager-table tbody tr {
  background-color: #f7f9fa;
  border-bottom: 1px solid #dbdde0;
}
.file-manager-table tbody tr:nth-child(even) {
  background-color: #fff;
}
.file-manager-table tbody tr.selected {
  background-color: #dceeff;
  border-bottom: 1px solid #b0cae2;
}
.file-manager-table tbody tr td {
  padding: 15px;
  color: #000;
}
.file-manager-table tbody tr td.name {
  white-space: nowrap;
  text-overflow: ellipsis;
  overflow: hidden;
}
.file-manager-table tbody tr td.name i {
  width: 25px;
  min-width: 25px;
}
.file-manager-table tbody tr td.name i.fa-folder {
  color: #FBD200;
}
.file-manager-table tbody tr td.name i.fa-file {
  color: #b9bbbe;
}
.file-manager-table tbody tr td.name a {
  text-decoration: none;
  color: #000;
}
.file-manager-table tbody tr td.name a:hover {
  text-decoration: underline;
}
.file-manager-table tbody tr td.date {
  font-size: 14px;
  color: #53555a;
}
.file-manager-table tbody tr td.actions .btn {
  display: inline-flex;
  align-items: center;
  justify-content: center;
  text-decoration: none;
  background: #4a79b4;
  color: #FFFFFF;
  padding: 11px 6px;
  border-radius: 4px;
  margin-right: 2px;
}
.file-manager-table tbody tr td.actions .btn:hover {
  background: #4672a9;
}
.file-manager-table tbody tr td.actions .btn.green {
  background: #4ab46d;
}
.file-manager-table tbody tr td.actions .btn.green:hover {
  background: #46a966;
}
.file-manager-table tbody tr td.actions .btn.red {
  background: #b44a4a;
}
.file-manager-table tbody tr td.actions .btn.red:hover {
  background: #a94646;
}
.file-manager-table tbody tr td.actions .btn:last-child {
  margin-right: 0;
}
That will be all for our stylesheet. Feel free to change the attributes and customize them to your own liking.
4. Developing the File Management System with PHP
We can finally start programming our file management system with PHP. In this section, we'll cover a large array of file manipulation techniques, including directory iteration with glob, determining the current directory with GET requests, file sortation, and so on.
4.1. Retrieve Files and Directories Listing
We can't populate the directory listing without implementing code that searches a specified directory and retrieves all the file and directory names. In our case, we can leverage the glob() function to do this task.
Edit the index.php file and add:
<?php
// The initial directory path (e.g. /www/your_directory/)
$initial_directory = '';
// The current directory path
$current_directory = $initial_directory;
// Retrieve all files and directories
$results = glob(str_replace(['[',']',"\f[","\f]"], ["\f[","\f]",'[[]','[]]'], ($current_directory ? $current_directory : $initial_directory)) . '*');
// If true, directories will appear first in the populated file list
$directory_first = true;
// Sort files
if ($directory_first) {
    usort($results, function($a, $b){
        $a_is_dir = is_dir($a);
        $b_is_dir = is_dir($b);
        if ($a_is_dir === $b_is_dir) {
            return strnatcasecmp($a, $b);
        } else if ($a_is_dir && !$b_is_dir) {
            return -1;
        } else if (!$a_is_dir && $b_is_dir) {
            return 1;
        }
    });
}
In the above code, we're using the glob function to retrieve the directory listing, which will be returned as an array of file and directory names. In addition, we've incorporated code that will prioritize the directories, so they'll appear first in the listing.
Did You Know? The is_dir() function can be used to identify a directory.
The glob() function has its limitations, and therefore we've implemented the str_replace() function to replace special characters that are known to cause issues.
4.2. Convert Bytes to Human-readable Format
Unfortunately, there isn't an in-built function that we can use to convert bytes to a human-readable format (e.g. KB, MB, GB), so we have to do it the tedious way and implement one ourselves. Luckily, I've already developed such a function in a previous project, so with a bit of modification, we can seamlessly adapt it to our needs.
Add after:
// Convert bytes to human readable format
function convert_filesize($bytes, $precision = 2) {
    $units = ['Bytes', 'KB', 'MB', 'GB', 'TB'];
    $bytes = max($bytes, 0);
    $pow = floor(($bytes ? log($bytes) : 0) / log(1024));
    $pow = min($pow, count($units) - 1);
    $bytes /= pow(1024, $pow);
    return round($bytes, $precision) . ' ' . $units[$pow];
}
We can now execute the above function whenever we need to convert bytes.
4.3. Determine the File Type Icon
The following function requires the Font Awesome library to be embedded in our project (we'll do that later). As you may know, I'm a big fan of the library and tend to use it in the majority of projects I post on here, so kudos to the Font Awesome team!
Add below the above code:
// Determine the file type icon
function get_filetype_icon($filetype) {
    if (is_dir($filetype)) {
        return '<i class="fa-solid fa-folder"></i>';
    } else if (preg_match('/image\/*/', mime_content_type($filetype))) {
        return '<i class="fa-solid fa-file-image"></i>';
    } else if (preg_match('/video\/*/', mime_content_type($filetype))) {
        return '<i class="fa-solid fa-file-video"></i>';
    } else if (preg_match('/audio\/*/', mime_content_type($filetype))) {
        return '<i class="fa-solid fa-file-audio"></i>';
    } else if (preg_match('/audio\/*/', mime_content_type($filetype))) {
        return '<i class="fa-solid fa-file-audio"></i>';
    }
    return '<i class="fa-solid fa-file"></i>';
}
?>
The above code will determine the file types and return the appropriate icon, which will be displayed when we populate the listing in our template. We can leverage the mime_content_type() function to determine the file type and regex to find a matched pattern.
It will help distinguish the files and directories when we populate them in our template.
4.4. Populating the Files and Directories
Next up, we'll implement the entire template for our project. The template will consist of HTML elements and PHP code that'll iterate the $results array and populate them accordingly.
Add after:
<!DOCTYPE html>
<html>
	<head>
		<meta charset="utf-8">
        <meta name="viewport" content="width=device-width,minimum-scale=1">
		<title>File Management System</title>
		<link href="style.css" rel="stylesheet" type="text/css">
        <link rel="stylesheet" href="https://cdnjs.cloudflare.com/ajax/libs/font-awesome/6.2.0/css/all.min.css" integrity="sha512-xh6O/CkQoPOWDdYTDqeRdPCVd1SpvCA9XXcUnZS2FmJNp1coAFzvtCN9BmamE+4aHK8yyUHUSCcJHgXloTyT2A==" crossorigin="anonymous" referrerpolicy="no-referrer">
	</head>
	<body>
        <div class="file-manager">

            <div class="file-manager-header">
                <h1><?=$current_directory?></h1>
                <a href="create.php?directory=<?=$current_directory?>"><i class="fa-solid fa-plus"></i></a>
            </div>

            <table class="file-manager-table">
                <thead>
                    <tr>
                        <td class="selected-column">Name<i class="fa-solid fa-arrow-down-long fa-xs"></i></td>
                        <td>Size</td>
                        <td>Modified</td>
                        <td>Actions</td>
                    </tr>
                </thead>
                <tbody>
                    <?php if (isset($_GET['file']) && realpath($current_directory) != realpath($initial_directory)): ?>
                    <tr>
                        <td colspan="10" class="name"><i class="fa-solid fa-folder"></i><a href="?file=<?=urlencode($_GET['file']) . '/..'?>">...</a></td>
                    </tr>
                    <?php endif; ?>
                    <?php foreach ($results as $result): ?>
                    <tr class="file">
                        <td class="name"><?=get_filetype_icon($result)?><a class="view-file" href="?file=<?=urlencode($result)?>"><?=basename($result)?></a></td>
                        <td><?=is_dir($result) ? 'Folder' : convert_filesize(filesize($result))?></td>
                        <td class="date"><?=str_replace(date('F j, Y'), 'Today,', date('F j, Y H:ia', filemtime($result)))?></td>
                        <td class="actions">
                            <a href="rename.php?file=<?=urlencode($result)?>" class="btn"><i class="fa-solid fa-pen fa-xs"></i></a>
                            <a href="delete.php?file=<?=urlencode($result)?>" class="btn red" onclick="return confirm('Are you sure you want to delete <?=basename($result)?>?')"><i class="fa-solid fa-trash fa-xs"></i></a>
                            <?php if (!is_dir($result)): ?>
                            <a href="?file=<?=urlencode($result)?>" class="btn green"><i class="fa-solid fa-download fa-xs"></i></a>
                            <?php endif; ?>
                        </td>
                    </tr>
                    <?php endforeach; ?>
                </tbody>
            </table>

        </div>
    </body>
</html>
In the above template code, the $results array is iterated using a foreach loop and subsequently populated in an HTML table element. In addition, we have included the buttons that'll be used to manage our files and directories, which are associated with the pages we'll create later on.
The create button and current directory label will appear at the top. We're binding a parameter to the create button as it'll help us identify which directory to create the new file/directory.
The realpath() function compares the current directory path with the initial directory path, meaning if both paths are different, it's clear the user is navigating a subdirectory, and therefore output the previous directory button which is represented as dots.
If we navigate to our newly created index file, we should see something similar to the following:
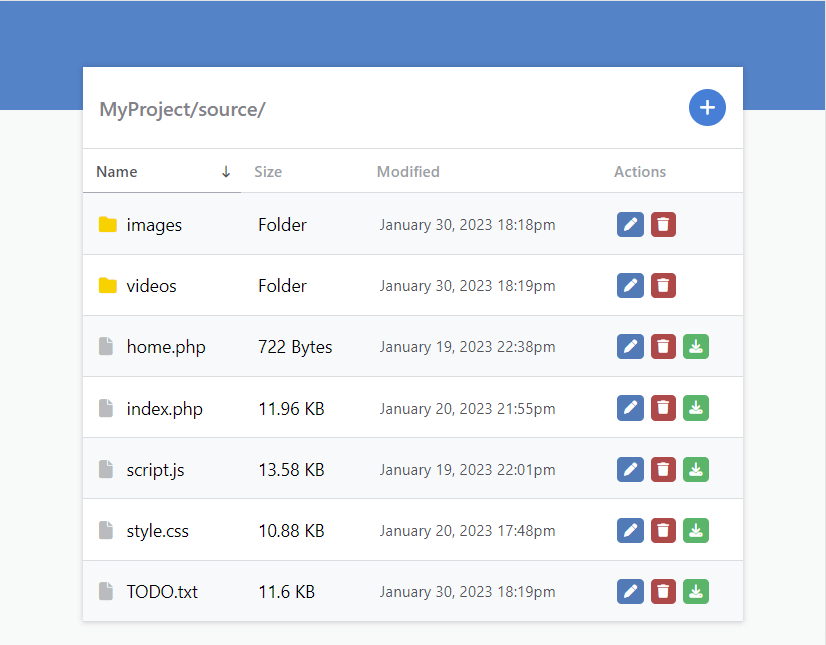
The links are not functional right now as we haven't got to that stage yet.
4.5. Handling the GET Requests
In this section, we shall utilize GET requests to determine which directory to navigate to and download files.
After:
$current_directory = $initial_directory;Add:
// Navigate to directory or download file
if (isset($_GET['file'])) {
    // If the file is a directory
    if (is_dir($_GET['file'])) {
        // Update the current directory
        $current_directory = $_GET['file'] . '/';
    } else {
        // Download file
        header('Content-Description: File Transfer');
        header('Content-Type: application/octet-stream');
        header('Content-Disposition: attachment; filename="' . basename($_GET['file']) . '"');
        readfile($_GET['file']);
        exit;
    }
}
The above code will check to see if the file parameter exists in the URI. If it does, it will proceed to check if the value is a directory, and if so, update the $current_directory variable we declared earlier. If the value is a file, the combination of the header() and readfile() functions will download the file.
To navigate to a subdirectory, we can simply click the directory name, and it will redirect us to the corresponding directory. Pretty cool, right?
Note You can change the directory by adjusting the GET parameter in the URI, so please be aware that by uploading the source code to a public network, you're exposing all your server files.
Next up, we'll develop the create page.
4.6. Developing the File Creation Page
In this section, we'll implement code that'll enable us to create new files and/or directories with an HTML form. We'll be utilizing POST requests to process the form data.
Edit the create.php file and add:
<?php
// Make sure GET param exists
if (isset($_GET['directory'])) {
    // If form submitted
    if (isset($_POST['filename'], $_POST['type'])) {
        // Make sure there are no special characters (excluding hyphens, dots, and whitespaces)
        if (preg_match('/^[\w\-. ]+$/', $_POST['filename'])) {
            // Create directory or else create a file
            if ($_POST['type'] == 'directory') {
                mkdir($_GET['directory'] . $_POST['filename']);
            } else {
                file_put_contents($_GET['directory'] . $_POST['filename'], '');
            }
            // Redirect to the index page
            if ($_GET['directory']) {
                header('Location: index.php?file=' . urlencode($_GET['directory']));
            } else {
                header('Location: index.php');
            }
            exit;
        } else {
            exit('Please enter a valid name!');
        }
    }
} else {
    exit('Invalid directory!');
}
?>
The above code will process the form data and make sure the captured data doesn't include special characters (excluding hyphens, dots, and whitespace). To create a new directory, we have to execute a separate function called mkdir(). Creating both files and directories is relatively straightforward with PHP.
Add after:
<!DOCTYPE html>
<html>
	<head>
		<meta charset="utf-8">
        <meta name="viewport" content="width=device-width,minimum-scale=1">
		<title>File Management System</title>
		<link href="style.css" rel="stylesheet" type="text/css">
        <link rel="stylesheet" href="https://cdnjs.cloudflare.com/ajax/libs/font-awesome/6.2.0/css/all.min.css" integrity="sha512-xh6O/CkQoPOWDdYTDqeRdPCVd1SpvCA9XXcUnZS2FmJNp1coAFzvtCN9BmamE+4aHK8yyUHUSCcJHgXloTyT2A==" crossorigin="anonymous" referrerpolicy="no-referrer">
	</head>
	<body>
        <div class="file-manager">

            <div class="file-manager-header">
                <h1>Create</h1>
            </div>

            <form action="" method="post">

                <label for="type">Type</label>
                <select id="type" name="type">
                    <option value="directory">Directory</option>
                    <option value="file">File</option>
                </select>

                <label for="filename">Name</label>
                <input id="filename" name="filename" type="text" placeholder="Name" required>

                <button type="submit">Save</button>

            </form>

        </div>
    </body>
</html>
With the above form, we can select whether we want to create a new file or directory. We don't need to set a value for the form action attribute as the data will be captured in the same file, so we can leave that blank.
If we navigate to our new page using the create button, we should see the following:
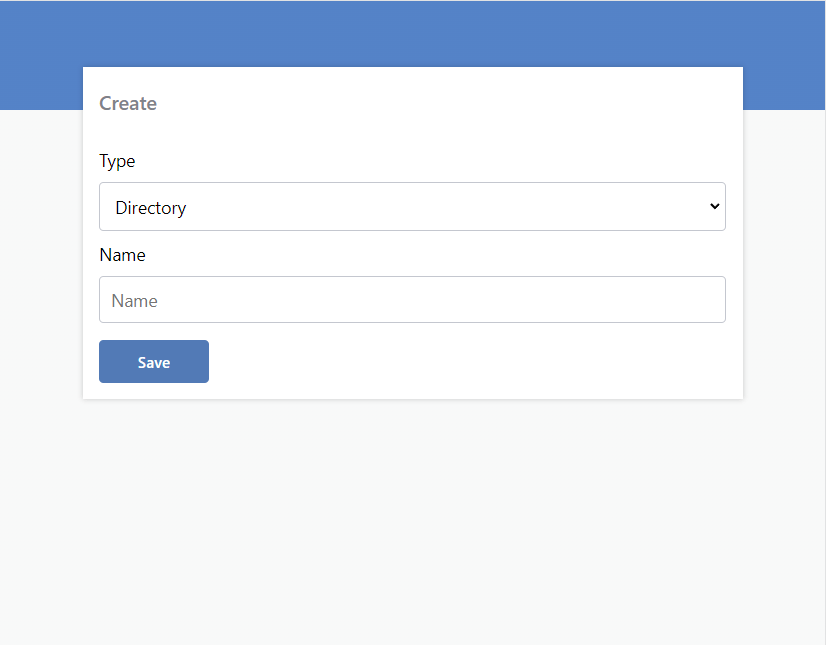
That's all we need to do to create new files and directories on our local web server. We can proceed to implement the file deletion code.
4.7. Developing the File Deletion Page
Because we've already implemented the delete button in our file manager template and associated the file with the GET parameter, all we have to do is add code to delete the file or directory.
Edit the delete.php file and add:
<?php
// Ensure captured GET param exists
if (isset($_GET['file'])) {
    // Check if file is a directory
    if (is_dir($_GET['file'])) {
        // Attempt to delete the directory
        if (rmdir($_GET['file'])) {
            // Delete success! Redirect to file manager page
            header('Location: index.php');
            exit;
        } else {
            // Delete failed - directory is empty or insufficient permissions
            exit('Directory must be empty!');
        }
    } else {
        // Delete the file
        unlink($_GET['file']);
        // Delete success! Redirect to file manager page
        header('Location: index.php');
        exit;
    }
} else {
    exit('Invalid Request!');
}
?>
The above code will delete a file or directory based on the GET parameter value. If it's a directory, the rmdir() function will suffice. Although to delete a directory with PHP, the directory must be empty, so you would have to navigate to the directory and delete the files separately. I suppose you could think of it as a protective measure, so you don't accidentally delete the wrong files.
In addition, if the GET parameter value is a file, we can leverage the unlink() function to delete it. Please be aware though, files are permanently deleted with PHP, meaning they will not end up in your recycling bin. They are gone forever.
Did You Know? The isset() function will check if a variable exists, which is especially useful for POST and GET requests.
I have included a JS popup confirmation box in the file manager template to prevent you from accidentally deleting the wrong files.
4.8. Developing the File Rename Page
Finally, we can finish up the tutorial by implementing the rename page, which will allow us to rename files and directories.
Edit the rename.php file and add:
<?php
// Make sure GET param exists
if (isset($_GET['file'])) {
// If form submitted
if (isset($_POST['filename'])) {
// Make sure there are no special characters (exluding hyphens, dots, and whitespaces)
if (preg_match('/^[\w\-. ]+$/', $_POST['filename'])) {
// Rename the file
rename($_GET['file'], rtrim(pathinfo($_GET['file'], PATHINFO_DIRNAME), '/') . '/' . $_POST['filename']);
// Redirect to the index page
header('Location: index.php');
exit;
} else {
exit('Please enter a valid name!');
}
}
} else {
exit('Invalid file!');
}
?>
<!DOCTYPE html>
<html>
<head>
<meta charset="utf-8">
<meta name="viewport" content="width=device-width,minimum-scale=1">
<title>File Management System</title>
<link href="style.css" rel="stylesheet" type="text/css">
<link rel="stylesheet" href="https://cdnjs.cloudflare.com/ajax/libs/font-awesome/6.2.0/css/all.min.css" integrity="sha512-xh6O/CkQoPOWDdYTDqeRdPCVd1SpvCA9XXcUnZS2FmJNp1coAFzvtCN9BmamE+4aHK8yyUHUSCcJHgXloTyT2A==" crossorigin="anonymous" referrerpolicy="no-referrer">
</head>
<body>
<div class="file-manager">
<div class="file-manager-header">
<h1>Rename</h1>
</div>
<form action="" method="post">
<label for="filename">Name</label>
<input id="filename" name="filename" type="text" placeholder="Name" value="<?=basename($_GET['file'])?>" required>
<button type="submit">Save</button>
</form>
</div>
</body>
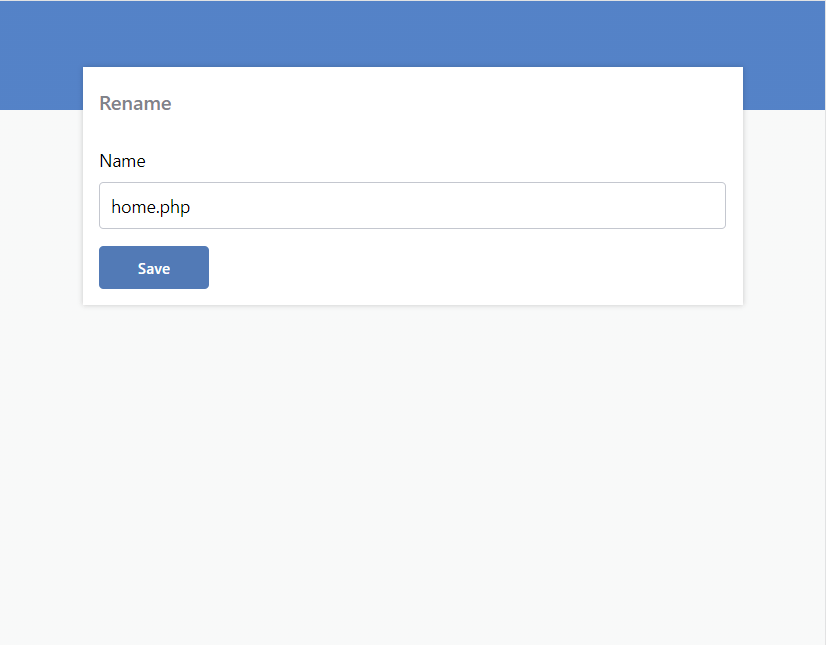
</html>Once again, we have incorporated POST and GET requests to process the form data. To rename a file or directory, we can simply use the rename() function. The pathinfo() function we've implemented will get the current directory.
If we click on one of the rename buttons in our populated file list, we'll be redirected to the rename page, which should look like the following:
Conclusion
Congratulions! You've successfully developed a file management system with PHP. If you've enjoyed reading the article, consider sharing it with the social buttons or drop a comment below.
I must emphasize again that you must NOT upload the source files to a public network as all your server files could be exposed to unauthorized users. Integrating it with a secure login system could solve the issue, but you should always tread carefully when using file manipulation methods.
As always, thanks for reading, and enjoy coding!
Advanced package coming soon...
Skip the copy-pasting and get the complete, working project from this tutorial as a free ZIP with a setup guide included. Free for personal and commercial use.
If you would like to support us, consider the advanced file management system below. It will greatly help us create more tutorials and keep our website up and running. The advanced package includes improved code and more features.