In this tutorial, you'll learn how to create a commenting system from scratch using PHP, MySQL, and AJAX (JavaScript). This will add a dynamic comment section to your website, so your visitors can share their thoughts and opinions.
I'll show you how to build a commenting system that is simple, clean, and fast. And with the use of AJAX, you can seamlessly implement the system on any webpage.
We'll use a MySQL database to store all the comments, which will be displayed on the page using PHP and HTML.
The Advanced package includes additional features and a download link to the source code.
Contents
1. Getting Started
You will need to install a web server environment if you're going to test the commenting system on your own computer system. Follow the below instructions.
- Install a web server environment solution package — I recommend you install XAMPP.
- If you have your own production server (VPS, Dedicated, etc.), you'll need to install PHP, Apache, MySQL, and phpMyAdmin (Note: these are already included with XAMPP).
- Install a code editor. You can use Notepad, but I don't recommend it, use one of the following instead: Visual Studio Code or Notepad++.
2. Creating the Database and setting-up Tables
We need to create the MySQL database and create the comments table, as that is what we'll use to store and retrieve all our comments. You can do this using phpMyAdmin.
Navigate to phpMyAdmin (e.g. localhost/phpmyadmin/) in your browser and follow the below instructions:
- Click the Databases tab at the top
- Under Create database, type in phpcomments in the text box
- Select utf8mb4_unicode_ci as the collation (UTF-8 is the default encoding in HTML5)
- Click Create
While the database is selected, click the SQL tab and execute the following statement code:
CREATE TABLE IF NOT EXISTS `comments` (
  `id` int(11) NOT NULL AUTO_INCREMENT,
  `page_id` int(11) NOT NULL,
  `parent_id` int(11) NOT NULL DEFAULT -1,
  `display_name` varchar(255) NOT NULL,
  `content` mediumtext NOT NULL,
  `submit_date` datetime NOT NULL DEFAULT current_timestamp(),
  PRIMARY KEY (`id`)
) ENGINE=InnoDB AUTO_INCREMENT=4 DEFAULT CHARSET=utf8mb4 COLLATE=utf8mb4_unicode_ci;

INSERT INTO `comments` (`id`, `page_id`, `parent_id`, `display_name`, `content`, `submit_date`) VALUES
(1, 1, -1, 'John Doe', 'Thank you for taking the time to write this article, I really enjoyed reading it!\r\n\r\nThank you, David!', '2025-07-23 14:00:00'),
(2, 1, 1, 'David Adams', 'It\'s good to hear that you enjoyed this article.', '2025-07-23 14:30:00'),
(3, 1, -1, 'Michael', 'I appreciate the time and effort you spent writing this article, good job!', '2025-07-23 15:00:00');
The above SQL statement will create the comments table with the following columns:
- id — The unique comment ID.
- page_id — This will determine which comment is for which page. It will be the page ID that you can specify on any webpage.
- parent_id — The parent comment ID that we'll use for comment replies.
- display_name — The name of the user (e.g., Joe Bloggs).
- content — The comment content will be what the user inputs via the form.
- submit_date — The date the comment was posted.
The data that we insert into the comments table will be for testing purposes.
This database table is the foundation of our PHP and MySQL commenting system. Each column has a specific purpose, from storing the comment content to linking replies to their parent comments.
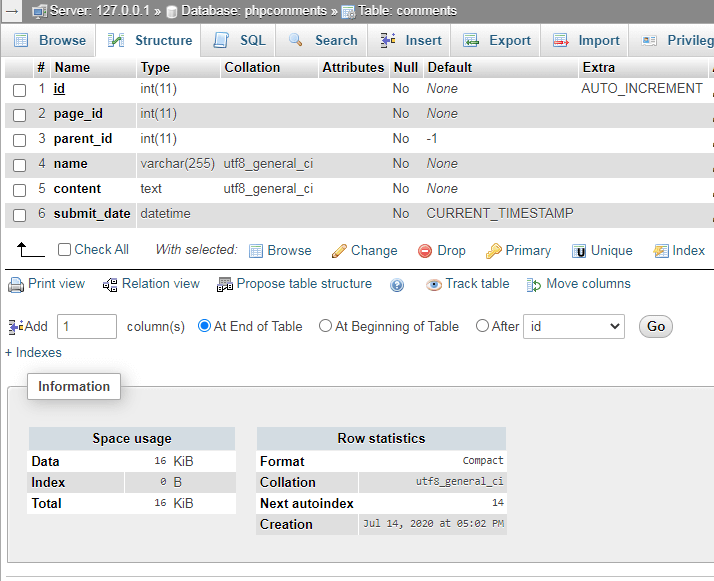
In phpMyAdmin, the table structure should resemble the following:
3. Creating the Stylesheets (CSS3)
We're going to create two CSS files. One will be for our homepage, which we'll use as an example of how to implement the commenting system. The second CSS file will be for the commenting system itself.
A clean and user-friendly design is important for any website feature. Good CSS makes the comment section easy to read and interact with, which will encourage more users to participate.
Create the style.css file and add the following:
* {
  box-sizing: border-box;
  font-family: system-ui, "Segoe UI", Roboto, Helvetica, Arial, sans-serif, "Apple Color Emoji", "Segoe UI Emoji", "Segoe UI Symbol";
  font-size: 16px;
}
body {
  background-color: #FFFFFF;
  margin: 0;
}
.page-nav {
  background-color: #28303d;
  height: 60px;
  width: 100%;
  border: 0;
}
.page-nav div {
  display: flex;
  align-items: center;
  margin: 0 auto;
  width: 800px;
  height: 100%;
}
.page-nav div h1 {
  flex: 1;
  font-size: 18px;
  padding: 0;
  margin: 0;
  color: rgb(233.5, 234.3, 235.6);
  font-weight: 500;
}
.page-content {
  width: 800px;
  margin: 0 auto;
}
.page-content > h2 {
  margin: 0;
  padding: 35px 0 20px 0;
  font-size: 26px;
  font-weight: 600;
  color: #666666;
}
.page-content > p {
  font-size: 16px;
  line-height: 1.6;
  margin: 0;
  padding: 15px 0;
  color: #666666;
}
Create the comments.css file and add:
.comments {
  padding: 20px 0 50px 0;
}
.comments .comment_header {
  display: flex;
  justify-content: space-between;
  padding: 15px 0;
  margin-bottom: 10px;
  align-items: center;
}
.comments .comment_header .total {
  color: #555761;
  font-size: 18px;
  padding-right: 25px;
  font-weight: 500;
}
.comments .comment_header .write_comment_btn {
  margin: 0;
}
.comments .write_comment_btn, .comments .write_comment button {
  display: inline-flex;
  align-items: center;
  justify-content: center;
  background-color: #3b3c3f;
  color: #ffffff;
  text-decoration: none;
  margin: 5px 6px 0 0;
  padding: 0 14px;
  border-radius: 5px;
  font-size: 14px;
  font-weight: 600;
  height: 35px;
  border: 0;
  position: relative;
  overflow: hidden;
  box-shadow: 0 0 6px 1px rgba(20, 24, 31, 0.05);
}
.comments .write_comment_btn:hover, .comments .write_comment button:hover {
  background-color: rgb(46.6680327869, 47.4590163934, 49.8319672131);
}
.comments .write_comment {
  display: none;
  padding: 10px 0;
}
.comments .write_comment textarea {
  width: 100%;
  padding: 10px;
  border: 1px solid #dfe1e7;
  border-radius: 5px;
  height: 150px;
  margin: 20px 0 10px 0;
}
.comments .write_comment textarea::placeholder {
  color: #95979e;
}
.comments .write_comment input {
  display: block;
  width: 250px;
  padding: 10px;
  border: 1px solid #dfe1e7;
  border-radius: 5px;
  margin-top: 10px;
}
.comments .write_comment input::placeholder {
  color: #95979e;
}
.comments .write_comment button {
  cursor: pointer;
}
.comments .comment {
  display: flex;
  flex-flow: row;
  width: 100%;
  max-width: 100%;
  padding-top: 10px;
}
.comments .comment .avatar {
  width: 55px;
  padding-right: 12px;
}
.comments .comment .avatar span {
  display: flex;
  align-items: center;
  justify-content: center;
  width: 40px;
  height: 40px;
  color: #fff;
  background-color: #777;
  border-radius: 50px;
  font-size: 16px;
  font-weight: 600;
}
.comments .comment .con {
  display: flex;
  flex-flow: column;
  width: calc(100% - 55px);
  max-width: calc(100% - 55px);
}
.comments .comment .name {
  display: inline;
  font-size: 16px;
  font-weight: 500;
  margin-right: 5px;
  color: #45464d;
}
.comments .comment .date {
  color: #8a8a92;
  font-size: 14px;
}
.comments .comment .content {
  margin: 0;
  padding: 10px 0;
  color: #1c1c1c;
}
.comments .comment .reply_comment_btn {
  display: inline-block;
  text-decoration: none;
  margin-bottom: 10px;
  font-size: 14px;
  color: #8a8a92;
}
.comments .comment .reply_comment_btn:hover {
  text-decoration: underline;
}
Feel free to customize the stylesheets above and add your own CSS rules.
4. Creating the Commenting System with PHP
Now, let's start coding the commenting system with PHP. In this part, we'll connect to our MySQL database using PDO, create some template functions, and use prepared statements to prevent SQL injection.
This is where the magic happens. The PHP script is the backend of our commenting system. It handles the database connection, retrieves comments, and processes new submissions. Using prepared statements is a crucial security measure to prevent SQL injection attacks.
Create the comments.php file and add:
<?php
// Update the details below with your MySQL details
$DATABASE_HOST = 'localhost';
$DATABASE_USER = 'root';
$DATABASE_PASS = '';
$DATABASE_NAME = 'phpcomments';
try {
    $pdo = new PDO('mysql:host=' . $DATABASE_HOST . ';dbname=' . $DATABASE_NAME . ';charset=utf8mb4', $DATABASE_USER, $DATABASE_PASS);
} catch (PDOException $exception) {
    // If there is an error with the connection, stop the script and display the error
    exit('Failed to connect to database!');
}
The code above will connect to our MySQL database using the PDO interface. Remember to update the connection variables to reflect your own details. If something goes wrong, you'll see an error message on the screen.
Add after:
// The following function will be used to assign a unique icon color to our users
function color_from_string($string) {
    // The list of hex colors
    $colors = ['#34568B','#FF6F61','#6B5B95','#88B04B','#F7CAC9','#92A8D1','#955251','#B565A7','#009B77','#DD4124','#D65076','#45B8AC','#EFC050','#5B5EA6','#9B2335','#DFCFBE','#BC243C','#C3447A','#363945','#939597','#E0B589','#926AA6','#0072B5','#E9897E','#B55A30','#4B5335','#798EA4','#00758F','#FA7A35','#6B5876','#B89B72','#282D3C','#C48A69','#A2242F','#006B54','#6A2E2A','#6C244C','#755139','#615550','#5A3E36','#264E36','#577284','#6B5B95','#944743','#00A591','#6C4F3D','#BD3D3A','#7F4145','#485167','#5A7247','#D2691E','#F7786B','#91A8D0','#4C6A92','#838487','#AD5D5D','#006E51','#9E4624'];
    // Find color based on the string
    $colorIndex = hexdec(substr(sha1($string), 0, 10)) % count($colors);
    // Return the hex color
    return $colors[$colorIndex];
}
// Below function will convert datetime to time elapsed string.
function time_elapsed_string($datetime, $full = false) {
    $now = new DateTime;
    $ago = new DateTime($datetime);
    $diff = $now->diff($ago);
    $w = floor($diff->d / 7);
    $diff->d -= $w * 7;
    $string = ['y' => 'year','m' => 'month','w' => 'week','d' => 'day','h' => 'hour','i' => 'minute','s' => 'second'];
    foreach ($string as $k => &$v) {
        if ($k == 'w' && $w) {
            $v = $w . ' week' . ($w > 1 ? 's' : '');
        } else if (isset($diff->$k) && $diff->$k) {
            $v = $diff->$k . ' ' . $v . ($diff->$k > 1 ? 's' : '');
        } else {
            unset($string[$k]);
        }
    }
    if (!$full) $string = array_slice($string, 0, 1);
    return $string ? implode(', ', $string) . ' ago' : 'just now';
}
The above functions will convert our date and time to an elapsed string, which will appear as "1 day ago" etc, in the commenting section and the other function will generate a unique color for each user (avatar).
Add after:
// This function will populate the comments and comments replies using a loop
function show_comments($comments, $parent_id = -1) {
    $html = '';
    if ($parent_id != -1) {
        // If the comments are replies sort them by the "submit_date" column
        array_multisort(array_column($comments, 'submit_date'), SORT_ASC, $comments);
    }
    // Iterate the comments using the foreach loop
    foreach ($comments as $comment) {
        if ($comment['parent_id'] == $parent_id) {
            // Add the comment to the $html variable
            $html .= '
            <div class="comment">
                <div class="avatar">
                    <span style="background-color:' . color_from_string($comment['display_name']) . '">' . htmlspecialchars(strtoupper(substr($comment['display_name'], 0, 1)), ENT_QUOTES) . '</span>
                </div>
                <div class="con">
                    <div>
                        <h3 class="name">' . htmlspecialchars($comment['display_name'], ENT_QUOTES) . '</h3>
                        <span class="date">' . time_elapsed_string($comment['submit_date']) . '</span>
                    </div>
                    <p class="content">' . nl2br(htmlspecialchars($comment['content'], ENT_QUOTES)) . '</p>
                    <a class="reply_comment_btn" href="#" data-comment-id="' . $comment['id'] . '">Reply</a>
                    ' . show_write_comment_form($comment['id']) . '
                    <div class="replies">
                    ' . show_comments($comments, $comment['id']) . '
                    </div>
                </div>
            </div>
            ';
        }
    }
    return $html;
}
This function will populate the array of comments and return the value in HTML format. To get the replies for a comment, we just call the same function again with the parent comment's ID.
The htmlspecialchars function is great because it helps prevent XSS attacks by converting special characters into HTML entities. To decode specific characters or HTML tags, we can leverage the str_replace function to replace specific special characters.
Add after:
// This function is the template for the write comment form
function show_write_comment_form($parent_id = -1) {
    $html = '
    <div class="write_comment" data-comment-id="' . $parent_id . '">
        <form autocomplete="off">
            <input name="parent_id" type="hidden" value="' . $parent_id . '">
            <input name="name" type="text" placeholder="Your Name" required>
            <textarea name="content" placeholder="Write your comment here..." required></textarea>
            <button type="submit">Submit Comment</button>
        </form>
    </div>
    ';
    return $html;
}
This function contains the template for our "write comment" form, which visitors will use to write comments and submit them.
Add after:
// Page ID needs to exist, this is used to determine which comments are for which page
if (isset($_GET['page_id'])) {
    // Check if the submitted form variables exist
    if (isset($_POST['name'], $_POST['content'])) {
        // Get the current date
        $date = date('Y-m-d H:i:s');
        // POST variables exist, insert a new comment into the MySQL comments table (user submitted form)
        $stmt = $pdo->prepare('INSERT INTO comments (page_id, parent_id, display_name, content, submit_date) VALUES (?,?,?,?,?)');
        $stmt->execute([ $_GET['page_id'], $_POST['parent_id'], $_POST['name'], $_POST['content'], $date ]);
        // Output success message
        exit('Your comment has been submitted!');
    }
    // Get all comments by the Page ID ordered by the submit date
    $stmt = $pdo->prepare('SELECT * FROM comments WHERE page_id = ? ORDER BY submit_date DESC');
    $stmt->execute([ $_GET['page_id'] ]);
    $comments = $stmt->fetchAll(PDO::FETCH_ASSOC);
    // Get the total number of comments
    $stmt = $pdo->prepare('SELECT COUNT(*) AS total_comments FROM comments WHERE page_id = ?');
    $stmt->execute([ $_GET['page_id'] ]);
    $comments_info = $stmt->fetch(PDO::FETCH_ASSOC);
} else {
    exit('No page ID specified!');
}
?>
The code above will check if the page ID variable is specified, as this is used to determine which comments to show on which page. If the page ID is not specified, stop the script and output the error.
After that, we grab the comments from the database and put them into an array, sorted by date. The total number of comments is calculated using the MySQL COUNT(*) function.
Add after:
<div class="comment_header">
    <span class="total"><?=$comments_info['total_comments']?> comments</span>
    <a href="#" class="write_comment_btn" data-comment-id="-1">Write Comment</a>
</div>

<?=show_write_comment_form()?>

<?=show_comments($comments)?>
This is the template for our commenting system. The comments are populated by executing the show_comments() function along with the comments associative array variable that we previously defined.
The show_write_comment_form() function shows the form that people can use to write and submit comments.
And that's all the code we need for this file. The next step is to implement the commenting system on a webpage using AJAX.
5. Implementing the Commenting System into our Webpage with AJAX
Now that we have our server-side PHP file created, we can implement the comment system on our webpage.
Create the index.html file and add:
<!DOCTYPE html>
<html>
	<head>
		<meta charset="utf-8">
		<meta name="viewport" content="width=device-width,minimum-scale=1">
		<title>Commenting System</title>
		<link href="style.css" rel="stylesheet" type="text/css">
		<link href="comments.css" rel="stylesheet" type="text/css">
	</head>
	<body>

	    <nav class="page-nav">
	    	<div>
	    		<h1>Commenting System</h1>
	    	</div>
	    </nav>

		<div class="page-content">

			<h2>Article</h2>

			<p>Lorem ipsum dolor sit amet, consectetur adipiscing elit. Nam tristique vel leo a vestibulum. Praesent varius ex elit, vitae pretium felis laoreet in. Nullam sit amet pretium nulla. Aliquam convallis sem vitae tincidunt pulvinar. Integer id ex efficitur, vulputate ante et, vulputate risus.</p>

			<p>Nunc id lacinia mauris. Aliquam pellentesque orci et neque egestas, vel lobortis risus egestas. Curabitur non rhoncus nibh. Donec ante lorem, luctus eget ex eget, malesuada ornare nisl. Class aptent taciti sociosqu ad litora torquent per conubia nostra, per inceptos himenaeos. Etiam consectetur egestas magna non dignissim. Pellentesque sit amet mollis mauris. Nunc quis arcu ac diam tempus auctor. Proin nec commodo nisl.</p>

		</div>

	</body>
</html>
This is the example page where we'll show our comments. The file does not need to be in PHP format because we'll use AJAX to retrieve the comments from our comments.php page.
Append this code to the page-content container:
<div class="comments"></div>

<script>
// The page ID of the comments page - it can be the blog post ID, product ID, etc.
const comments_page_id = 1;
// Execute AJAX request to fetch the comments
fetch("comments.php?page_id=" + comments_page_id).then(response => response.text()).then(data => {
	// Render comments in the "comments" div
	document.querySelector(".comments").innerHTML = data;
	// Toggle comment write form
	document.querySelectorAll(".comments .write_comment_btn, .comments .reply_comment_btn").forEach(element => {
		element.onclick = event => {
			event.preventDefault();
			document.querySelectorAll(".comments .write_comment").forEach(element => element.style.display = 'none');
			document.querySelector("div[data-comment-id='" + element.getAttribute("data-comment-id") + "']").style.display = 'block';
			document.querySelector("div[data-comment-id='" + element.getAttribute("data-comment-id") + "'] input[name='name']").focus();
		};
	});
	// Execute AJAX request to submit new comment when the form is submitted
	document.querySelectorAll(".comments .write_comment form").forEach(element => {
		element.onsubmit = event => {
			event.preventDefault();
			fetch("comments.php?page_id=" + comments_page_id, {
				method: 'POST',
				body: new FormData(element),
                cache: 'no-cache'
			}).then(response => response.text()).then(data => {
				element.parentElement.innerHTML = data;
			});
		};
	});
});
</script>
The JavaScript code above will retrieve the comments using the fetch API and add them to the comments container.
Using AJAX is a game-changer for user experience. It allows us to load the comments without reloading the entire page, which makes the whole process much faster and smoother for the user. This is a key feature of any modern web application.
JavaScript Tip The fetch API interface can retrieve an external resource using asynchronous communication and therefore isn't render-blocking (which can impact site speed).
If you want to add this commenting system to another page, make sure you change the comments_page_id variable to a unique number for that page.
And now, if we navigate to this file in our web browser (over localhost), we should see something like the following:
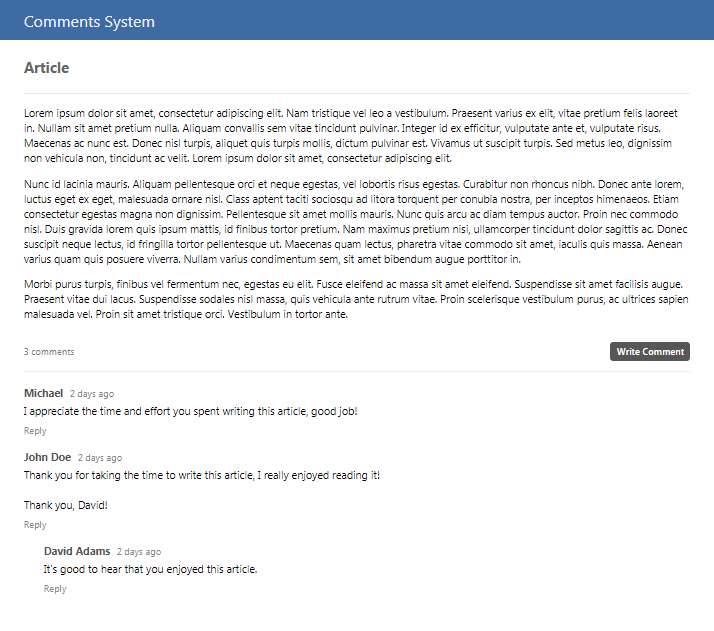
Don't forget to test out the commenting system to make sure everything works correctly.
Conclusion
Congratulations! You've just built a complete commenting system with PHP, MySQL, and AJAX. So, what's next? Consider implementing your own features into the system and integrating it with your own projects.
There are a few benefits to using an AJAX-powered commenting system, one being it isn't going to slow down the speed of your pages, which is an important factor in SEO. The comments are loaded dynamically after the rest of the page is already visible.
If you liked this article, feel free to share it and leave a comment below.
Enjoy coding, and thank you for reading!
If you would like to support us, consider the advanced commenting system below. It will greatly help us create more tutorials and keep our website up and running. The advanced package includes improved code and more features.