In this tutorial, we will build a simple Ticketing System with PHP and MySQL. A ticketing system (also called a help desk) is a vital tool for customer service. It helps businesses manage support requests and track issues directly on their website.
We will create a secure, lightweight system where you can:
- Browse Tickets: See a list of all support requests.
- Create Tickets: Allow users to submit new issues.
- View & Manage: Read ticket details and update their status.
All data is stored in a MySQL database. We will use PHP to fetch this data and show it on the webpage using HTML. This is a great project to learn PHP CRUD (Create, Read, Update, Delete) basics.
The Advanced package includes additional features like file attachments, user accounts, and a download link to the full source code.
Contents
1. Getting Started
Before we start programming our ticketing system, we need to make sure we have a fully functioning web server with PHP and MySQL installed.
1.1. Requirements
- I recommend you download and install XAMPP on your development environment. This allows you to run a server locally on your computer.
- Make sure your local web server is running PHP 8.0 or higher. If you download the latest version of XAMPP, it includes the newest PHP version, so your code will be fast and secure.
- Download and install a code editor. You can use Notepad, but for better highlighting, we recommend Visual Studio Code or Notepad++.
1.2. What You Will Learn in this Tutorial
- Fetch MySQL Data — Learn how to retrieve support tickets from the database and display them in a clean HTML list.
- Form Design — Design a "Create Ticket" form using modern HTML5 and CSS3.
- Database Management — Execute MySQL queries using the PDO interface to create and update records securely.
- Prepared SQL Queries — Protect your database against SQL injection attacks using prepared statements.
- Templating — Create a reusable header and footer system using PHP functions to keep your code clean.
1.3. File Structure & Setup
We need to start our web server and create the directories and files we're going to use for our ticketing system. If you've installed XAMPP, follow the instructions below.
- Open XAMPP Control Panel
- Next to the Apache module, click Start
- Next to the MySQL module, click Start
- Navigate to XAMPP's installation directory (C:\xampp)
- Open the htdocs directory
- Create the following directories and files:
File Structure
\-- ticketsystem
|-- style.css
|-- index.php
|-- create.php
|-- view.php
|-- functions.php
Each file will contain the following:
- style.css — The stylesheet (CSS3) for our ticketing system, which is used to format our structured (HTML) content.
- index.php — Retrieve all the tickets from the MySQL database, iterate the results, and output them accordingly.
- create.php — HTML form that'll be used to create tickets and insert them into the MySQL database.
- view.php — The view page will contain all the information related to the ticket and will consist of buttons that'll update the status of the ticket (close, resolve, etc.), and user-submitted comments.
- functions.php — This file will contain the MySQL database connection function and the header and footer functions.
2. Creating the Database and setting-up Tables
We need to create the MySQL database and create the tickets table. We can do this with phpMyAdmin (included with XAMPP).
Navigate to phpMyAdmin (e.g., localhost/phpmyadmin/) in your browser and follow the below instructions.
- Click the Databases tab at the top
- Under Create database, type in phpticket in the text box
- Select utf8mb4_unicode_ci as the collation (UTF-8 is the default encoding in HTML5)
- Click Create
While the database is selected, click the SQL tab and execute the following statement:
CREATE TABLE IF NOT EXISTS `tickets` (
  `id` int(11) NOT NULL AUTO_INCREMENT,
  `title` varchar(255) NOT NULL,
  `msg` mediumtext NOT NULL,
  `email` varchar(255) NOT NULL,
  `created` datetime NOT NULL DEFAULT current_timestamp(),
  `ticket_status` enum('open','closed','resolved') NOT NULL DEFAULT 'open',
  PRIMARY KEY (`id`)
) ENGINE=InnoDB AUTO_INCREMENT=5 DEFAULT CHARSET=utf8mb4 COLLATE=utf8mb4_unicode_ci;

INSERT INTO `tickets` (`id`, `title`, `msg`, `email`, `created`, `ticket_status`) VALUES
(1, 'How do I navigate to the website?', 'Hello, I\'m having trouble and need your help!', 'member@example.com', '2026-01-01 12:00:00', 'closed'),
(2, 'Website issue', 'I\'m having issues running the website on my laptop. Can you help?', 'member@example.com', '2026-01-01 13:00:00', 'open'),
(3, 'Responsive design issue', 'I have noticed on mobile devices the website does not work correctly. Will you guys fix this problem?', 'member@example.com', '2026-01-01 14:00:00', 'resolved'),
(4, 'Navigation menu not aligned', 'When I browse the website on a mobile device, I have noticed the menu is not aligned. Just letting you guys know.', 'member@example.com', '2026-01-01 15:00:00', 'open');

CREATE TABLE IF NOT EXISTS `tickets_comments` (
  `id` int(11) NOT NULL AUTO_INCREMENT,
  `ticket_id` int(11) NOT NULL,
  `msg` mediumtext NOT NULL,
  `created` datetime NOT NULL DEFAULT current_timestamp(),
  PRIMARY KEY (`id`)
) ENGINE=InnoDB AUTO_INCREMENT=1 DEFAULT CHARSET=utf8mb4 COLLATE=utf8mb4_unicode_ci;
We have included some dummy data in the SQL code above. This helps us test the help desk system immediately after installation to see how it looks.
The above SQL code will create the tickets and tickets_comments table. View the definition of each column below.
tickets:
- id — The unique ticket ID.
- title — The title of the ticket.
- msg — The ticket message.
- email — The email address associated with the user.
- created — The date the ticket was submitted.
- ticket_status — The status of the ticket, which can be defined as open, closed, or resolved.
tickets_comments:
- id — The unique ticket ID.
- ticket_id — The ticket ID, which will be used to associate both tables and create a relation.
- msg — The comment message.
- created — The date the comment was submitted.
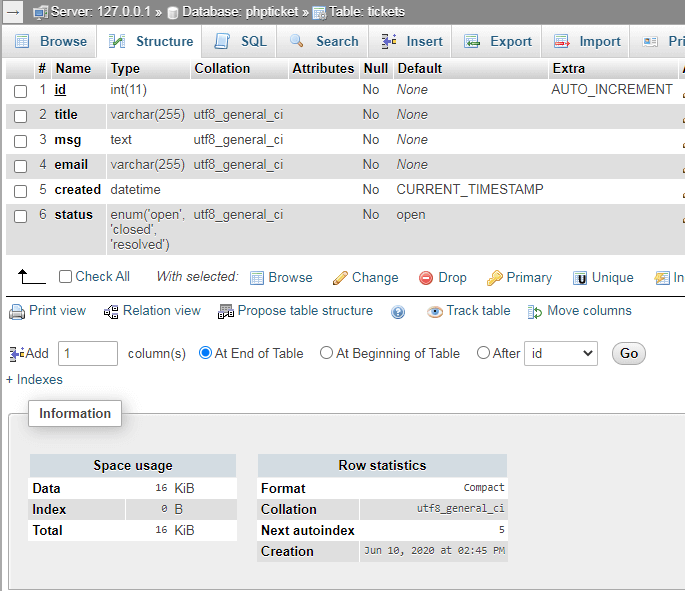
In phpMyAdmin, the tickets table structure should reflect the following:
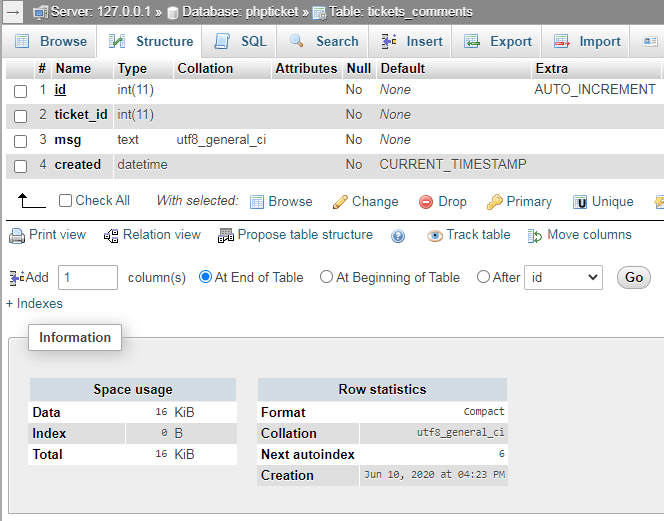
And the tickets_comments table should reflect the following:
3. Designing the Ticketing System with CSS3
The stylesheet will format the layout of our ticketing system. With CSS (Cascading Style Sheets), we can change the font, color scheme, sizes, and more.
Edit the style.css file and add:
* {
  box-sizing: border-box;
  font-family: system-ui, "Segoe UI", Roboto, Helvetica, Arial, sans-serif, "Apple Color Emoji", "Segoe UI Emoji", "Segoe UI Symbol";
  font-size: 16px;
}
body {
  background-color: #FFFFFF;
  margin: 0;
}
.navtop {
  background-color: #232529;
  height: 60px;
  width: 100%;
  border: 0;
}
.navtop div {
  display: flex;
  margin: 0 auto;
  max-width: 800px;
  width: 100%;
  height: 100%;
}
.navtop div h1, .navtop div a {
  display: inline-flex;
  align-items: center;
}
.navtop div h1 {
  flex: 1;
  font-size: 18px;
  padding: 0;
  margin: 0;
  color: rgb(233, 233.2, 233.6);
  font-weight: 500;
}
.navtop div a {
  display: flex;
  align-items: center;
  padding: 0 20px;
  text-decoration: none;
  color: rgb(189, 189.6, 190.8);
  font-size: 15px;
  font-weight: 500;
}
.navtop div a svg {
  margin-right: 5px;
  fill: rgb(189, 189.6, 190.8);
}
.navtop div a:hover {
  color: rgb(233, 233.2, 233.6);
}
.navtop div a:hover svg {
  fill: rgb(233, 233.2, 233.6);
}
.content {
  max-width: 800px;
  width: 100%;
  margin: 0 auto;
}
.content > .title {
  display: flex;
  align-items: center;
  margin: 0;
  padding: 30px 0 20px 0;
  font-size: 22px;
  font-weight: 500;
  color: #60636b;
}
.content > .title span {
  margin-left: 10px;
  font-weight: 700;
}
.content > .desc {
  margin: 0;
  padding: 0 0 25px 0;
  font-size: 16px;
  font-weight: 400;
  color: #60636b;
}
.btns {
  display: flex;
  gap: 13px;
  flex-wrap: wrap;
}
.btn {
  display: inline-flex;
  align-items: center;
  justify-content: center;
  text-decoration: none;
  appearance: none;
  cursor: pointer;
  border: 0;
  background-color: #3783da;
  color: #FFFFFF;
  padding: 0 18px;
  font-size: 14px;
  font-weight: 500;
  border-radius: 4px;
  height: 38px;
  box-shadow: 0px 0px 6px 1px rgba(68, 45, 45, 0.1);
}
.btn:has(svg) {
  padding: 0 18px 0 14px;
}
.btn svg {
  margin-right: 7px;
  fill: rgb(175, 205.4, 240.2);
}
.btn:hover {
  background-color: rgb(38.6392405063, 118.0063291139, 208.8607594937);
}
.btn.red {
  background-color: #bd4d4d;
}
.btn.red:hover {
  background-color: rgb(175.4467213115, 65.0532786885, 65.0532786885);
}
.home .tickets-list {
  display: flex;
  flex-flow: column;
  padding: 25px 0;
}
.home .tickets-list .ticket {
  padding: 15px 15px 15px 0;
  width: 100%;
  display: flex;
  text-decoration: none;
  border-radius: 15px;
}
.home .tickets-list .ticket:nth-child(even) {
  background-color: #fbfbfd;
}
.home .tickets-list .ticket .con {
  display: flex;
  justify-content: center;
  flex-flow: column;
  gap: 7px;
}
.home .tickets-list .ticket .con > svg {
  text-align: center;
  width: 80px;
  fill: rgb(229.5, 229.5, 229.5);
}
.home .tickets-list .ticket .con > svg.closed {
  fill: #bd4d4d;
}
.home .tickets-list .ticket .con > svg.resolved {
  fill: #44bb78;
}
.home .tickets-list .ticket .title {
  font-weight: 600;
  color: #60636b;
  max-width: 700px;
  word-break: break-word;
}
.home .tickets-list .ticket .title svg {
  margin-left: 5px;
  fill: #999999;
}
.home .tickets-list .ticket .msg {
  overflow: hidden;
  white-space: nowrap;
  text-overflow: ellipsis;
  max-width: 400px;
  color: rgb(127.5, 127.5, 127.5);
  font-size: 14px;
}
.home .tickets-list .ticket .created {
  flex-grow: 1;
  align-items: flex-end;
  color: rgb(127.5, 127.5, 127.5);
  font-size: 14px;
}
.home .tickets-list .ticket:hover {
  background-color: #f9f9fc;
}
.home .tickets-list .ticket:hover svg {
  fill: rgb(191.25, 191.25, 191.25);
}
.view h2 .open, .view h2 .resolved {
  color: #38b673;
}
.view h2 .closed {
  color: #b63838;
}
.view .ticket {
  padding: 0 0 25px 0;
}
.view .ticket .created {
  color: rgb(127.5, 127.5, 127.5);
}
.view .comments {
  margin-top: 15px;
  padding: 25px 0;
}
.view .comments .comment {
  display: flex;
  padding-bottom: 5px;
}
.view .comments .comment div {
  display: flex;
  align-items: flex-start;
  justify-content: center;
  width: 70px;
  transform: scaleX(-1);
}
.view .comments .comment div svg {
  fill: rgb(229.5, 229.5, 229.5);
}
.view .comments .comment p {
  margin: 0 0 20px 0;
}
.view .comments .comment p span {
  display: flex;
  font-size: 14px;
  padding-bottom: 5px;
  color: rgb(127.5, 127.5, 127.5);
}
.create form, .view form {
  padding: 15px 0;
  display: flex;
  flex-flow: column;
  max-width: 400px;
  width: 100%;
}
.create form label, .view form label {
  display: inline-flex;
  width: 100%;
  padding: 10px 0;
  margin-right: 25px;
  font-weight: 500;
  font-size: 14px;
  color: #60636b;
}
.create form input, .create form textarea, .view form input, .view form textarea {
  padding: 10px 12px;
  width: 100%;
  margin-right: 25px;
  margin-bottom: 15px;
  border-radius: 4px;
  border: 1px solid #dee2e6;
}
.create form input::placeholder, .create form textarea::placeholder, .view form input::placeholder, .view form textarea::placeholder {
  color: rgb(163.9655172414, 175, 186.0344827586);
}
.create form textarea, .view form textarea {
  height: 200px;
}
That is all the CSS we need. This makes the support portal responsive, meaning it looks great on mobile phones and desktops. You can change the hex codes to match your own brand colors easily.
4. Creating the Functions File
The functions.php file stores code that we use on every page. This includes the database connection and the HTML header/footer. Using a single file for this makes the code cleaner and easier to manage.
Edit the functions.php file and add:
<?php
// Connect to MySQL using PDO
// Update the details below to reflect your MySQL details
$DATABASE_HOST = 'localhost';
$DATABASE_USER = 'root';
$DATABASE_PASS = '';
$DATABASE_NAME = 'phpticket';
try {
	$pdo = new PDO('mysql:host=' . $DATABASE_HOST . ';dbname=' . $DATABASE_NAME . ';charset=utf8mb4', $DATABASE_USER, $DATABASE_PASS);
} catch (PDOException $exception) {
	// If there is an error with the connection, stop the script and display the error.
	exit('Failed to connect to database!');
}
The above code we'll use to connect to our MySQL database using the PDO interface. The database variables must reflect your MySQL database credentials.
Add after:
// Template header, feel free to customize this
function template_header($title) {
echo '<!DOCTYPE html>
<html>
	<head>
		<meta charset="utf-8">
		<title>' . $title . '</title>
		<link href="style.css" rel="stylesheet" type="text/css">
	</head>
	<body>
		<nav class="navtop">
			<div>
				<h1>Ticketing System</h1>
				<a href="index.php">
					<svg width="18" height="18" xmlns="http://www.w3.org/2000/svg" viewBox="0 0 24 24"><path d="M8.59,16.58L13.17,12L8.59,7.41L10,6L16,12L10,18L8.59,16.58Z" /></svg>
					View Tickets
				</a>
				<a href="create.php">
					<svg width="18" height="18" xmlns="http://www.w3.org/2000/svg" viewBox="0 0 24 24"><path d="M19,13H13V19H11V13H5V11H11V5H13V11H19V13Z" /></svg>
					Create Ticket
				</a>
			</div>
		</nav>
		<main>';
}
This is our template header function. Instead of repeating the same code in every file, we can simply execute the above function.
Add after:
// Template footer
function template_footer() {
echo '</main>
    </body>
</html>';
}
?>
Similar to the template header function, but instead, the template footer function will append the closing tags to our template. The template code that we add in all our files will be placed between these two functions.
5. Creating the Home Page
The home page will consist of a populated list of tickets with links that will redirect the user to the ticket page. The "create ticket button" will also be included on this page. All the tickets are retrieved from the MySQL database.
Edit index.php and add:
<?php
// Include the functions.php file
include 'functions.php';
// MySQL query that retrieves all the tickets from the databse
$stmt = $pdo->prepare('SELECT * FROM tickets ORDER BY created DESC');
$stmt->execute();
$tickets = $stmt->fetchAll(PDO::FETCH_ASSOC);
?>
First, we include functions.php to access our database connection. Then, we run a MySQL query to fetch all tickets. We order them by date (DESC) so the newest support requests appear at the top.
The results are stored in the $tickets array, which we will display using HTML.
Add after:
<?=template_header('Tickets')?>

<div class="content home">

	<h2 class="title">Tickets</h2>

	<p class="desc">Welcome to the index page! You can view the list of tickets below.</p>

	<div class="btns">
		<a href="create.php" class="btn">
			<svg width="18" height="18" xmlns="http://www.w3.org/2000/svg" viewBox="0 0 24 24"><path d="M19,13H13V19H11V13H5V11H11V5H13V11H19V13Z" /></svg>
			Create Ticket
		</a>
	</div>

	<div class="tickets-list">
		<?php foreach ($tickets as $ticket): ?>
		<a href="view.php?id=<?=$ticket['id']?>" class="ticket">
			<span class="con">
				<?php if ($ticket['ticket_status'] == 'open'): ?>
				<svg class="open" width="40" height="40" xmlns="http://www.w3.org/2000/svg" viewBox="0 0 24 24"><title>Open</title><path d="M12,20A8,8 0 0,0 20,12A8,8 0 0,0 12,4A8,8 0 0,0 4,12A8,8 0 0,0 12,20M12,2A10,10 0 0,1 22,12A10,10 0 0,1 12,22C6.47,22 2,17.5 2,12A10,10 0 0,1 12,2M12.5,7V12.25L17,14.92L16.25,16.15L11,13V7H12.5Z" /></svg>
				<?php elseif ($ticket['ticket_status'] == 'resolved'): ?>
				<svg class="resolved" width="40" height="40" xmlns="http://www.w3.org/2000/svg" viewBox="0 0 24 24"><title>Resolved</title><path d="M21,7L9,19L3.5,13.5L4.91,12.09L9,16.17L19.59,5.59L21,7Z" /></svg>
				<?php elseif ($ticket['ticket_status'] == 'closed'): ?>
				<svg class="closed" width="40" height="40" xmlns="http://www.w3.org/2000/svg" viewBox="0 0 24 24"><title>Closed</title><path d="M19,6.41L17.59,5L12,10.59L6.41,5L5,6.41L10.59,12L5,17.59L6.41,19L12,13.41L17.59,19L19,17.59L13.41,12L19,6.41Z" /></svg>
				<?php endif; ?>
			</span>
			<span class="con">
				<span class="title"><?=htmlspecialchars($ticket['title'], ENT_QUOTES)?></span>
				<span class="msg"><?=htmlspecialchars($ticket['msg'], ENT_QUOTES)?></span>
			</span>
			<time datetime="<?=$ticket['created']?>" class="con created"><?=date('F dS, G:ia', strtotime($ticket['created']))?></time>
		</a>
		<?php endforeach; ?>
	</div>

</div>

<?=template_footer()?>
With the above code, we execute the template header and footer functions, and between those two functions, we iterate the tickets using a foreach loop and populate them accordingly using the HTML hyperlink tag.
We use the htmlspecialchars function to prevent XSS attacks, which will convert special characters to HTML entities and therefore any attack presented will be converted.
This is all we need to do for the home page. If we navigate to localhost/ticketsystem/index.php in our browser, we should see the following:

6. Creating the Create Ticket Page
The Create Ticket page will contain an HTML form the visitors can use to submit tickets.
Edit the create.php file and add:
<?php
include 'functions.php';
// Output message variable
$msg = '';
// Check if POST data exists (user submitted the form)
if (isset($_POST['title'], $_POST['email'], $_POST['msg'])) {
    // Validation checks... make sure the POST data is not empty
    if (empty($_POST['title']) || empty($_POST['email']) || empty($_POST['msg'])) {
        $msg = 'Please complete the form!';
    // Make sure the email is valid
    } else if (!filter_var($_POST['email'], FILTER_VALIDATE_EMAIL)) {
        $msg = 'Please provide a valid email address!';
    // Check if title is between 1 and 255 characters
    } else if (strlen($_POST['title']) < 3 || strlen($_POST['title']) > 255) {
        $msg = 'Title must be between 3 and 255 characters!';
    // Check if message is between 3 and 1000 characters
    } else if (strlen($_POST['msg']) < 3 || strlen($_POST['msg']) > 5000) {
        $msg = 'Message must be between 3 and 5000 characters!';
    } else {
        // Success! Insert new record into the tickets table
        $stmt = $pdo->prepare('INSERT INTO tickets (title, email, msg) VALUES (?, ?, ?)');
        $stmt->execute([ $_POST['title'], $_POST['email'], $_POST['msg'] ]);
        // Redirect to the view ticket page where the user will see their created ticket
        header('Location: view.php?id=' . $pdo->lastInsertId());
        exit;
    }
}
?>
When the user clicks "Create," the form sends data to the server using a POST request. We check the input to ensure the title and email are valid. This validation step is important for security and keeps your customer service database clean.
The header function will redirect the user to their ticket page upon form submission.
Add after:
<?=template_header('Create Ticket')?>
<div class="content create">
<h2 class="title">Create Ticket</h2>
<form action="create.php" method="post">
<label for="title">Title</label>
<input type="text" name="title" placeholder="Title" id="title" required>
<label for="email">Email</label>
<input type="email" name="email" placeholder="johndoe@example.com" id="email" required>
<label for="msg">Message</label>
<textarea name="msg" placeholder="Enter your message here..." id="msg" required></textarea>
<div class="btns">
<button type="submit" class="btn">Create</button>
</div>
</form>
<?php if ($msg): ?>
<p><?=$msg?></p>
<?php endif; ?>
</div>
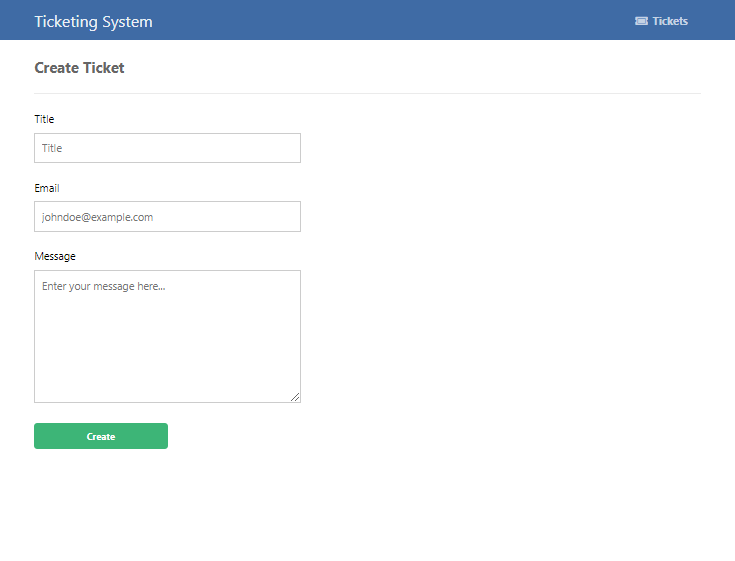
<?=template_footer()?>The code above is the HTML form template that consists of input, label, and textarea elements. The $msg variable will output the validation errors.
If we click the Create Ticket button on the home page, we should see:
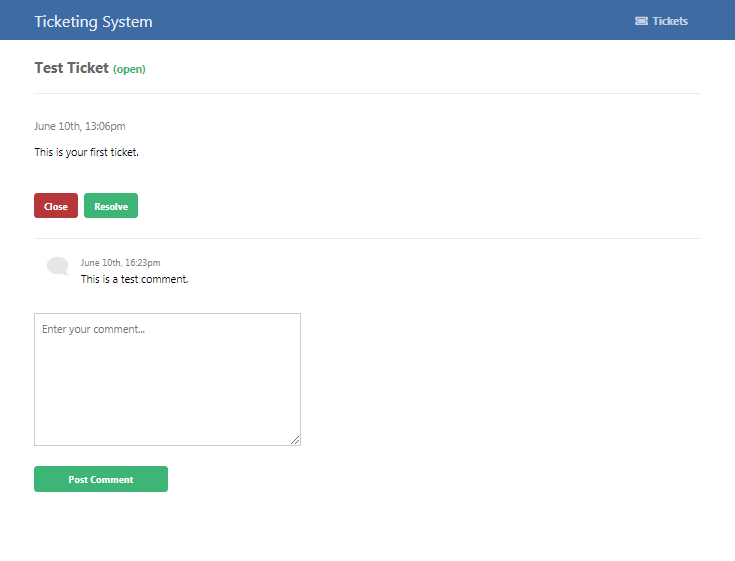
7. Creating the View Ticket Page
On the view ticket page, the user will be able to view all the details associated with their ticket, along with comments and the buttons to change the status of the ticket (open, closed, resolved, etc.).
Edit the view.php file and add:
<?php
include 'functions.php';
// Check if the ID param in the URL exists
if (!isset($_GET['id'])) {
    exit('No ID specified!');
}
// MySQL query that selects the ticket by the ID column, using the ID GET request variable
$stmt = $pdo->prepare('SELECT * FROM tickets WHERE id = ?');
$stmt->execute([ $_GET['id'] ]);
$ticket = $stmt->fetch(PDO::FETCH_ASSOC);
// Check if ticket exists
if (!$ticket) {
    exit('Invalid ticket ID!');
}
To view this page, the ticket ID param needs to be included in the URL as we're using a GET request to determine the ticket ID, and subsequently, we can retrieve the ID with PHP using the $_GET['id'] variable.
The prepared statement will prevent SQL injection and retrieve the ticket from the MySQL tickets table. If the ticket does not exist, then the script will end and output the error.
Add after:
// Update status
if (isset($_GET['status']) && in_array($_GET['status'], array('open', 'closed', 'resolved'))) {
    $stmt = $pdo->prepare('UPDATE tickets SET ticket_status = ? WHERE id = ?');
    $stmt->execute([ $_GET['status'], $_GET['id'] ]);
    header('Location: view.php?id=' . $_GET['id']);
    exit;
}
The code above will update the status of the ticket, but only if the GET param exists and the value is either: open, closed, or resolved. The code will only execute when the user clicks the Close or Resolve button.
Add after:
// Check if the comment form has been submitted
if (isset($_POST['msg']) && !empty($_POST['msg'])) {
    // Insert the new comment into the "tickets_comments" table
    $stmt = $pdo->prepare('INSERT INTO tickets_comments (ticket_id, msg) VALUES (?, ?)');
    $stmt->execute([ $_GET['id'], $_POST['msg'] ]);
    header('Location: view.php?id=' . $_GET['id']);
    exit;
}
// Retrieve the ticket comments from the database
$stmt = $pdo->prepare('SELECT * FROM tickets_comments WHERE ticket_id = ? ORDER BY created DESC');
$stmt->execute([ $_GET['id'] ]);
$comments = $stmt->fetchAll(PDO::FETCH_ASSOC);
?>
The above code will handle the comments on the ticket page. Users can use the comment section to respond to tickets. All comments are retrieved using the ticket ID and are stored in the tickets_comments table.
Did You Know? The isset() function will ensure the declared variable exists before the subsequent code is executed. It's useful for GET and POST parameters.
Add after:
<?=template_header(htmlspecialchars($ticket['title'], ENT_QUOTES) . ' - Ticket #' . $ticket['id'])?>

<div class="content view">

	<h2 class="title"><?=htmlspecialchars($ticket['title'], ENT_QUOTES)?> <span class="<?=$ticket['ticket_status']?>">(<?=$ticket['ticket_status']?>)</span></h2>

    <div class="ticket">
        <p class="created"><?=date('F dS, G:ia', strtotime($ticket['created']))?></p>
        <p class="msg"><?=nl2br(htmlspecialchars($ticket['msg'], ENT_QUOTES))?></p>
    </div>

    <div class="btns">
        <a href="view.php?id=<?=$_GET['id']?>&status=closed" class="btn red">Close</a>
        <a href="view.php?id=<?=$_GET['id']?>&status=resolved" class="btn">Resolve</a>
    </div>

    <div class="comments">
        <?php foreach($comments as $comment): ?>
        <div class="comment">
            <div>
                <svg width="40" height="40" xmlns="http://www.w3.org/2000/svg" viewBox="0 0 24 24"><path d="M9,22A1,1 0 0,1 8,21V18H4A2,2 0 0,1 2,16V4C2,2.89 2.9,2 4,2H20A2,2 0 0,1 22,4V16A2,2 0 0,1 20,18H13.9L10.2,21.71C10,21.9 9.75,22 9.5,22V22H9M10,16V19.08L13.08,16H20V4H4V16H10M6,7H18V9H6V7M6,11H15V13H6V11Z" /></svg>
            </div>
            <p>
                <span><?=date('F dS, G:ia', strtotime($comment['created']))?></span>
                <?=nl2br(htmlspecialchars($comment['msg'], ENT_QUOTES))?>
            </p>
        </div>
        <?php endforeach; ?>
        <form method="post">
            <textarea name="msg" placeholder="Enter your comment..."></textarea>
            <div class="btns">
                <button type="submit" class="btn">Post Comment</button>
            </div>
        </form>
    </div>

</div>

<?=template_footer()?>
The above code is the template for this page.
If we navigate back to the Tickets page and click one of the tickets. We should then see the ticket page along with the comments:
Frequently Asked Questions
Is this ticketing system secure?
Yes, we use PDO prepared statements in the PHP code. This protects your database from SQL injection attacks, which is the industry standard for security.
Can I use this on a real website?
Absolutely. While this is a basic version, it functions fully as a customer support tool. For large businesses, we recommend checking out the Advanced Package which includes features like file attachments and user accounts.
How do I add a password login?
To make this a private system, you would need to create a `users` table and use PHP sessions. The Advanced Package includes a full login and registration system out of the box.
Conclusion
Summary
Great job! You have built a functional PHP ticketing system. You now have a central place to track customer issues and respond to them efficiently.
Take it to the next level
If you need professional features like file attachments, user login/registration, rich text editors, and email notifications, check out our Advanced Ticketing System. It saves you hours of coding time and is ready for production use immediately.
If you found this tutorial helpful, please share it on social media and drop a comment below.
Thanks for reading and enjoy coding!
If you would like to support us, consider the advanced ticketing system below. It will greatly help us create more tutorials and keep our website up and running. The advanced package includes improved code and more features.
— View Dashboard
— Create, View & Delete Tickets
— Manage Categories
— Manage Email Templates
— Export & Import Tickets (CSV, JSON, XML, etc.)
— Configure Settings
— And more!
* Advanced package also includes the tutorial source code.
* Instant download after payment.
To learn more about the advanced package, please visit the Advanced Ticketing System page.