In this tutorial we'll be integrating PayPal into our existing shopping cart system, we'll be creating the payment gateway with PHP and storing PayPal transactions into our MySQL database.
I recommend you follow the Shopping Cart System tutorial, as we'll be using it in this tutorial.
PayPal is one of the most popular payment gateways for online shopping, so why not use it? You can now make secure debit and credit card payments without creating a PayPal account.
The integration will allow you to checkout with multiple products with PayPal, for this to work correctly you will need a remote address (URL).
Contents
1. Getting Started
If you've followed the Shopping Cart System tutorial you'll have no problem with setting up the MySQL database and server enviroment, but if you haven't you need to:
- Install a web server environment, I recommend XAMPP.
- If you have your own web server you need to install PHP, Apache, MySQL, cURL, and phpMyAdmin.
- Make sure you have the PHP cURL extension enabled, as this will be used for the PayPal IPN.
2. Creating the Database and setting-up Tables
Now we need to create the database and create the transactions table we're going to use, we can do this with phpMyAdmin.
Navigate to phpMyAdmin (e.g. localhost/phpmyadmin/) in your browser, if you already have the "shoppingcart" database you can just go ahead and click it, but if you haven't you need to:
- Click the Databases tab at the top
- Under Create database, type in shoppingcart in the text box
- Select utf8_general_ci as the collation (UTF-8 is the default encoding in HTML5)
- Click Create
While the database is selected click the SQL tab and execute the following statement:
CREATE TABLE `transactions` (
`id` int(11) NOT NULL AUTO_INCREMENT,
`txn_id` varchar(255) NOT NULL,
`payment_amount` decimal(7,2) NOT NULL,
`payment_status` varchar(30) NOT NULL,
`item_id` varchar(255) NOT NULL,
`item_quantity` varchar(255) NOT NULL,
`item_mc_gross` varchar(255) NOT NULL,
`created` datetime NOT NULL,
`payer_email` varchar(255) NOT NULL,
`first_name` varchar(100) NOT NULL,
`last_name` varchar(100) NOT NULL DEFAULT '',
`address_street` varchar(255) NOT NULL,
`address_city` varchar(255) NOT NULL,
`address_state` varchar(255) NOT NULL,
`address_zip` varchar(255) NOT NULL,
`address_country` varchar(255) NOT NULL,
PRIMARY KEY (`id`)
) ENGINE=InnoDB DEFAULT CHARSET=utf8;
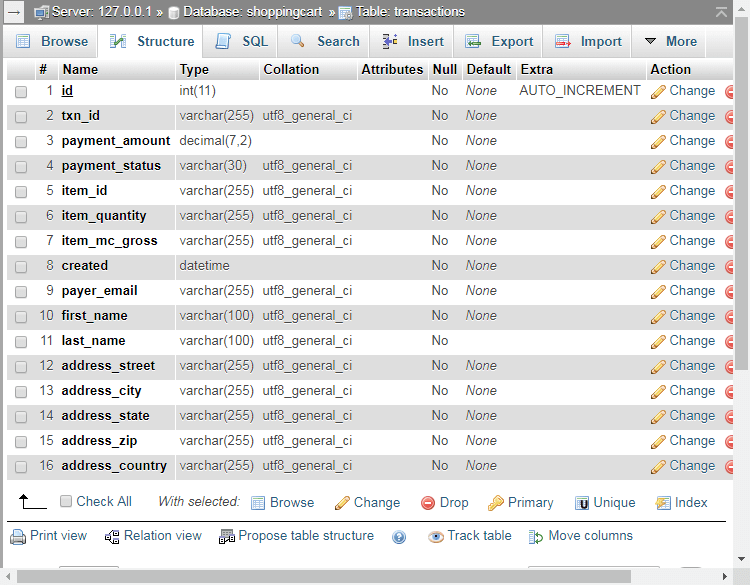
ALTER TABLE `transactions` ADD UNIQUE KEY `txn_id` (`txn_id`);This will create the transactions table with the following columns:
- id — The unique transaction ID.
- txn_id — The PayPal transaction ID.
- payment_amount — The total amount for all products.
- payment_status — The status of the payment, this will be updated via the PayPal IPN.
- item_id — The product ID, if there are multiple items this will be a comma-seperated list.
- item_quantity — The product quantity, if there are multiple items this will be a comma-seperated list.
- item_mc_gross — The total amount of each product (comma-seperated list).
- created — The date the purchase was created.
- payer_email — The customer's email.
- first_name — The customer's first name.
- last_name — The customer's last name.
- address_street — The customer's street.
- address_city — The customer's city.
- address_state — The customer's state.
- address_zip — The customer's ZIP/POST code.
- address_country — The customer's country.
On phpMyAdmin this should look like:
3. Integrating PayPal with PHP
Now that we have our database and tables set-up we can start implementing PayPal into our shopping cart system.
If you followed the Shopping Cart System you can go ahead and edit the cart.php file, if not you can add the code to your shopping cart page.
Edit cart.php and find:
<div class="buttons">
    <input type="submit" value="Update" name="update">
    <input type="submit" value="Place Order" name="placeorder">
</div>
Add after:
<div class="paypal">
    <button type="submit" name="paypal"><img src="https://www.paypalobjects.com/webstatic/mktg/Logo/pp-logo-100px.png" border="0" alt="PayPal Logo"></button>
</div>
Add the CSS to your stylesheet file (style.css):
.paypal {
text-align: right;
padding-bottom: 40px;
}
.paypal button {
display: inline-block;
padding: 10px 20px 7px 20px;
background-color: #FFC439;
border-radius: 5px;
border: none;
cursor: pointer;
width: 215px;
}
.paypal button:hover {
background-color: #f3bb37;
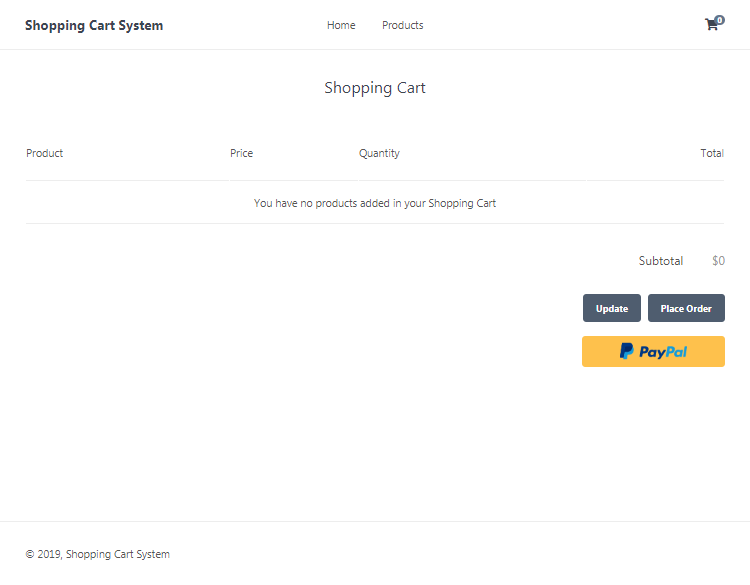
}This will create the PayPal button we'll be using to make payments on our shopping cart page, it should look like this (the yellow button):
If you're using your own shopping cart system, you will need to include the form:
<form action="your php cart file" method="post">
	<div class="paypal">
		<button type="submit" name="paypal"><img src="https://www.paypalobjects.com/webstatic/mktg/Logo/pp-logo-100px.png" border="0" alt="PayPal Logo"></button>
	</div>
</form>
Now we need to add the PHP code that will validate and redirect to PayPal.
Before the PHP closing tag in cart.php add:
// For testing purposes set this to true, if set to true it will use paypal sandbox
$testmode = true;
$paypalurl = $testmode ? 'https://www.sandbox.paypal.com/cgi-bin/webscr' : 'https://www.paypal.com/cgi-bin/webscr';
// If the user clicks the PayPal checkout button...
if (isset($_POST['paypal']) && $products_in_cart && !empty($products_in_cart)) {
    // Variables we need to pass to paypal
    // Make sure you have a business account and set the "business" variable to your paypal business account email
    $data = array(
        'cmd'			=> '_cart',
        'upload'        => '1',
        'lc'			=> 'EN',
        'business' 		=> 'payments@yourwebsite.com',
        'cancel_return'	=> 'https://yourwebsite.com/index.php?page=cart',
        'notify_url'	=> 'https://yourwebsite.com/index.php?page=cart&ipn_listener=paypal',
        'currency_code'	=> 'USD',
        'return'        => 'https://yourwebsite.com/index.php?page=placeorder'
    );
    // Add all the products that are in the shopping cart to the data array variable
    for ($i = 0; $i < count($products); $i++) {
        $data['item_number_' . ($i+1)] = $products[$i]['id'];
        $data['item_name_' . ($i+1)] = $products[$i]['name'];
        $data['quantity_' . ($i+1)] = $products_in_cart[$products[$i]['id']];
        $data['amount_' . ($i+1)] = $products[$i]['price'];
    }
    // Send the user to the paypal checkout screen
    header('location:' . $paypalurl . '?' . http_build_query($data));
    // End the script don't need to execute anything else
    exit;
}
The above code will execute if the user clicks the PayPal button (POST request), make sure you update the variables in the $data variable array, replace "yourdomain.com" with your own domain name, if you want to change the currency you will need to change the "currency_code" value.
If you want to add more data variables you can view the list here.
Also you will need to register a business account on PayPal, you can register for one on their website, you can also create an account on their sandbox website that you can use for testing purposes.
If you didn't follow the Shopping Cart System tutorial you will need to create the $products_in_cart and the $products variables, they need to contain data in the following format:
// Below the key is the product ID and the value is the quantity
$products_in_cart = array(
	1 => 2, // Product with the ID 1 has a quantity of 2
	2 => 2
);
// Products should look like the following, you can execute a SQL query to get products from your database
$products = array(
	array(
		'id' => 1,
		'name' => 'Smart Watch',
		'price' => 15.00
	),
	array(
		'id' => 2,
		'name' => 'Headphones',
		'price' => 10.00
	)
);
If everything checks out the user will be redirected to PayPal, but only if there are products in their shopping cart.
4. Creating the PayPal IPN (Instant Payment Notification) Listener
The instant payment notification listener will insert/update transactions in our database, every time a user makes a purchase, PayPal will notify back to our PHP file and then our PHP code will validate the transaction and then insert/update a transaction into our MySQL database.
Add after the PHP code we added previously:
// Below is the listener for paypal, make sure to set the IPN URL (e.g. example.com/cart.php?ipn_listener=paypal) in your paypal account, this will not work on a local server
if (isset($_GET['ipn_listener']) && $_GET['ipn_listener'] == 'paypal') {
    // Get all input variables and convert them all to URL string variables
    $raw_post_data = file_get_contents('php://input');
    $raw_post_array = explode('&', $raw_post_data);
    $myPost = array();
    foreach ($raw_post_array as $keyval) {
        $keyval = explode ('=', $keyval);
        if (count($keyval) == 2) $myPost[$keyval[0]] = urldecode($keyval[1]);
    }
    $req = 'cmd=_notify-validate';
    $get_magic_quotes_exists = function_exists('get_magic_quotes_gpc') ? true : false;
    foreach ($myPost as $key => $value) {
        if ($get_magic_quotes_exists == true && get_magic_quotes_gpc() == 1) {
            $value = urlencode(stripslashes($value));
        } else {
            $value = urlencode($value);
        }
        $req .= "&$key=$value";
    }
    // Below will verify the transaction, it will make sure the input data is correct
    $ch = curl_init($paypalurl);
    curl_setopt($ch, CURLOPT_HTTP_VERSION, CURL_HTTP_VERSION_1_1);
    curl_setopt($ch, CURLOPT_POST, 1);
    curl_setopt($ch, CURLOPT_RETURNTRANSFER, 1);
    curl_setopt($ch, CURLOPT_POSTFIELDS, $req);
    curl_setopt($ch, CURLOPT_SSL_VERIFYPEER, 1);
    curl_setopt($ch, CURLOPT_SSL_VERIFYHOST, 2);
    curl_setopt($ch, CURLOPT_FORBID_REUSE, 1);
    curl_setopt($ch, CURLOPT_HTTPHEADER, array('Connection: Close'));
    $res = curl_exec($ch);
    curl_close($ch);
    if (strcmp($res, 'VERIFIED') == 0) {
        // Transaction is verified and successful...
        $item_id = array();
        $item_quantity = array();
        $item_mc_gross = array();
        // Add all the item numbers, quantities and prices to the above array variables
        for ($i = 1; $i < ($_POST['num_cart_items']+1); $i++) {
            array_push($item_id, $_POST['item_number' . $i]);
            array_push($item_quantity, $_POST['quantity' . $i]);
            array_push($item_mc_gross, $_POST['mc_gross_' . $i]);
        }
        // Insert the transaction into our transactions table, as the payment status changes the query will execute again and update it, make sure the "txn_id" column is unique
        $stmt = $pdo->prepare('INSERT INTO transactions VALUES (?,?,?,?,?,?,?,?,?,?,?,?,?,?,?,?) ON DUPLICATE KEY UPDATE payment_status = VALUES(payment_status)');
        $stmt->execute([
            NULL,
            $_POST['txn_id'],
            $_POST['mc_gross'],
            $_POST['payment_status'],
            implode(',', $item_id),
            implode(',', $item_quantity),
            implode(',', $item_mc_gross),
            date('Y-m-d H:i:s'),
            $_POST['payer_email'],
            $_POST['first_name'],
            $_POST['last_name'],
            $_POST['address_street'],
            $_POST['address_city'],
            $_POST['address_state'],
            $_POST['address_zip'],
            $_POST['address_country']
        ]);
    }
    exit;
}
Basically what happens here is every time the status of the PayPal transaction changes the above code will execute, but for this to work correctly we need to add the IPN URL to our PayPal business account, follow these instructions:
- Navigate to the PayPal website and log into your business account
- Go to Settings
- Click Notifications
- Next to Instant Payment Notifications click Update
- Change the URL to: https://yourwebsite.com/index.php?page=cart&ipn_listener=paypal
- Make sure you change yourwebsite.com to your own website, localhost will not work, you need a remote address.
- Save settings and enable it.
I recommend you try it on the PayPal sandbox website first to make sure it is working correctly for you, the sandbox website is used for testing payments.
The curl request in the above snippet will verify the transaction, we don't want anybody to try and change these POST values, so the validation is a must.
If you're using your own shopping cart system you will need to change the IPN URL and make sure you connect to the MySQL database using PDO.
Conclusion
That's basically all you have to do to integrate PayPal with your website, I highly recommend you follow the Shopping Cart System tutorial if you haven't already, it will be much easier to implement if you do.
Feel free to share the article by clicking the social links below, this will help us create new tutorials and improve current ones.
Enjoy coding!