In this tutorial, we will develop a comprehensive invoice system using Stripe for handling payments, PHP for server-side scripting, and MySQL for database management. This system will allow you to generate invoices, handle payments securely, and store transaction details.
Stripe provides a secure and efficient way to process payments, while PHP and MySQL will manage the backend logic and data storage, respectively.
The Advanced package includes additional features and a download link to the source code.
Contents
1. Introduction
An invoice is a document that a seller sends to a buyer. It lists the products or services provided and shows the amount that the buyer needs to pay. Invoices are important because they provide a clear record of the transaction for both parties. They usually include details like the invoice number, date, description of goods or services, payment terms, and the total amount due.
Invoices offer many benefits. For businesses, they provide a systematic way to request payments and keep track of sales. This helps in maintaining accurate financial records, which is crucial for accounting and tax purposes. Invoices can also serve as legal proof in case of disputes.
For customers, invoices give a detailed breakdown of their purchase, ensuring transparency and trust. They provide clear instructions on how and when to pay, which helps customers manage their finances better. By using invoices, businesses can improve cash flow, look more professional, and make their financial processes more efficient.
2. Getting Started
Let's go ahead and install the required dependencies and create the file structure for our invoice system.
2.1. Requirements
Before we begin, ensure you have the following installed and set up:
- A web server with PHP support (e.g., XAMPP, WAMP, or a live server)
- MySQL Server — usually included with XAMPP, etc.
- Stripe Account (for payment processing)
- Code Editor (e.g., Visual Studio Code, Sublime Text)
Having these tools ready will make it easier to follow along with the tutorial.
2.2. File Structure & Setup
Let's create the necessary files and folders for our project. Set up your project directory as follows:
\-- phpinvoice
|-- create.php
|-- index.php
|-- invoice.php
|-- ipn.php
|-- main.php
|-- pay.php
|-- style.css
This structure helps keep our project organized and easy to manage. Each file has a specific role:
- main.php — Contains shared configurations and functions.
- create.php — File to create new invoices.
- index.php — Main file that lists all invoices.
- invoice.php — Displays individual invoice details.
- pay.php — Processes payments via Stripe.
- ipn.php — Handles Stripe IPN (Instant Payment Notification).
- style.css — Stylesheet for the application.
Once you have created these files and folders, you're ready to start building your invoice system.
If you've installed XAMPP, please follow the below instructions to get started:
- Download and install XAMPP from https://www.apachefriends.org/index.html.
- Open the XAMPP Control Panel.
- Start the Apache and MySQL services.
- Click on the Admin button next to MySQL to open phpMyAdmin.
- Create a new database named phpinvoice_tutorial or execute the SQL below.
Warning XAMPP should only be used for development purposes only!
Now that we have our project structure set up, let's move on to creating the database and setting up the necessary tables.
3. Creating the Database
To store invoice information, we need to set up a MySQL database. Follow these steps to create the database and the necessary tables:
- Open phpMyAdmin in your browser.
- Click on the SQL tab in the top menu.
- Execute the following SQL queries to create the database and tables:
CREATE DATABASE IF NOT EXISTS `phpinvoice_tutorial` DEFAULT CHARACTER SET utf8 COLLATE utf8_general_ci;
USE `phpinvoice_tutorial`;

CREATE TABLE IF NOT EXISTS `invoices` (
  `id` int(11) NOT NULL AUTO_INCREMENT,
  `client_name` varchar(255) NOT NULL,
  `client_address` text NOT NULL,
  `payment_status` varchar(50) NOT NULL,
  `notes` text NOT NULL,
  `created` datetime NOT NULL,
  PRIMARY KEY (`id`)
) ENGINE=InnoDB AUTO_INCREMENT=1 DEFAULT CHARSET=utf8 COLLATE=utf8_general_ci;

CREATE TABLE IF NOT EXISTS `invoice_items` (
  `id` int(11) NOT NULL AUTO_INCREMENT,
  `item_name` varchar(255) NOT NULL,
  `item_quantity` int(11) NOT NULL,
  `item_price` decimal(7,2) NOT NULL,
  `invoice_id` int(11) NOT NULL,
  PRIMARY KEY (`id`)
) ENGINE=InnoDB AUTO_INCREMENT=1 DEFAULT CHARSET=utf8 COLLATE=utf8_general_ci;
These tables will help us manage our invoices and their items effectively.
4. Stylesheet (CSS3)
To give our invoice system a clean and modern look, we'll use CSS3 for styling. Edit the style.css file and add the following styles:
* {
  box-sizing: border-box;
  font-family: system-ui, "Segoe UI", Roboto, Helvetica, Arial, sans-serif, "Apple Color Emoji", "Segoe UI Emoji", "Segoe UI Symbol";
  font-size: 16px;
}
body, html {
  margin: 0;
  padding: 0;
  background-color: #f3f4f7;
}
.invoices, .invoice, .create-invoice {
  box-shadow: 0px 0px 7px 1px rgba(45, 54, 68, 0.05);
  border-radius: 5px;
  background-color: #fff;
  margin: 60px auto;
  max-width: 600px;
  width: 100%;
}
.invoices .header, .invoice .header, .create-invoice .header {
  display: flex;
  justify-content: space-between;
  align-items: center;
  padding: 30px 40px 0;
}
.invoices .header h1, .invoice .header h1, .create-invoice .header h1 {
  color: #4a5361;
  font-size: 26px;
  font-weight: 500;
  padding: 0;
  margin: 0;
}
.invoices .content, .invoice .content, .create-invoice .content {
  padding: 30px 40px 40px;
}
.invoices .content .invoices-table, .invoices .content .invoice-items-table, .invoice .content .invoices-table, .invoice .content .invoice-items-table, .create-invoice .content .invoices-table, .create-invoice .content .invoice-items-table {
  width: 100%;
  border-collapse: collapse;
}
.invoices .content .invoices-table thead, .invoices .content .invoice-items-table thead, .invoice .content .invoices-table thead, .invoice .content .invoice-items-table thead, .create-invoice .content .invoices-table thead, .create-invoice .content .invoice-items-table thead {
  border-bottom: 1px solid #f1f2f4;
}
.invoices .content .invoices-table thead th, .invoices .content .invoice-items-table thead th, .invoice .content .invoices-table thead th, .invoice .content .invoice-items-table thead th, .create-invoice .content .invoices-table thead th, .create-invoice .content .invoice-items-table thead th {
  color: #5d6779;
  font-size: 14px;
  font-weight: 500;
  padding: 15px 15px 15px 0;
  text-align: left;
}
.invoices .content .invoices-table thead th.pull-right, .invoices .content .invoice-items-table thead th.pull-right, .invoice .content .invoices-table thead th.pull-right, .invoice .content .invoice-items-table thead th.pull-right, .create-invoice .content .invoices-table thead th.pull-right, .create-invoice .content .invoice-items-table thead th.pull-right {
  text-align: right;
}
.invoices .content .invoices-table tbody tr, .invoices .content .invoice-items-table tbody tr, .invoice .content .invoices-table tbody tr, .invoice .content .invoice-items-table tbody tr, .create-invoice .content .invoices-table tbody tr, .create-invoice .content .invoice-items-table tbody tr {
  border-bottom: 1px solid #f1f2f4;
}
.invoices .content .invoices-table tbody tr td, .invoices .content .invoice-items-table tbody tr td, .invoice .content .invoices-table tbody tr td, .invoice .content .invoice-items-table tbody tr td, .create-invoice .content .invoices-table tbody tr td, .create-invoice .content .invoice-items-table tbody tr td {
  padding: 15px 15px 15px 0;
  font-size: 14px;
  color: #5d6779;
}
.invoices .content .invoices-table tbody tr td .action, .invoices .content .invoice-items-table tbody tr td .action, .invoice .content .invoices-table tbody tr td .action, .invoice .content .invoice-items-table tbody tr td .action, .create-invoice .content .invoices-table tbody tr td .action, .create-invoice .content .invoice-items-table tbody tr td .action {
  color: #0e75d6;
  font-weight: 500;
  font-size: 14px;
  text-decoration: none;
}
.invoices .content .invoices-table tbody tr td .action:hover, .invoices .content .invoice-items-table tbody tr td .action:hover, .invoice .content .invoices-table tbody tr td .action:hover, .invoice .content .invoice-items-table tbody tr td .action:hover, .create-invoice .content .invoices-table tbody tr td .action:hover, .create-invoice .content .invoice-items-table tbody tr td .action:hover {
  text-decoration: underline;
}
.invoices .content .invoices-table tbody tr td .green, .invoices .content .invoices-table tbody tr td .red, .invoices .content .invoice-items-table tbody tr td .green, .invoices .content .invoice-items-table tbody tr td .red, .invoice .content .invoices-table tbody tr td .green, .invoice .content .invoices-table tbody tr td .red, .invoice .content .invoice-items-table tbody tr td .green, .invoice .content .invoice-items-table tbody tr td .red, .create-invoice .content .invoices-table tbody tr td .green, .create-invoice .content .invoices-table tbody tr td .red, .create-invoice .content .invoice-items-table tbody tr td .green, .create-invoice .content .invoice-items-table tbody tr td .red {
  display: inline-flex;
  font-weight: 600;
  font-size: 12px;
  padding: 3px 10px;
  border-radius: 15px;
  text-transform: capitalize;
  white-space: nowrap;
  background-color: #e8ebec;
  color: #8e9499;
}
.invoices .content .invoices-table tbody tr td .green.small, .invoices .content .invoices-table tbody tr td .red.small, .invoices .content .invoice-items-table tbody tr td .green.small, .invoices .content .invoice-items-table tbody tr td .red.small, .invoice .content .invoices-table tbody tr td .green.small, .invoice .content .invoices-table tbody tr td .red.small, .invoice .content .invoice-items-table tbody tr td .green.small, .invoice .content .invoice-items-table tbody tr td .red.small, .create-invoice .content .invoices-table tbody tr td .green.small, .create-invoice .content .invoices-table tbody tr td .red.small, .create-invoice .content .invoice-items-table tbody tr td .green.small, .create-invoice .content .invoice-items-table tbody tr td .red.small {
  font-size: 12px;
  padding: 2px 8px;
  border-radius: 5px;
}
.invoices .content .invoices-table tbody tr td .green, .invoices .content .invoice-items-table tbody tr td .green, .invoice .content .invoices-table tbody tr td .green, .invoice .content .invoice-items-table tbody tr td .green, .create-invoice .content .invoices-table tbody tr td .green, .create-invoice .content .invoice-items-table tbody tr td .green {
  background-color: #b8f7d5;
  color: #34aa6b;
}
.invoices .content .invoices-table tbody tr td .red, .invoices .content .invoice-items-table tbody tr td .red, .invoice .content .invoices-table tbody tr td .red, .invoice .content .invoice-items-table tbody tr td .red, .create-invoice .content .invoices-table tbody tr td .red, .create-invoice .content .invoice-items-table tbody tr td .red {
  background-color: #f7caca;
  color: #b64343;
}
.invoices .content .invoices-table tbody tr td strong, .invoices .content .invoice-items-table tbody tr td strong, .invoice .content .invoices-table tbody tr td strong, .invoice .content .invoice-items-table tbody tr td strong, .create-invoice .content .invoices-table tbody tr td strong, .create-invoice .content .invoice-items-table tbody tr td strong {
  font-size: 14px;
  font-weight: 500;
  color: #5d6779;
}
.invoices .content .invoices-table tbody tr td .remove-item, .invoices .content .invoice-items-table tbody tr td .remove-item, .invoice .content .invoices-table tbody tr td .remove-item, .invoice .content .invoice-items-table tbody tr td .remove-item, .create-invoice .content .invoices-table tbody tr td .remove-item, .create-invoice .content .invoice-items-table tbody tr td .remove-item {
  text-decoration: none;
}
.invoices .content .invoices-table tbody tr td .remove-item svg, .invoices .content .invoice-items-table tbody tr td .remove-item svg, .invoice .content .invoices-table tbody tr td .remove-item svg, .invoice .content .invoice-items-table tbody tr td .remove-item svg, .create-invoice .content .invoices-table tbody tr td .remove-item svg, .create-invoice .content .invoice-items-table tbody tr td .remove-item svg {
  fill: #a0a8b6;
}
.invoices .content .invoices-table tbody tr td input, .invoices .content .invoice-items-table tbody tr td input, .invoice .content .invoices-table tbody tr td input, .invoice .content .invoice-items-table tbody tr td input, .create-invoice .content .invoices-table tbody tr td input, .create-invoice .content .invoice-items-table tbody tr td input {
  padding: 6px 8px;
  margin: 0;
}
.invoices .content .invoices-table tbody tr td.alt, .invoices .content .invoice-items-table tbody tr td.alt, .invoice .content .invoices-table tbody tr td.alt, .invoice .content .invoice-items-table tbody tr td.alt, .create-invoice .content .invoices-table tbody tr td.alt, .create-invoice .content .invoice-items-table tbody tr td.alt {
  font-size: 14px;
  color: #a0a8b6;
}
.invoices .content .invoices-table tbody tr td.pull-right, .invoices .content .invoice-items-table tbody tr td.pull-right, .invoice .content .invoices-table tbody tr td.pull-right, .invoice .content .invoice-items-table tbody tr td.pull-right, .create-invoice .content .invoices-table tbody tr td.pull-right, .create-invoice .content .invoice-items-table tbody tr td.pull-right {
  text-align: right;
}
.invoices .content .invoices-table tbody tr:last-child, .invoices .content .invoice-items-table tbody tr:last-child, .invoice .content .invoices-table tbody tr:last-child, .invoice .content .invoice-items-table tbody tr:last-child, .create-invoice .content .invoices-table tbody tr:last-child, .create-invoice .content .invoice-items-table tbody tr:last-child {
  border-bottom: 0;
}
.create-invoice {
  max-width: 500px;
}
.create-invoice .content {
  display: flex;
  flex-flow: column;
}
.create-invoice .content .invoice-items {
  padding-bottom: 15px;
}
.create-invoice .content .invoice-items .add-item {
  display: inline-flex;
  align-items: center;
  text-decoration: none;
  font-weight: 500;
  color: #2579da;
  font-size: 14px;
  margin-bottom: 5px;
}
.create-invoice .content .invoice-items .add-item svg {
  fill: #2579da;
  margin-right: 3px;
}
.create-invoice .content .invoice-items .add-item:hover {
  color: #1e61ae;
}
.create-invoice .content .invoice-items .add-item:hover svg {
  fill: #1e61ae;
}
.create-invoice .content label {
  font-size: 14px;
  font-weight: 500;
  color: #5d6779;
  margin: 0 0 10px 0;
  padding: 0;
}
.create-invoice .content input, .create-invoice .content textarea {
  border: 1px solid #e2e4e9;
  border-radius: 5px;
  padding: 10px;
  font-size: 14px;
  color: #5d6779;
  margin: 0 0 15px 0;
  width: 100%;
}
.create-invoice .content input:focus, .create-invoice .content textarea:focus {
  border-color: #0e75d6;
}
.create-invoice .content input::placeholder, .create-invoice .content textarea::placeholder {
  color: #a0a8b6;
}
.create-invoice .content textarea {
  min-height: 100px;
}
.create-invoice .content button {
  margin-top: 10px;
  align-self: flex-start;
}
.invoice {
  max-width: 500px;
}
.invoice .header {
  padding-bottom: 30px;
  border-bottom: 1px solid #f1f2f4;
}
.invoice .header .due-date {
  font-size: 14px;
  font-weight: 500;
  color: #9fa4b1;
  margin: 10px 0 0 0;
  padding: 0;
}
.invoice .header .paid {
  font-size: 20px;
  font-weight: 500;
  color: #1bce6e;
  margin: 10px 0 0 0;
  padding: 0;
}
.invoice .content {
  display: flex;
  flex-flow: wrap;
}
.invoice .content .from-details, .invoice .content .to-details {
  width: 50%;
  padding: 10px 20px 20px 0;
}
.invoice .content .from-details h3, .invoice .content .to-details h3 {
  font-size: 14px;
  font-weight: 600;
  color: #9fa4b1;
  margin: 0 0 10px 0;
  padding: 0;
}
.invoice .content .from-details p, .invoice .content .to-details p {
  font-size: 14px;
  color: #5d6779;
  margin: 0 0 5px 0;
  padding: 0;
}
.invoice .content .invoice-items {
  width: 100%;
  flex: 1;
}
.btn {
  text-decoration: none;
  display: inline-flex;
  align-items: center;
  justify-content: center;
  appearance: none;
  background: #0e75d6;
  box-shadow: 0px 0px 7px 1px rgba(45, 54, 68, 0.12);
  border: 0;
  border-radius: 4px;
  color: #FFFFFF;
  height: 36px;
  padding: 0 14px;
  font-size: 14px;
  line-height: 16px;
  font-weight: 500;
  cursor: pointer;
  margin-top: 5px;
}
.btn:hover {
  background: #0c68be;
}
.btn svg {
  margin-right: 6px;
  fill: #b7d6f3;
}
.btn:has(svg) {
  padding-left: 10px;
}
This CSS will style the various sections of our invoice system, including the invoice list, invoice details, and the create invoice form.
5. Variables & Database Connection
The main file will contain the essential configurations and the database connection setup. This file is crucial as it will be included in other PHP files to provide necessary configurations and database access.
First, we need to declare some variables for our database connection and other configurations. Create a file named main.php and add the following code:
<?php
// Database connection variables
$db_host = 'localhost';
$db_user = 'root';
$db_pass = '';
$db_name = 'phpinvoice_tutorial';
$db_charset = 'utf8';
// Other variables
$currency_code = '$';
// Company details
$company_name = 'Your Company Name';
$company_address = "123 Example Street\nExample City\nEX4 MPL\nUnited States";
// Stripe variables
$stripe_secret_key = '';
$stripe_currency = 'USD';
$stripe_success_url = 'https://example.com/invoice.php';
$stripe_cancel_url = 'https://example.com/invoice.php';
$stripe_webhook_secret = '';
?>In this code, we define the variables needed for the database connection, currency, company details, and Stripe configurations. These variables will be used throughout the application. Make sure to update the variables to reflect your own details, etc.
Next, we need to establish a connection to the MySQL database using PDO (PHP Data Objects). This will allow us to interact with the database securely and efficiently. Add the following code to the main.php file:
// Database connection using PDO
try {
    $pdo = new PDO('mysql:host=' . $db_host . ';dbname=' . $db_name . ';charset=' . $db_charset, $db_user, $db_pass);
    $pdo->setAttribute(PDO::ATTR_ERRMODE, PDO::ERRMODE_EXCEPTION);
} catch (PDOException $exception) {
    // If there is an error with the connection, stop the script and display the error.
    exit('Failed to connect to database: ' . $exception->getMessage());
}
This code attempts to connect to the MySQL database using the PDO extension. If the connection is successful, the $pdo object will be available for use in other parts of the application. If the connection fails, an error message will be displayed, and the script will stop executing.
Now, our main.php file is ready with the necessary configurations and database connection setup. This file will be included in other PHP files to provide the configurations and database access they need.
6. Creating Invoices
The create.php file will allow users to create new invoices. This file will contain a form where users can enter invoice details such as the client's name, address, items, quantities, and prices. Let's implement the form, validate the data, and insert it into the database.
6.1. Implementing the Form
Edit the create.php file and add the following code:
<!DOCTYPE html>
<html>
  <head>
    <title>Create Invoice</title>
        <meta charset="utf-8">
        <meta name="viewport" content="width=device-width,minimum-scale=1">
        <link href="style.css" rel="stylesheet" type="text/css">
  </head>
  <body>
        <div class="create-invoice">
            <div class="header">
                <h1>Create Invoice</h1>
            </div>
            <form action="" method="post" class="content">

                <label for="client_name">Client Name</label>
                <input type="text" name="client_name" id="client_name" placeholder="Joe Bloggs" required>

                <label for="client_address">Client Address</label>
                <textarea name="client_address" id="client_address" placeholder="Enter the client's address..."></textarea>

                <div class="invoice-items">
                    <table class="invoice-items-table">
                        <thead>
                            <tr>
                                <th>Name</th>
                                <th>Quantity</th>
                                <th>Price</th>
                                <th></th>
                            </tr>
                        </thead>
                        <tbody>
                            <tr class="item">
                                <td><input type="text" name="item_name[]" placeholder="Item 1" required></td>
                                <td><input type="number" name="item_quantity[]" placeholder="1" required></td>
                                <td><input type="number" name="item_price[]" placeholder="0.00" required></td>
                                <td><a href="#" class="remove-item"><svg width="16" height="16" xmlns="http://www.w3.org/2000/svg" viewBox="0 0 24 24"><path d="M19,6.41L17.59,5L12,10.59L6.41,5L5,6.41L10.59,12L5,17.59L6.41,19L12,13.41L17.59,19L19,17.59L13.41,12L19,6.41Z" /></svg></a></td>
                            </tr>
                        </tbody>
                    </table>
                    <a href="#" class="add-item"><svg width="16" height="16" xmlns="http://www.w3.org/2000/svg" viewBox="0 0 24 24"><path d="M19,13H13V19H11V13H5V11H11V5H13V11H19V13Z" /></svg>Add Item</a>
                </div>

                <label for="notes">Notes</label>
                <textarea name="notes" id="notes" placeholder="Enter any notes for the invoice..."></textarea>

                <button type="submit" class="btn">Create Invoice</button>

            </form>
        </div>
        <script>
        document.querySelector('.add-item').onclick = event => {
            event.preventDefault();
            const table = document.querySelector('.invoice-items-table');
            const row = table.insertRow(table.rows.length);
            row.className = 'item';
            row.innerHTML = `
                <td><input type="text" name="item_name[]" placeholder="Item ${table.rows.length-1}" required></td>
                <td><input type="number" name="item_quantity[]" placeholder="1" required></td>
                <td><input type="number" name="item_price[]" placeholder="0.00" required></td>
                <td><a href="#" class="remove-item"><svg width="16" height="16" xmlns="http://www.w3.org/2000/svg" viewBox="0 0 24 24"><path d="M19,6.41L17.59,5L12,10.59L6.41,5L5,6.41L10.59,12L5,17.59L6.41,19L12,13.41L17.59,19L19,17.59L13.41,12L19,6.41Z" /></svg></a></td>
            `;
            row.querySelector('.remove-item').onclick = event => {
                event.preventDefault();
                table.deleteRow(row.rowIndex);
            };
        };
        document.querySelectorAll('.remove-item').forEach(element => {
            element.onclick = event => {
                event.preventDefault();
                element.closest('tr').remove();
            };
        });
        </script>
    </body>
</html>
This code creates a form for users to enter invoice details such as the client's name, address, items, quantities, prices, and notes. The form also includes a button to submit the invoice data.
If we navigate to our new page, it should resemble the following:
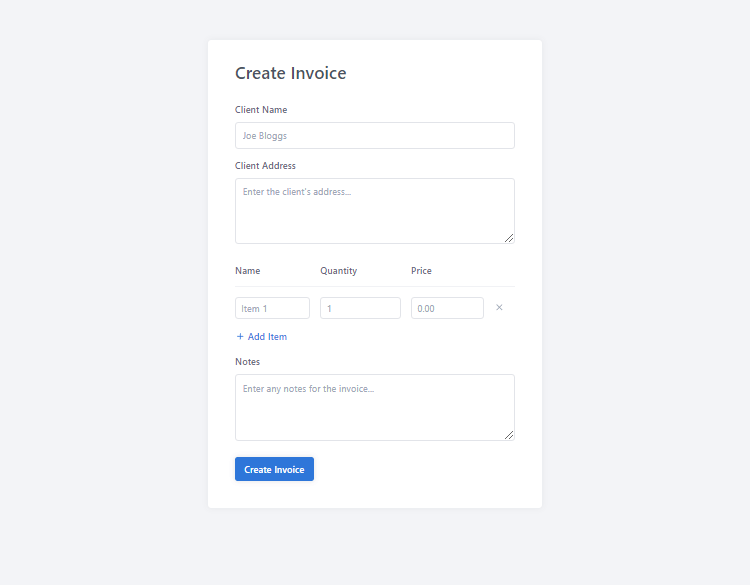
The JavaScript code at the bottom of the file adds functionality to dynamically add and remove invoice items. This allows users to add multiple items to the invoice form.
6.2. Validating & Inserting Form Data into the Database
Next, we need to validate the form data to ensure all required fields are filled out correctly.
Add the following code to the beginning of the create.php file:
<?php
// Include the main.php file
require 'main.php';
// If the form is submitted
if (isset($_POST['client_name'])) {
    // Insert a new invoice into the database
    $stmt = $pdo->prepare('INSERT INTO invoices (client_name, client_address, payment_status, notes, created) VALUES (?, ?, ?, ?, ?)');
    $stmt->execute([ $_POST['client_name'], $_POST['client_address'], 'Unpaid', $_POST['notes'], date('Y-m-d H:i:s') ]);
    // Get the ID of the new invoice
    $invoice_id = $pdo->lastInsertId();
    // Insert each item into the database
    if (isset($_POST['item_name']) && is_array($_POST['item_name']) && count($_POST['item_name']) > 0) {
        $stmt = $pdo->prepare('INSERT INTO invoice_items (invoice_id, item_name, item_quantity, item_price) VALUES (?, ?, ?, ?)');
        for ($i = 0; $i < count($_POST['item_name']); $i++) {
            $stmt->execute([ $invoice_id, $_POST['item_name'][$i], $_POST['item_quantity'][$i], $_POST['item_price'][$i] ]);
        }
    }
    // Redirect to the invoices page
    header('Location: index.php');
    exit;
}
?>
To check whether the form is submitted, we use the isset() function to verify if the client_name field is set. If the form is submitted, we insert a new invoice into the database using a prepared statement. The invoice details include the client's name, address, payment status, notes, and creation date.
Tip Using prepared statements helps prevent SQL injection attacks. This makes the invoice system more secure and robust against malicious attacks.
That's essentially it for the create.php file. Users can now create new invoices by filling out the form with the required details. Next, we'll create the index file to list all the invoices stored in the database.
7. Populating Invoices
The index.php file will display a list of all the invoices stored in the database, which will provide users with an overview of all invoices and later on be able to view each individual invoice.
7.1. Fetching Invoices from the Database
First, let's fetch all the invoices from the database. Edit the index.php file and add the following code:
<?php
// Include the main.php file
require 'main.php';
// Fetch all invoices from the database ordered by the invoice date
$stmt = $pdo->query('SELECT i.*, (SELECT SUM(ii.item_quantity * ii.item_price) FROM invoice_items ii WHERE ii.invoice_id = i.id) AS payment_amount FROM invoices i ORDER BY i.created DESC');
$invoices = $stmt->fetchAll();
?>
This code fetches all invoices from the database and calculates the total payment amount for each invoice. The invoices are ordered by the creation date in descending order, so the most recent invoices will be displayed first.
7.2. Populating the Data
Next, let's create the HTML structure to display the list of invoices. This code will generate a table with all the invoices, displaying their details such as ID, client name, amount, status, date, and actions.
Add the following code to the index.php file:
<!DOCTYPE html>
<html>
  <head>
    <title>Invoices</title>
        <meta charset="utf-8">
        <meta name="viewport" content="width=device-width,minimum-scale=1">
        <link href="style.css" rel="stylesheet" type="text/css">
  </head>
  <body>
        <div class="invoices">
            <div class="header">
                <h1>Invoices</h1>
                <a href="create.php" class="btn"><svg width="18" height="18" xmlns="http://www.w3.org/2000/svg" viewBox="0 0 24 24"><path d="M19,13H13V19H11V13H5V11H11V5H13V11H19V13Z" /></svg>Create</a>
            </div>
            <div class="content">
                <table class="invoices-table">
                    <thead>
                        <tr>
                            <th>#</th>
                            <th>Client</th>
                            <th>Amount</th>
                            <th>Status</th>
                            <th>Date</th>
                            <th>Actions</th>
                        </tr>
                    </thead>
                    <tbody>
                        <?php foreach ($invoices as $invoice): ?>
                        <tr>
                            <td class="alt"><?=$invoice['id']?></td>
                            <td><?=$invoice['client_name']?></td>
                            <td><strong><?=$currency_code?><?=number_format($invoice['payment_amount'], 2)?></strong></td>
                            <td>
                                <?php if ($invoice['payment_status'] == 'Paid'): ?>
                                <span class="green">Paid</span>
                                <?php else: ?>
                                <span class="red">Unpaid</span>
                                <?php endif; ?>
                            </td>
                            <td class="alt"><?=date('F d, Y', strtotime($invoice['created']))?></td>
                            <td>
                                <a href="invoice.php?id=<?=$invoice['id']?>" class="action">View</a>
                            </td>
                        </tr>
                        <?php endforeach; ?>
                    </tbody>
                </table>
            </div>
        </div>
    </body>
</html>
In the code above, we start by including the main.php file, which contains our database connection and configuration details. We then use an SQL query to fetch all invoices from the database, ordered by the creation date. Each invoice includes a calculated payment amount, which is the sum of the quantities and prices of the items in the invoice.
If we navigate to the index.php file, it should resemble the following:
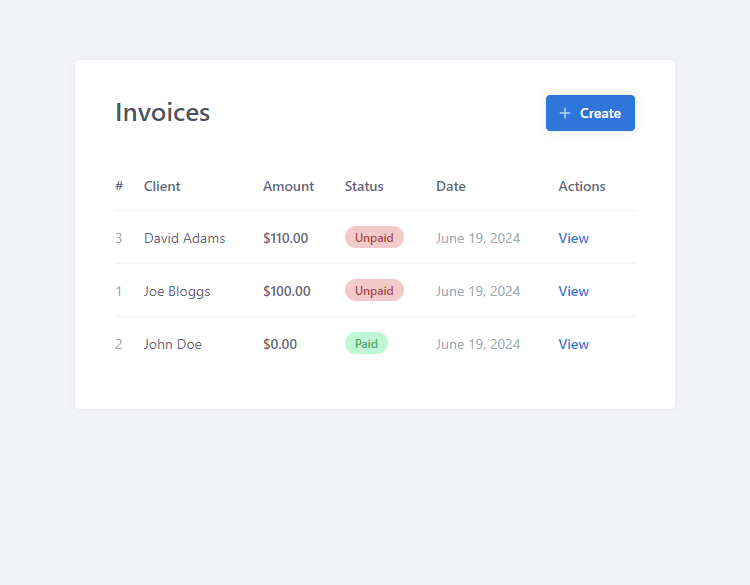
The fetched invoices are stored in the $invoices array, which we then loop through to display each invoice in a table format. The table includes columns for the invoice ID, client name, payment amount, payment status, creation date, and actions. Each row of the table represents an individual invoice with its details.
We also include a "Create" button in the header, which links to the create.php file where users can create new invoices. The status of each invoice is displayed using conditional formatting: "Paid" invoices are shown with a green label, while "Unpaid" invoices are shown with a red label. This provides a clear visual indication of the payment status of each invoice.
This index file serves as the main dashboard for managing invoices. Users can view the details of each invoice by clicking on the "View" link, which takes them to the invoice.php file. This setup makes it easy to keep track of all invoices, their clients, amounts, and statuses in a structured and organized manner.
8. Creating the Invoice File
The invoice page provides a comprehensive overview of the invoice information in a professional and structured format. From here, the client will be able to pay for the invoice with the Stripe payment gateway.
8.1. Validating the Invoice ID
The first step is to check if the invoice ID is set and valid. If not, an error message will be displayed. This validation ensures that we are working with an existing invoice and prevents invalid access.
Edit the invoice.php file and add:
<?php
// Include the main.php file
require 'main.php';
// Check if get ID is set
if (isset($_GET['id'])) {
    // Get the invoice from the database
    // ...
} else {
    // If the ID was not set, output error
    exit('No ID specified!');
}
?>
The above code will ensure the GET parameter id is set. The ID parameter reflects the invoice ID, so for example, if the URL is invoice.php?id=1, the code will fetch the invoice with ID 1 from the database. If the ID is not set, an error message will be displayed.
8.2. Fetching Invoice Details
After validating the invoice ID, we need to fetch the invoice details and items from the database. This information will be used to populate the invoice page.
Find the following:
// Get the invoice from the databaseAdd below:
$stmt = $pdo->prepare('SELECT i.*, (SELECT SUM(ii.item_quantity * ii.item_price) FROM invoice_items ii WHERE ii.invoice_id = i.id) AS payment_amount FROM invoices i WHERE i.id = ?');
$stmt->execute([ $_GET['id'] ]);
$invoice = $stmt->fetch(PDO::FETCH_ASSOC);
// If the invoice does not exist, output error
if (!$invoice) {
    exit('Invoice does not exist!');
}
// Get invoice items
$stmt = $pdo->prepare('SELECT * FROM invoice_items WHERE invoice_id = ?');
$stmt->execute([ $_GET['id'] ]);
$invoice_items = $stmt->fetchAll(PDO::FETCH_ASSOC);
The SQL queries in the above code retrieve the necessary details and items, which are stored in the $invoice and $invoice_items variables, respectively.
8.3. Displaying Invoice Details
We can now implement the template code to display the invoice details. This code will present the invoice information in a structured and professional manner.
Add the following code:
<!DOCTYPE html>
<html>
  <head>
    <title>Invoices</title>
        <meta charset="utf-8">
        <meta name="viewport" content="width=device-width,minimum-scale=1">
        <link href="style.css" rel="stylesheet" type="text/css">
  </head>
  <body>
        <div class="invoice">
            <div class="header">
                <div>
                    <h1>Invoice</h1>
                    <p class="due-date">Due <?=date('F d, Y', strtotime($invoice['created']))?></p>
                </div>
                <?php if ($invoice['payment_status'] == 'Unpaid'): ?>
                <a href="pay.php?id=<?=$invoice['id']?>" class="btn"><svg width="18" height="18" xmlns="http://www.w3.org/2000/svg" viewBox="0 0 24 24"><path d="M20,8H4V6H20M20,18H4V12H20M20,4H4C2.89,4 2,4.89 2,6V18A2,2 0 0,0 4,20H20A2,2 0 0,0 22,18V6C22,4.89 21.1,4 20,4Z" /></svg>Pay Now</a>
                <?php else: ?>
                <p class="paid"><?=$invoice['payment_status']?></p>
                <?php endif; ?>
            </div>
            <div class="content">
                <div class="from-details">
                    <h3>From</h3>
                    <p><?=nl2br($company_name)?></p>
                    <p><?=nl2br($company_address)?></p>
                </div>
                <div class="to-details">
                    <h3>To</h3>
                    <p><?=$invoice['client_name']?></p>
                    <p><?=nl2br($invoice['client_address'])?></p>
                </div>
                <div class="invoice-items">
                    <table class="invoice-items-table">
                        <thead>
                            <tr>
                                <th>Name</th>
                                <th>Quantity</th>
                                <th>Price</th>
                                <th class="pull-right">Total</th>
                            </tr>
                        </thead>
                        <tbody>
                            <?php foreach ($invoice_items as $item): ?>
                            <tr class="item">
                                <td><?=$item['item_name']?></td>
                                <td><?=$item['item_quantity']?></td>
                                <td><?=$currency_code?><?=number_format($item['item_price'], 2)?></td>
                                <td class="pull-right"><?=$currency_code?><?=number_format($item['item_quantity'] * $item['item_price'], 2)?></td>
                            </tr>
                            <?php endforeach; ?>
                            <tr class="total">
                                <td colspan="3" class="pull-right"><strong>Total</strong></td>
                                <td class="pull-right"><?=$currency_code?><?=number_format($invoice['payment_amount'], 2)?></td>
                            </tr>
                        </tbody>
                    </table>
                </div>
            </div>
        </div>
    </body>
</html>
In the code above, we display the invoice details, including the due date, payment status, company details, client details, invoice items, and total amount. The due date is calculated based on the creation date of the invoice. The payment status is displayed as "Paid" or "Unpaid" with corresponding styling.
If we select one of the invoices on the index.php page, it should navigate us to the invoice page that resembles the following:
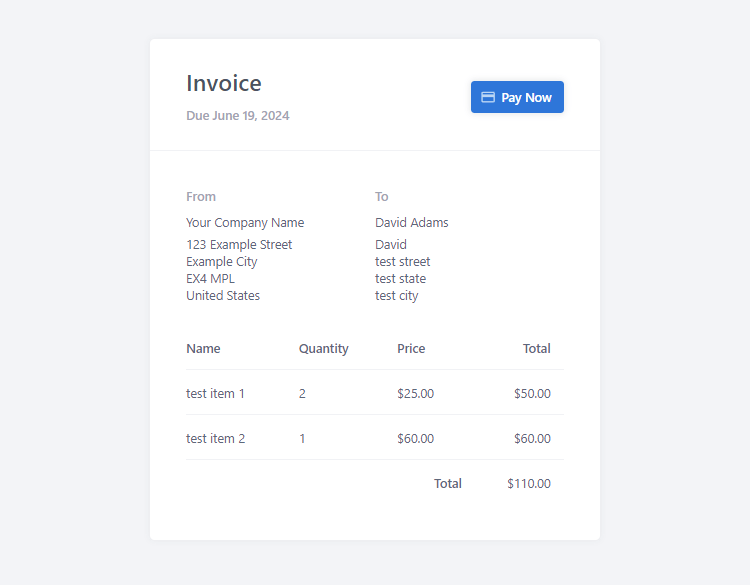
The "Pay" button allows the client to pay for the invoice using the Stripe payment gateway. If the invoice is already paid, the payment status will be displayed as "Paid" and the button will be replaced with a label to prevent the client from paying for the invoice more than once.
9. Processing Payment with Stripe
Stripe is a popular payment gateway that allows businesses to accept online payments securely. In this section, we will integrate Stripe into our invoice system to handle payments.
9.1. Validating the Invoice
The pay.php file handles the payment process for an invoice. The first step is to check if the invoice ID is set and valid. This validation ensures that the invoice exists before proceeding with the payment process.
Edit the pay.php file and add the following code:
<?php
// Include the main.php file
require 'main.php';
// Check if get ID is set
if (isset($_GET['id'])) {
    // Get the invoice from the database
    $stmt = $pdo->prepare('SELECT i.*, (SELECT SUM(ii.item_quantity * ii.item_price) FROM invoice_items ii WHERE ii.invoice_id = i.id) AS payment_amount FROM invoices i WHERE i.id = ?');
    $stmt->execute([ $_GET['id'] ]);
    $invoice = $stmt->fetch(PDO::FETCH_ASSOC);
    // If the invoice does not exist, output error
    if (!$invoice) {
        exit('Invoice does not exist!');
    }
    // Process payment with Stripe checkout session using cURL
    // ...
}
?>
The above code fetches the invoice details from the database based on the invoice ID provided in the GET parameter. If the invoice does not exist, an error message is displayed. Once again, we have to use prepared statements to secure our SQL queries.
9.2. Process Invoice with Stripe using cURL
After validating the invoice, the next step is to process the payment using Stripe. We will create a Stripe checkout session using cURL. This session will handle the payment process and redirect the user to the Stripe checkout page.
After the following line of code:
// Process payment with Stripe checkout session using cURLAdd after:
$ch = curl_init();
curl_setopt($ch, CURLOPT_URL, 'https://api.stripe.com/v1/checkout/sessions');
curl_setopt($ch, CURLOPT_RETURNTRANSFER, 1);
curl_setopt($ch, CURLOPT_POST, 1);
curl_setopt($ch, CURLOPT_POSTFIELDS, http_build_query([
    'payment_method_types[]' => 'card',
    'line_items[][price_data][currency]' => $stripe_currency,
    'line_items[][price_data][product_data][name]' => 'Invoice #' . $invoice['id'],
    'line_items[][price_data][unit_amount]' => $invoice['payment_amount'] * 100,
    'line_items[][quantity]' => 1,
    'metadata[client_reference_id]' => $invoice['id'],
    'mode' => 'payment',
    'success_url' => $stripe_success_url . '?id=' . $invoice['id'],
    'cancel_url' => $stripe_cancel_url . '?id=' . $invoice['id']
]));
curl_setopt($ch, CURLOPT_USERPWD, $stripe_secret_key . ':');
$result = curl_exec($ch);
curl_close($ch);
// Decode the result
$result = json_decode($result, true);
// If the session ID was returned
if (isset($result['id'])) {
    // Redirect to the checkout page
    header('Location: ' . $result['url']);
    exit;
} else if (isset($result['error']) && isset($result['error']['message'])) {
    // If the session ID was not returned, output error
    exit('Error creating checkout session: ' . $result['error']['message']);
} else {
    // If the session ID was not returned, output error
    exit('Error creating checkout session!');
}
This code initializes a cURL session and sets the necessary options to create a Stripe checkout session. The session includes the invoice details, such as the payment amount and description. If the session is successfully created, the user is redirected to the Stripe checkout page. If there is an error, an error message is displayed.
Make sure to update the Stripe variables declared in the main.php file.
9.3. Implementing the IPN
The IPN (Instant Payment Notification) file handles notifications from Stripe when a payment event occurs, such as a payment being completed. The first step is to validate the IPN request to ensure it is coming from Stripe.
Edit the ipn.php file and add the following code:
<?php
// Include the main.php file
require 'main.php';
// Validate header
if (!isset($_SERVER['HTTP_STRIPE_SIGNATURE'])) {
    http_response_code(400);
    exit;
}
// Declare variables
$payload = @file_get_contents('php://input');
$sig_header = $_SERVER['HTTP_STRIPE_SIGNATURE'];
$event = null;
// Verify the signature
function verify_stripe_signature($payload, $sig_header, $endpoint_secret) {
    $timestamp = explode(',', $sig_header)[0];
    $signature = explode(',', $sig_header)[1];
    $signed_payload = $timestamp . '.' . $payload;
    $expected_signature = hash_hmac('sha256', $signed_payload, $endpoint_secret);
    return hash_equals($expected_signature, $signature);
}
// If the signature is not valid, return a 400 error
if (!verify_stripe_signature($payload, $sig_header, $stripe_webhook_secret)) {
    http_response_code(400);
    exit;
}
// Decode the payload
$event = json_decode($payload, true);
// Handle the checkout.session.completed event
if ($event['type'] == 'checkout.session.completed') {
    // Update the invoice
    // ...
}
http_response_code(200);
?>
This code validates the IPN request by checking the Stripe signature and verifying it against the endpoint secret. If the signature is valid, the payload is decoded, and the event type is checked. If the event type is checkout.session.completed, the invoice is updated in the database.
9.4. Updating the Invoice in the Database
After validating the IPN request, we need to handle the payment event and update the invoice status in the database. This ensures that the invoice status is updated to "Paid" when a payment is completed.
Find the following:
// Update the invoiceAdd below:
$session = $event['data']['object'];
// Retrieve the invoice ID from the session metadata (if you set it)
$invoice_id = $session['metadata']['client_reference_id'];
// Update the invoice status to 'Paid' in your database
$stmt = $pdo->prepare('UPDATE invoices SET payment_status = ? WHERE id = ?');
$stmt->execute([ 'Paid', $invoice_id ]);
This code retrieves the invoice ID from the session metadata and updates the invoice status to "Paid" in the database. This ensures that the invoice status reflects the payment completion status accurately.
Follow the below instructions to set up the webhook in your Stripe account:
- Log in to your Stripe account.
- Go to the Developers section and click on Webhooks.
- Click on Add endpoint and enter the URL of your IPN file (e.g., https://example.com/ipn.php).
- Set the Event types to send to checkout.session.completed.
- Click on Add endpoint to save the webhook configuration.
With the IPN file set up and the webhook configured in your Stripe account, you can now handle payment events and update the invoice status accordingly. However, please be aware that it will not work using a development server like XAMPP or WAMP because Stripe must be able to send a POST request to your server.
Conclusion
We've now built a complete invoice system using Stripe, PHP, and MySQL from scratch. This tutorial has guided you through setting up the necessary files, creating the database, and implementing key features such as creating invoices, displaying them, and processing payments.
By following the steps outlined, you have a fully functional invoice system that not only handles invoice creation and storage but also integrates seamlessly with Stripe for secure payment processing. This system is designed to be flexible and customizable, allowing you to adapt it to your specific needs.
We hope you found this tutorial helpful and informative. Feel free to expand on this project and add more features as needed.
Thank you for reading, and enjoy coding!
If you would like to support us, consider the advanced invoice management system below. It will greatly help us create more tutorials and keep our website up and running. The advanced package includes improved code and more features.