 Download the full source codeComplete working project · Setup guide included · Free for commercial use
Free ZIP
Download the full source codeComplete working project · Setup guide included · Free for commercial use
Free ZIP
In this tutorial, we will be designing and developing an interactive multi-step survey form with PHP, JavaScript, and CSS3. The form will seamlessly enable the user to navigate between form pages without reloading the page.
What is a survey form?
A survey form consists of input fields and options that enable users to input their unbiased opinion regarding the survey topic, which the survey provider subsequently analyzes.
Basically, survey forms will help you improve your products and related services as you'll be able to make a formal decision based on the feedback received.
Contents
1. Getting Started
There are a few requirements that we need to meet before we start developing our survey form. We'll be leveraging PHP and therefore need a development web server solution.
1.1. Requirements
- XAMPP Web Server — Will enable us to develop web applications using PHP.
- Code Editor — I highly recommend Visual Studio Code, but you can use Notepad to develop web applications.
1.2. What You Will Learn in this Tutorial
- Survey Form — Design and develop an interactive multi-step survey form.
- Multi-Step with JS — Seamlessly navigate between survey pages using JavaScript.
- Send Mail with PHP — Capture user input and send results to an email address.
- Structure Form with CSS3 — Leverage CSS3 and craft a beautiful innovative layout.
1.3. Setup & File Structure
Now that we have the basic fundamentals installed, we can begin to start our web server.
- Open the XAMPP Control Panel
- Next to the Apache module, click Start
- Next to the MySQL module, click Start
- Navigate to XAMPPs installation directory (C:\xampp)
- Open the htdocs directory
- Create the following directories and files:
File Structure
\-- surveyform
|-- survey.php
|-- email-template.php
|-- style.css
The above files will contain the following:
- survey.php — The file will consist of HTML form elements and PHP code to process the form.
- email-template.php — This file will contain the email template code.
- style.css — The stylesheet file that will structure our page and make it look more appealing.
2. Designing the Survey Form with CSS
The stylesheet will structure our survey form and make it look more appealing. With CSS3, we can change text color, customize elements, and provide an elegant experience for our users.
Edit the style.css file and add:
html, body, div, input, span, a, select, textarea, option, h1, h2, h3, h4, main, aside, article, section, header, p, footer, nav, pre {
    box-sizing: border-box;
    font-family: Tahoma, Geneva, sans-serif;
}
html {
    background: #f8f9f9 linear-gradient(0deg, #f8f9f9 0%, #f8f9f9 80%, #51b47c 80%, #51b47c 100%) no-repeat;
    padding: 30px;
    height: 100%;
}
input,textarea,select {
    outline: 0;
}
h1 {
    margin: 0;
    padding: 35px 25px 25px 25px;
    font-size: 20px;
    color: #6a737f;
    font-weight: 600;
}
h1 i {
    padding-right: 10px;
    font-size: 24px;
}
.survey-form {
    background-color: #fff;
    width: 500px;
    margin: 0 auto;
    box-shadow: 0px 0px 5px 0px rgba(0,0,0,.2);
}
.survey-form .fields {
    position: relative;
    padding: 20px;
}
.survey-form select {
    appearance: none;
    background-image: linear-gradient(45deg, transparent 50%, #c7c9cb 50%), linear-gradient(135deg, #c7c9cb 50%, transparent 50%), linear-gradient(to right, #dfe0e0, #dfe0e0);
    background-position: calc(100% - 20px) 20px, calc(100% - 15px) 20px, calc(100% - 40px) 10px;
    background-size: 5px 5px, 5px 5px, 1px 25px;
    background-repeat: no-repeat;
}
.survey-form select option:first-child {
    display: none;
 }
.survey-form input[type="date"]::-webkit-calendar-picker-indicator {
    color: #ddd;
    filter: invert(0.8);
}
.survey-form input[type="text"],
.survey-form input[type="email"],
.survey-form input[type="date"],
.survey-form input[type="tel"],
.survey-form select {
    display: flex;
    margin-top: 10px;
    padding: 15px;
    border: 1px solid #dfe0e0;
    width: 100%;
    flex-basis: 100%;
    height: 47px;
}
.survey-form input[type="text"]:focus,
.survey-form input[type="email"]:focus,
.survey-form input[type="tel"]:focus,
.survey-form input[type="date"]:focus,
.survey-form select:focus {
    border: 1px solid #c6c7c7;
}
.survey-form input[type="text"]::placeholder,
.survey-form input[type="email"]::placeholder,
.survey-form input[type="tel"]::placeholder,
.survey-form input[type="date"]:invalid,
.survey-form textarea::placeholder,
.survey-form select:invalid {
    color: #858688;
}
.survey-form textarea {
    resize: none;
    margin-top: 15px;
    padding: 15px;
    border: 1px solid #dfe0e0;
    width: 100%;
    height: 150px;
}
.survey-form textarea:focus {
    border: 1px solid #c6c7c7;
}
.survey-form .buttons {
    padding: 20px;
    border-top: 1px solid #eceff2;
}
.survey-form .btn {
    display: inline-block;
    padding: 10px 20px;
    border: 0;
    background-color: #c9704c;
    font-weight: bold;
    color: #fff;
    cursor: pointer;
    border-radius: 25px;
    margin-right: 5px;
    text-decoration: none;
    font-size: 14px;
}
.survey-form .btn:hover {
    background-color: #c26c4a;
}
.survey-form .btn.alt {
    background-color: transparent;
    border: 1px solid #c9704c;
    color: #c9704c;
}
.survey-form .btn.alt:hover {
    border: 1px solid #c26c4a;
    color: #c26c4a;
}
.survey-form input[name="email"] {
    position: relative;
    display: block;
}
.survey-form .field {
    display: inline-flex;
    position: relative;
    width: 100%;
    padding-bottom: 20px;
}
.survey-form label, .survey-form p {
    font-size: 14px;
    font-weight: 600;
    color: #8e939b;
}
.survey-form .field i {
    position: absolute;
    color: #dfe2e5;
    top: 25px;
    left: 15px;
    z-index: 10;
}
.survey-form .field i ~ input {
    padding-left: 45px !important;
}
.survey-form .responses {
    padding: 15px;
    margin: 0;
}
.survey-form .fields .wrapper {
    display: flex;
    justify-content: space-between;
}
.survey-form .fields .wrapper > div {
    width: 100%;
}
.survey-form .fields .wrapper .gap {
    width: 35px;
}
.survey-form .steps {
    position: relative;
    display: flex;
    justify-content: space-between;
    margin-top: 10px;
    width: calc(100% - 35px);
    align-self: center;
    margin: 0 auto;
}
.survey-form .steps::before {
    content: "";
    position: absolute;
    top: 0;
    left: 0;
    width: 100%;
    height: 4px;
    background-color: #f2f4f7;
    margin: auto 0;
    top: 0;
    bottom: 0;
    z-index: 0;
}
.survey-form .steps .step {
    width: 25px;
    height: 25px;
    background-color: #f2f4f7;
    border: 3px solid #f2f4f7;
    border-radius: 50px;

    z-index: 1;
}
.survey-form .steps .step.current {
    background-color: #8cc6f2;
}
.survey-form .steps .step.complete {
    background-color: #6ECBA4;
}
.survey-form .rating {
    display: flex;
    justify-content: space-between;
    padding: 5px 0;
}
.survey-form .rating input[type="radio"]:checked,
.survey-form .rating input[type="radio"]:not(:checked) {
    position: absolute;
    left: -9999px;
}
.survey-form .rating input[type="radio"]:checked + label,
.survey-form .rating input[type="radio"]:not(:checked) + label
{
    display: flex;
    position: relative;
    font-size: 14px;
    justify-content: center;
    align-items: center;
    width: 31px;
    height: 31px;
    cursor: pointer;
    color: #8e939b;
    z-index: 10;
}
.survey-form .rating input[type="radio"]:checked + label:before,
.survey-form .rating input[type="radio"]:not(:checked) + label:before {
    content: "";
    position: absolute;
    left: 0;
    top: 0;
    width: 30px;
    height: 30px;
    border: 1px solid #dfe0e0;
    border-radius: 100%;
    background: #fff;
    z-index: -1;
}
.survey-form .rating input[type="radio"]:checked + label:after,
.survey-form .rating input[type="radio"]:not(:checked) + label:after {
    content: "";
    position: absolute;
    top: 0;
    left: 0;
    width: 31px;
    height: 31px;
    border-radius: 100%;
    background: #c9704c;
    z-index: -1;
}
.survey-form .rating input[type="radio"]:not(:checked) + label:after {
    opacity: 0;
}
.survey-form .rating input[type="radio"]:checked + label {
    color: #fff;
}
.survey-form .rating input[type="radio"]:checked + label:after {
    opacity: 1;
}
.survey-form .rating-footer {
    display: flex;
    justify-content: space-between;
    font-size: 14px;
    color: #8e939b;
    padding: 15px 0 25px;
}
.survey-form .group {
    display: flex;
    flex-flow: column;
    justify-content: center;
    padding-bottom: 15px;
}
.survey-form .group label {
    display: flex;
    font-weight: 500;
    height: 25px;
    align-items: center;
    padding-bottom: 5px;
}
.survey-form .group input[type="radio"],
.survey-form .group input[type="checkbox"] {
    appearance: none;
    display: inline-flex;
    cursor: pointer;
    width: 16px;
    height: 16px;
    padding: 2px;
    background-clip: content-box;
    border: 1px solid #dfe0e0;
    background-color: #eef1f1;
    border-radius: 50%;
    margin-right: 10px;
}
.survey-form .group input[type="radio"]:hover,
.survey-form .group input[type="checkbox"]:hover {
    border: 1px solid #d2d3d3;
}
.survey-form .group input[type="radio"]:checked,
.survey-form .group input[type="checkbox"]:checked {
    border: 1px solid #d2d3d3;
    background-color: #2996ed;
}
.survey-form .group input[type="checkbox"] {
    border-radius: 0;
}
.survey-form .step-content {
    display: none;
}
.survey-form .step-content.current {
    display: block;
}
.survey-form .result {
    padding: 25px;
}
.survey-form .result h3 {
    color: #6a737f;
}
.survey-form .result p {
    font-weight: 500;
}
That's everything we need for our stylesheet file. You're free to customize the stylesheet and apply your own styles.
3. Structuring the Survey Form with HTML
In this section, we need to implement the HTML form along with the input fields. In addition, we will add JS code to determine which survey page the user is currently on.
Edit the survey.php file and add:
<!DOCTYPE html>
<html lang="en">
	<head>
		<meta charset="utf-8">
		<meta name="viewport" content="width=device-width,minimum-scale=1">
		<title>Survey Form</title>
		<link rel="stylesheet" href="https://use.fontawesome.com/releases/v5.7.1/css/all.css">
		<link rel="stylesheet" href="style.css">
	</head>
	<body>
		<form class="survey-form" method="post" action="">
		<!-- place code here -->
		</form>
	</body>
</html>
In the above code, we have declared the HTML form element that will initiate a POST request when it's submitted. The stylesheet file and Font Awesome library are included in the head section. The Font Awesome library will enable us to add icons to the form.
Add the following code between the form tags:
<h1><i class="far fa-list-alt"></i>Survey Form</h1>

<div class="steps">
	<div class="step current"></div>
	<div class="step"></div>
	<div class="step"></div>
	<div class="step"></div>
</div>
The first line of code will output the heading for our survey form, and the element with the class steps assigned to it will indicate which survey page we're on and the number of survey steps. For this tutorial, we'll add four survey pages and therefore have declared four containers with the class step.
Add after the above code:
<div class="step-content current" data-step="1">
	<div class="fields">
		<p>How would you rate your experience with us?</p>
		<div class="rating">
			<input type="radio" name="rating" id="radio1" value="Very Unsatisfied">
			<label for="radio1">1</label>
			<input type="radio" name="rating" id="radio2" value="Unsatisfied">
			<label for="radio2">2</label>
			<input type="radio" name="rating" id="radio3" value="Neutral">
			<label for="radio3">3</label>
			<input type="radio" name="rating" id="radio4" value="Satisfied">
			<label for="radio4">4</label>
			<input type="radio" name="rating" id="radio5" value="Very Satisfied">
			<label for="radio5">5</label>
		</div>
		<div class="rating-footer">
			<span>Very Unsatisfied</span>
			<span>Very Satisfied</span>
		</div>
		<p>Where did you hear about us?</p>
		<div class="group">
			<label for="radio6">
				<input type="radio" name="hear_about_us" id="radio6" value="Search Engine">
				Search Engine
			</label>
			<label for="radio7">
				<input type="radio" name="hear_about_us" id="radio7" value="Newsletter">
				Newsletter
			</label>
			<label for="radio8">
				<input type="radio" name="hear_about_us" id="radio8" value="Advertisements">
				Advertisements
			</label>
			<label for="radio9">
				<input type="radio" name="hear_about_us" id="radio9" value="Social Media">
				Social Media
			</label>
		</div>
	</div>
	<div class="buttons">
		<a href="#" class="btn" data-set-step="2">Next</a>
	</div>
</div>
The above code will be the first survey page, which will consist of two form elements, one being the overall rating (radio element) and the other being the "where did you hear about us" element (radio). The first element will be a customized radio element that will populate the rating from one to five, with one being "Very Unsatisfied" and five being "Very Satisfied".
The button associated with the above survey page will navigate to the next page when it's pressed. The data-set-step attribute determines which page to navigate to.
If we navigate to the survey.php file in our browser, we should see the following:

We now need to add the remaining survey pages to the form:
<!-- page 2 -->
<div class="step-content" data-step="2">
	<div class="fields">
		<p>How likely are you to recommend us?</p>
		<div class="rating">
			<input type="radio" name="recommend" id="radio10" value="Very Unlikely">
			<label for="radio10">1</label>
			<input type="radio" name="recommend" id="radio11" value="Unlikely">
			<label for="radio11">2</label>
			<input type="radio" name="recommend" id="radio12" value="Neutral">
			<label for="radio12">3</label>
			<input type="radio" name="recommend" id="radio13" value="Likely">
			<label for="radio13">4</label>
			<input type="radio" name="recommend" id="radio14" value="Very Likely">
			<label for="radio14">5</label>
		</div>
		<div class="rating-footer">
			<span>Very Unlikely</span>
			<span>Very Likely</span>
		</div>
		<p>How would you like us to respond to you?</p>
		<div class="group">
			<label for="check1">
				<input type="checkbox" name="contact_pref[]" id="check1" value="Email">
				Email
			</label>
			<label for="check2">
				<input type="checkbox" name="contact_pref[]" id="check2" value="Phone">
				Phone
			</label>
			<label for="check3">
				<input type="checkbox" name="contact_pref[]" id="check3" value="Post">
				Post
			</label>
		</div>
	</div>
	<div class="buttons">
		<a href="#" class="btn alt" data-set-step="1">Prev</a>
		<a href="#" class="btn" data-set-step="3">Next</a>
	</div>
</div>

<!-- page 3 -->
<div class="step-content" data-step="3">
	<div class="fields">
		<label for="email">Your Email</label>
		<div class="field">
			<i class="fas fa-envelope"></i>
			<input id="email" type="email" name="email" placeholder="Your Email" required>
		</div>
		<label for="comments">Additional Comments</label>
		<div class="field">
			<textarea id="comments" name="comments" placeholder="Enter your comments ..."></textarea>
		</div>
	</div>
	<div class="buttons">
		<a href="#" class="btn alt" data-set-step="2">Prev</a>
		<input type="submit" class="btn" name="submit" value="Submit">
	</div>
</div>

<!-- page 4 -->
<div class="step-content" data-step="4">
	<div class="result"><?=$response?></div>
</div>
The above code will add the remaining three survey pages to our form. The last page will output the response variable with PHP, which we will declare in the last section.
But wait! The next and previous buttons are not functioning! What do I do? That's because we have yet to include the JS code that handles the click events.
Add the following JS code to the end of the document (before the body closing tag):
<script>
const setStep = step => {
	document.querySelectorAll(".step-content").forEach(element => element.style.display = "none");
	document.querySelector("[data-step='" + step + "']").style.display = "block";
	document.querySelectorAll(".steps .step").forEach((element, index) => {
		index < step-1 ? element.classList.add("complete") : element.classList.remove("complete");
		index == step-1 ? element.classList.add("current") : element.classList.remove("current");
	});
};
document.querySelectorAll("[data-set-step]").forEach(element => {
	element.onclick = event => {
		event.preventDefault();
		setStep(parseInt(element.dataset.setStep));
	};
});
<?php if (!empty($_POST)): ?>
setStep(4);
<?php endif; ?>
</script>
The above JS code will update the step indicator and the current survey page when the next and previous buttons are clicked. If the user submitted the form, the code would automatically navigate to the last page, which will subsequently output the response.
4. Creating the Email Template
The email template we'll use to track results and analyze them accordingly. To send emails with PHP, we need a working SMTP server, which shouldn't require additional configuration with most hosting providers.
The template will consist of an HTML table and populated variables that we'll declare in the last section.
Edit the email-template.php file and add:
<!DOCTYPE html>
<html>
	<head>
		<meta charset="utf-8">
		<meta name="viewport" content="width=device-width,minimum-scale=1">
		<title>Survey</title>
	</head>
	<body style="background-color:#F5F6F8;font-family:-apple-system, BlinkMacSystemFont, 'segoe ui', roboto, oxygen, ubuntu, cantarell, 'fira sans', 'droid sans', 'helvetica neue', Arial, sans-serif;box-sizing:border-box;font-size:16px;">
		<div style="background-color:#fff;margin:30px;box-sizing:border-box;font-size:16px;">
			<h1 style="padding:40px;box-sizing:border-box;font-size:24px;color:#ffffff;background-color:#cb5f51;margin:0;">Survey</h1>
			<p style="padding:40px 40px 20px 40px;margin:0;box-sizing:border-box;font-size:16px;">A user has submitted a survey.</p>
			<h2 style="padding:20px 40px;margin:0;color:#394453;box-sizing:border-box;">Survey Results</h2>
			<div style="box-sizing:border-box;padding:0 40px 20px;">
				<table style="border-collapse:collapse;width:100%;">
					<tbody>
						<tr>
							<td style="padding:15px 0;text-decoration:underline;">Email</td>
							<td style="text-align:right;"><?=$email?></td>
						</tr>
						<tr>
							<td style="padding:15px 0;text-decoration:underline;">Comments</td>
							<td style="text-align:right;"><?=htmlspecialchars($comments, ENT_QUOTES)?></td>
						</tr>
						<tr>
							<td style="padding:15px 0;text-decoration:underline;">How would you rate your experience with us?</td>
							<td style="text-align:right;"><?=htmlspecialchars($rating, ENT_QUOTES)?></td>
						</tr>
						<tr>
							<td style="padding:15px 0;text-decoration:underline;">Where did you hear about us?</td>
							<td style="text-align:right;"><?=htmlspecialchars($hear_about_us, ENT_QUOTES)?></td>
						</tr>
						<tr>
							<td style="padding:15px 0;text-decoration:underline;">How likely are you to recommend us?</td>
							<td style="text-align:right;"><?=htmlspecialchars($recommend, ENT_QUOTES)?></td>
						</tr>
						<tr>
							<td style="padding:15px 0;text-decoration:underline;">How would you like us to respond to you?</td>
							<td style="text-align:right;"><?=htmlspecialchars($contact_pref, ENT_QUOTES)?></td>
						</tr>
					</tbody>
				</table>
			</div>
		</div>
	</body>
</html>
When someone submits the survey form, we will receive the email containing the results. It is how we will track and analyze them.
PHP TipThe htmlspecialchars() function will convert special characters to HTML entities and therefore preventing XSS attacks.
The email template will look similar to the following:
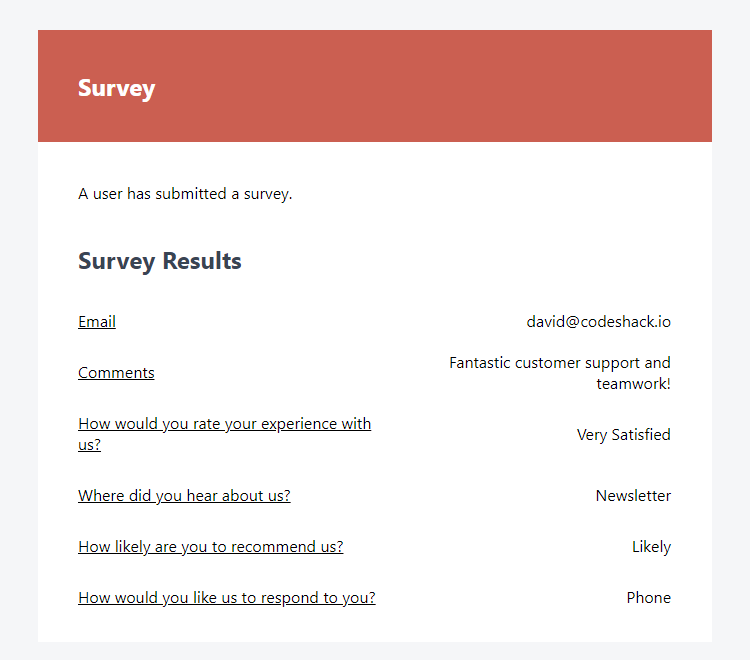
That's all we need to do for the email template. You're free to customize the structure, but I don't recommend changing the variable names until we've finished the next section as these are associated with the POST variables.
5. Processing the Survey Form with PHP
Finally, we're going to implement code to process the form and send emails with PHP.
Edit the survey.php file and prepend the following code (before the HTML template):
<?php
// Output messages
$response = '';
// Check if the form was submitted
if (isset($_POST['rating'], $_POST['hear_about_us'], $_POST['contact_pref'], $_POST['email'], $_POST['comments'], $_POST['recommend'])) {
	// Process form data
	// Assign POST variables
	$rating = $_POST['rating'];
	$hear_about_us = $_POST['hear_about_us'];
	$contact_pref = implode(', ', $_POST['contact_pref']);
	$email = $_POST['email'];
	$comments = $_POST['comments'];
	$recommend = $_POST['recommend'];
	// Where to send the mail? It should be your email address
	$to      = 'surveys@yourwebsite.com';
	// Mail from
	$from    = 'noreply@yourwebsite.com';
	// Mail subject
	$subject = 'A user has submitted a survey';
	// Mail headers
	$headers = 'From: ' . $from . "\r\n" . 'Reply-To: ' . $from . "\r\n" . 'Return-Path: ' . $from . "\r\n" . 'X-Mailer: PHP/' . phpversion() . "\r\n" . 'MIME-Version: 1.0' . "\r\n" . 'Content-Type: text/html; charset=UTF-8' . "\r\n";
	// Capture the email template file as a string
	ob_start();
	include 'email-template.php';
	$email_template = ob_get_clean();
	// Try to send the mail
	if (mail($to, $subject, $email_template, $headers)) {
		// Success
		$response = '<h3>Thank You!</h3><p>With your help, we can improve our services for all our trusted members.</p>';
	} else {
		// Fail
		$response = '<h3>Error!</h3><p>Message could not be sent! Please check your mail server settings!</a>';
	}
}
The above code will ensure all POST variables exist before processing the form with the help of the isset() function. If all variables exist, we use the mail() function to send an email to the specified email address.
We can leverage the ob_start() and ob_get_clean() functions to return the email template file as a string and bind it to the mail function.
Note Make sure to update the email variables to reflect your own, otherwise you won't receive the survey results emails.
Conclusion
That's all we need to do to create a survey form and track the results with PHP. What next? Consider implementing more survey pages and add your own input fields. You can duplicate the existing ones and use them as a base.
If you encounter any errors, I suggest you reread the tutorial carefully.
If you've enjoyed this tutorial, consider sharing the article on social media using the links below, and drop a comment with your feedback.
Happy coding!
Skip the copy-pasting and get the complete, working project from this tutorial as a free ZIP with a setup guide included. Free for personal and commercial use.