 Download the full source codeComplete working project · Setup guide included · Free for commercial use
Free ZIP
Download the full source codeComplete working project · Setup guide included · Free for commercial use
Free ZIP
In this article, we'll be creating an elegant hotel reservation form with PHP, which will enable guests to submit reservations using an HTML form.
The code will consist of an HTML form and PHP to send the reservation form submissions to a specific email address. In addition, we'll add validation to the form to prevent invalid data.
What is a hotel reservation form used for?
Well, it is self-explanatory. The form will enable guests to submit reservations on your website. The easy-to-use interface will provide an innovative experience for your guests. Fast and straightforward. Whether you own a hotel, motel, resort, or another type of accommodation. The form is ideal for your business.
Contents
1. Getting Started
Before we start coding our hotel reservation form, we need to ensure we have a working web server and meet all the requirements below. We cannot execute PHP code without a working web server as it is a server-side programming language.
1.1. Requirements
- Web Server — If you haven't installed a local web server solution package, I recommend you download and install XAMPP. XAMPP is an open-source web server solution package.
- Mail Server (SMTP) — Without a working mail server, you'll unable to receive emails that are processed using the reservation form. If you're hosting your website with a provider, you shouldn't need to do anything. However, if you have your own server (dedicated/vps), I recommend you install Postfix.
1.2. What You Will Learn in this Tutorial
- Design a Hotel Reservation Form — We'll be using CSS to design our hotel reservation form and HTML to structure our code.
- Design a Email Template — Design a template suitable for emails using HTML and CSS.
- Form Validation — Implement validation to individual elements in our form.
- Send Mail — The PHP mail function will enable us to send mail to a specified email address.
1.3. Setup & File Structure
Now that we've installed a web server, we need to start it. In addition, we will create the directories and files we're going to use for our hotel reservation form page.
- Open the XAMPP Control Panel
- Next to the Apache module, click Start
- Next to the MySQL module, click Start
- Navigate to XAMPPs installation directory (C:\xampp)
- Open the htdocs directory
- Create the following directories and files:
File Structure
\-- hotelreservationform
|-- hotel.php
|-- email-template.php
|-- style.css
The above files will contain the following:
- hotel.php — This file will contain our hotel reservation form template and PHP code that will process the form.
- email-template.php — This file will contain the email template code.
- style.css — The stylesheet that will structure our page and make it look more appealing.
2. Designing the Hotel Reservation Form with CSS
The stylesheet will structure our layout and describe how each element will display on the screen. It includes the fonts, colors, and size of the elements.
Edit the style.css file and add:
html, body, div, input, span, a, select, textarea, option, h1, h2, h3, h4, main, aside, article, section, header, p, footer, nav, pre {
    box-sizing: border-box;
    font-family: Tahoma, Geneva, sans-serif;
}
html {
    background-color: #F8F9F9;
    background: linear-gradient(0deg, #f9f8f8 0%, #f9f8f8 80%, #cb5f51 80%, #cb5f51 100%);
    padding: 30px;
    height: 100%;
}
input,textarea,select {
    outline: 0;
}
h1 {
    margin: 0;
    padding: 25px;
    font-size: 20px;
    text-align: center;
    border-bottom: 1px solid #eceff2;
    color: #6a737f;
    font-weight: 600;
    background-color: #f9fbfc;
}
h1 i {
    padding-right: 10px;
    font-size: 24px;
}
.hotel-reservation-form {
    background-color: #fff;
    width: 500px;
    margin: 0 auto;
    box-shadow: 0px 0px 5px 0px rgba(0,0,0,.2);
}
.hotel-reservation-form .fields {
    position: relative;
    padding: 20px;
}
.hotel-reservation-form select {
    appearance: none;
    background-image: linear-gradient(45deg, transparent 50%, #c7c9cb 50%), linear-gradient(135deg, #c7c9cb 50%, transparent 50%), linear-gradient(to right, #dfe0e0, #dfe0e0);
    background-position: calc(100% - 20px) 20px, calc(100% - 15px) 20px, calc(100% - 40px) 10px;
    background-size: 5px 5px, 5px 5px, 1px 25px;
    background-repeat: no-repeat;
}
.hotel-reservation-form select option:first-child {
    display: none;
 }
.hotel-reservation-form input[type="date"]::-webkit-calendar-picker-indicator {
    color: #ddd;
    filter: invert(0.8);
}
.hotel-reservation-form input[type="text"],
.hotel-reservation-form input[type="email"],
.hotel-reservation-form input[type="date"],
.hotel-reservation-form input[type="tel"],
.hotel-reservation-form select {
    display: flex;
    margin-top: 10px;
    padding: 15px;
    border: 1px solid #dfe0e0;
    width: 100%;
    flex-basis: 100%;
    height: 47px;
}
.hotel-reservation-form input[type="text"]:focus,
.hotel-reservation-form input[type="email"]:focus,
.hotel-reservation-form input[type="tel"]:focus,
.hotel-reservation-form input[type="date"]:focus,
.hotel-reservation-form select:focus {
    border: 1px solid #c6c7c7;
}
.hotel-reservation-form input[type="text"]::placeholder,
.hotel-reservation-form input[type="email"]::placeholder,
.hotel-reservation-form input[type="tel"]::placeholder,
.hotel-reservation-form input[type="date"]:invalid,
.hotel-reservation-form textarea::placeholder,
.hotel-reservation-form select:invalid {
    color: #858688;
}
.hotel-reservation-form textarea {
    resize: none;
    margin-top: 15px;
    padding: 15px;
    border: 1px solid #dfe0e0;
    width: 100%;
    height: 150px;
}
.hotel-reservation-form textarea:focus {
    border: 1px solid #c6c7c7;
}
.hotel-reservation-form input[type="submit"] {
    display: block;
    margin-top: 15px;
    padding: 15px;
    border: 0;
    background-color: #cb5f51;
    font-weight: bold;
    color: #fff;
    cursor: pointer;
    width: 100%;
}
.hotel-reservation-form input[type="submit"]:hover {
    background-color: #c15b4d;
}
.hotel-reservation-form input[name="email"] {
    position: relative;
    display: block;
}
.hotel-reservation-form .field {
    display: inline-flex;
    position: relative;
    width: 100%;
    padding-bottom: 20px;
}
.hotel-reservation-form label {
    font-size: 14px;
    font-weight: 600;
    color: #8e939b;
}
.hotel-reservation-form .field i {
    position: absolute;
    color: #dfe2e5;
    top: 25px;
    left: 15px;
    z-index: 10;
}
.hotel-reservation-form .field i ~ input {
    padding-left: 45px !important;
}
.hotel-reservation-form .responses {
    padding: 15px;
    margin: 0;
}
.hotel-reservation-form .fields .wrapper {
    display: flex;
    justify-content: space-between;
}
.hotel-reservation-form .fields .wrapper > div {
    width: 100%;
}
.hotel-reservation-form .fields .wrapper .gap {
    width: 35px;
}
That's all we need to do for the stylesheet file. We can now move on to creating the reservation form template.
3. Structuring the Hotel Reservation Form with HTML
The reservation form will enable the guest to enter their details and submit them. We'll create an HTML form element and append input elements that we're going to use. In addition, we will specify attributes that will validate the elements.
Edit the hotel.php file and add:
<!DOCTYPE html>
<html lang="en">
	<head>
		<meta charset="utf-8">
		<meta name="viewport" content="width=device-width,minimum-scale=1">
		<title>Hotel Reservation Form</title>
		<link rel="stylesheet" href="https://use.fontawesome.com/releases/v5.7.1/css/all.css">
		<link rel="stylesheet" href="style.css">
	</head>
	<body>
		<form class="hotel-reservation-form" method="post" action="">
			<h1><i class="far fa-calendar-alt"></i>Hotel Reservation Form</h1>
			<div class="fields">
				<!-- Input Elements -->
			</div>
		</form>
	</body>
</html>
That will create the base structure for our reservation form. As you can see, the style.css file is included in the head section along with the Font Awesome library, which will allow us to output icons in our form.
We have set the form's method to post as the data we're going to send needs to be enclosed in the body. The method is essential; without it, we cannot retrieve the form data with PHP.
There is no need to specify the action attribute as the code that will process the form will be in the same file, and therefore it's not necessary. The empty value will submit the form to the current URL.
After:
<!-- Input Elements -->Add:
<div class="wrapper">
	<div>
		<label for="arrival">Arrival</label>
		<div class="field">
			<input id="arrival" type="date" name="arrival" required>
		</div>
	</div>
	<div class="gap"></div>
	<div>
		<label for="departure">Departure</label>
		<div class="field">
			<input id="departure" type="date" name="departure" required>
		</div>
	</div>
</div>
The above code will create the arrival and departure input elements, with both types declared as a date. The required attribute will ensure both input elements have been entered by the guest. They cannot submit the form without entering the date.
With PHP, we can retrieve the input element by the name attribute, so for instance, we can retrieve the arrival date with $_POST['arrival'], but only when the form has been submitted.
HTML TipWhen clicking the text inside a label element, it will toggle the associated input element, which is determined by the ID attribute.
The label elements will appear above the input field, and the containers surrounding the input elements will structure the layout.
Add after:
<div class="wrapper">
	<div>
		<label for="first_name">First Name</label>
		<div class="field">
			<i class="fas fa-user"></i>
			<input id="first_name" type="text" name="first_name" placeholder="First Name" required>
		</div>
	</div>
	<div class="gap"></div>
	<div>
		<label for="last_name">Last Name</label>
		<div class="field">
			<i class="fas fa-user"></i>
			<input id="last_name" type="text" name="last_name" placeholder="Last Name" required>
		</div>
	</div>
</div>
The above code will add the first and last name elements, with both type attributes set as text. The placeholder text will appear in the background when the element is empty.
Add after:
<label for="email">Email</label>
<div class="field">
	<i class="fas fa-envelope"></i>
	<input id="email" type="email" name="email" placeholder="Your Email" required>
</div>
The above code will add the email field with the element's type attribute set to email.
Add after:
<label for="phone">Phone</label>
<div class="field">
	<i class="fas fa-phone"></i>
	<input id="phone" type="tel" name="phone" placeholder="Your Phone Number" required>
</div>
The above code will add the phone number element with the type attribute set to tel, which is the abbreviation for telephone number.
Add after:
<div class="wrapper">
	<div>
		<label for="adults">Adults</label>
		<div class="field">
			<select id="adults" name="adults" required>
				<option disabled selected value="">--</option>
				<option value="1">1</option>
				<option value="2">2</option>
				<option value="3">3</option>
				<option value="4">4</option>
			</select>
		</div>
	</div>
	<div class="gap"></div>
	<div>
		<label for="children">Children</label>
		<div class="field">
			<select id="children" name="children" required>
				<option disabled selected value="">--</option>
				<option value="0">0</option>
				<option value="1">1</option>
				<option value="2">2</option>
				<option value="3">3</option>
				<option value="4">4</option>
			</select>
		</div>
	</div>
</div>
The above form elements are different to the ones we have previously created. Instead of the input elements, we are using drop-down elements that we can populate with numbers. Both the adults and children elements will be a drop-down list.
To add more items to the drop-down element, all you need to do is append an option element. For instance:
<option value="5">5</option>Add after:
<label for="room_pref">Room Preference</label>
<div class="field">
	<select id="room_pref" name="room_pref" required>
		<option disabled selected value="">--</option>
		<option value="Standard">Standard</option>
		<option value="Deluxe">Deluxe</option>
		<option value="Suite">Suite</option>
	</select>
</div>
Similar to the element we implemented previously, both are using the select (drop-down) element. With the room preference element, the guest can specify the type of accommodation they want to stay in.
Add after:
<input type="submit" value="Reserve">Finally, we can include the code that will submit the form.
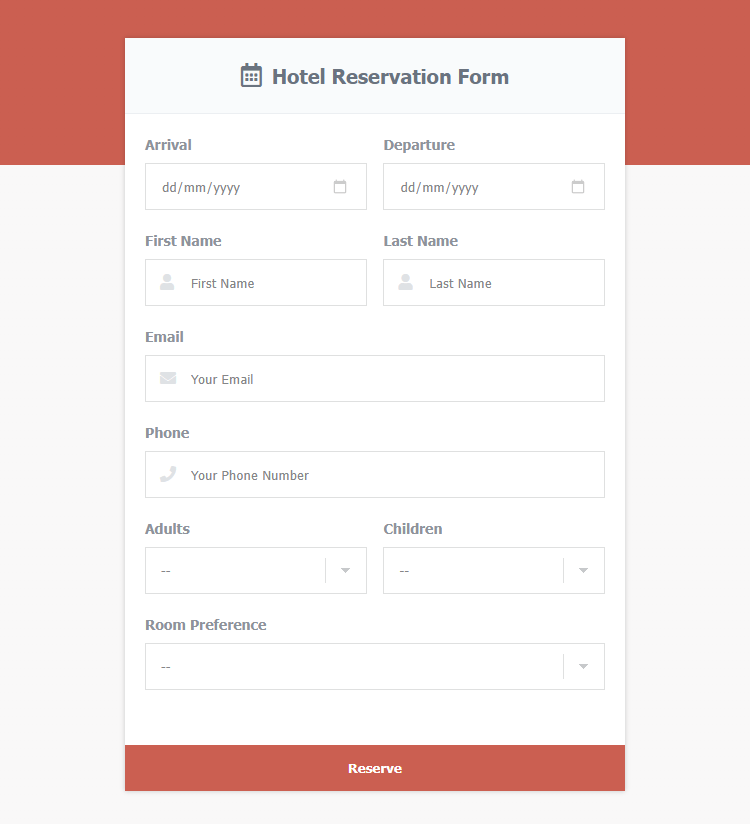
If we navigate to the file in our web browser, we should see the following:
That's all we need to do for the reservation form template. We can now proceed to create the email template.
4. Creating the Email Template
All reservation submissions will be sent to a specified email address using the email template. We will use output buffering to capture the file and bind it to the mail() function, which we will do in the next section.
Edit the email-template.php file and add:
<!DOCTYPE html>
<html>
	<head>
		<meta charset="utf-8">
		<meta name="viewport" content="width=device-width,minimum-scale=1">
		<title>Hotel Reservation</title>
	</head>
	<body style="background-color:#F5F6F8;font-family:-apple-system, BlinkMacSystemFont, 'segoe ui', roboto, oxygen, ubuntu, cantarell, 'fira sans', 'droid sans', 'helvetica neue', Arial, sans-serif;box-sizing:border-box;font-size:16px;">
		<div style="background-color:#fff;margin:30px;box-sizing:border-box;font-size:16px;">
			<h1 style="padding:40px;box-sizing:border-box;font-size:24px;color:#ffffff;background-color:#cb5f51;margin:0;">Hotel Reservation</h1>
			<p style="padding:40px 40px 20px 40px;margin:0;box-sizing:border-box;font-size:16px;">A guest has booked a reservation for <b><?=$arrival?></b> and will departure on <b><?=$departure?></b>.</p>
			<h2 style="padding:20px 40px;margin:0;color:#394453;box-sizing:border-box;">Guest Details</h2>
			<div style="box-sizing:border-box;padding:0 40px 20px;">
				<table style="border-collapse:collapse;width:100%;">
					<tbody>
						<tr>
							<td style="padding:15px 0;text-decoration:underline;">Email</td>
							<td style="text-align:right;"><?=$email?></td>
						</tr>
						<tr>
							<td style="padding:15px 0;text-decoration:underline;">Name</td>
							<td style="text-align:right;"><?=$first_name?> <?=$last_name?></td>
						</tr>
						<tr>
							<td style="padding:15px 0;text-decoration:underline;">Phone</td>
							<td style="text-align:right;"><?=$phone?></td>
						</tr>
						<tr>
							<td style="padding:15px 0;text-decoration:underline;">Adults</td>
							<td style="text-align:right;"><?=$adults?></td>
						</tr>
						<tr>
							<td style="padding:15px 0;text-decoration:underline;">Children</td>
							<td style="text-align:right;"><?=$children?></td>
						</tr>
						<tr>
							<td style="padding:15px 0;text-decoration:underline;">Room Preference</td>
							<td style="text-align:right;"><?=$room_pref?></td>
						</tr>
					</tbody>
				</table>
			</div>
		</div>
	</body>
</html>
The variables specified in the email template file will be declared in our hotel.php file.
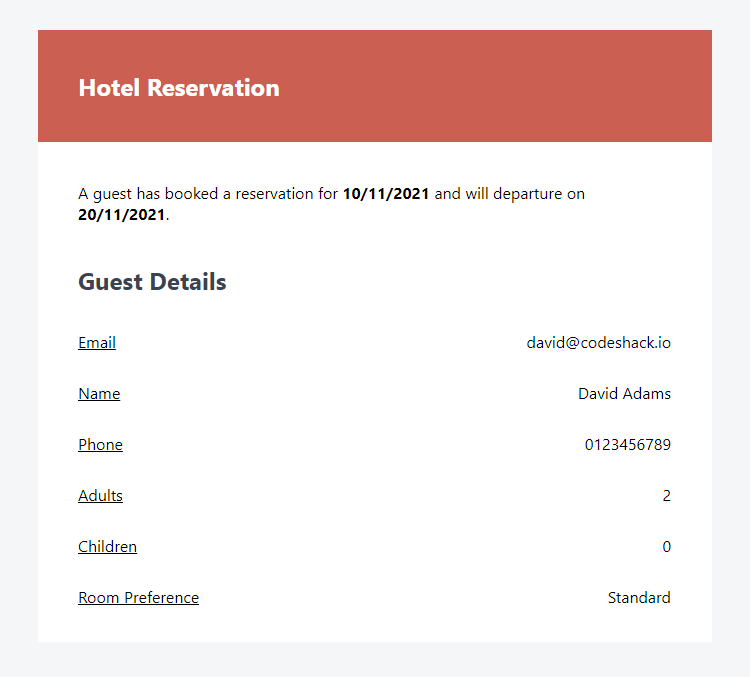
When a guest makes a reservation, we will receive an email that will look similar to:
That's all we need to do for the email template. In the next section, we will implement code that will process the reservation form.
5. Processing the Hotel Reservation Form with PHP
Finally, we need to include the code that will process the form data, which will consist of validation and sending the email using the email template we previously created.
Edit the hotel.php file and place the following code at the very top:
<?php
// Output messages
$responses = [];
// Check if the form was submitted
if (isset($_POST['arrival'], $_POST['departure'], $_POST['first_name'], $_POST['last_name'], $_POST['email'], $_POST['phone'], $_POST['adults'], $_POST['children'], $_POST['room_pref'])) {
	// Process form data
}
?>
With the above code, we have declared the responses array that we will use to output validation and success messages. To check whether the form was submitted, we can use the isset() function as that will check if the variables are declared.
After:
// Process form dataAdd:
// Assign POST variables
$arrival = htmlspecialchars($_POST['arrival'], ENT_QUOTES);
$departure = htmlspecialchars($_POST['departure'], ENT_QUOTES);
$first_name = htmlspecialchars($_POST['first_name'], ENT_QUOTES);
$last_name = htmlspecialchars($_POST['last_name'], ENT_QUOTES);
$email = htmlspecialchars($_POST['email'], ENT_QUOTES);
$phone = htmlspecialchars($_POST['phone'], ENT_QUOTES);
$adults = htmlspecialchars($_POST['adults'], ENT_QUOTES);
$children = htmlspecialchars($_POST['children'], ENT_QUOTES);
$room_pref = htmlspecialchars($_POST['room_pref'], ENT_QUOTES);
The above code will assign all the post variables that we are going to use and convert special characters to HTML entities.
PHP TipThe htmlspecialchars() function converts special characters to HTML entities and therefore preventing XSS attacks.
Add after:
// Validate email adress
if (!filter_var($email, FILTER_VALIDATE_EMAIL)) {
	$responses[] = 'Email is not valid!';
}
// First name must contain only alphabet characters.
if (!preg_match('/^[a-zA-Z]+$/', $first_name)) {
	$responses[] = 'First name must contain only characters!';
}
// Last name must contain only alphabet characters.
if (!preg_match('/^[a-zA-Z]+$/', $last_name)) {
	$responses[] = 'Last name must contain only characters!';
}
The above code will add basic validation to the email, first name and last name fields. You're free to implement your own validation for the other fields.
Add after:
// If there are no errors
if (!$responses) {
	// Where to send the mail? It should be your email address
	$to      = 'reservations@yourwebsite.com';
	// Mail from
	$from    = 'noreply@yourwebsite.com';
	// Mail subject
	$subject = 'A guest has booked a reservation';
	// Mail headers
	$headers = 'From: ' . $from . "\r\n" . 'Reply-To: ' . $from . "\r\n" . 'Return-Path: ' . $from . "\r\n" . 'X-Mailer: PHP/' . phpversion() . "\r\n" . 'MIME-Version: 1.0' . "\r\n" . 'Content-Type: text/html; charset=UTF-8' . "\r\n";
	// Capture the email template file as a string
	ob_start();
	include 'email-template.php';
	$email_template = ob_get_clean();
	// Try to send the mail
	if (mail($to, $subject, $email_template, $headers)) {
		// Success
		$responses[] = 'Thank you for your reservation!';
	} else {
		// Fail; problem with the mail server...
		$responses[] = 'Message could not be sent! Please check your mail server settings!';
	}
}
Finally, the above code will send the email to the specified address using the captured template. Don't forget to update the $to and $from variables.
Before:
<input type="submit" value="Reserve">Add:
<?php if ($responses): ?>
<p class="responses"><?php echo implode('<br>', $responses); ?></p>
<?php endif; ?>
That's all we need to do for the hotel.php file. If you encounter a mail server error, you will need to verify that you have a working SMTP mail server and configure it accordingly. Without a working mail server, you will not receive emails.
Conclusion
Congratulations! You've successfully created your very own hotel reservation form with HTML, CSS and PHP! What next? Consider implementing validation for the other fields and connect the form to a MySQL database.
Consider sharing the article using the social links below if you've found it helpful and drop a comment below. We greatly appreciate the support.
Enjoy coding and thank you for reading!
Skip the copy-pasting and get the complete, working project from this tutorial as a free ZIP with a setup guide included. Free for personal and commercial use.