In this tutorial, we'll explore various ways to utilize Gmail's SMTP to send emails with PHP. Sending emails is essential for tasks like account verification, password resets, newsletters, and so on.
We'll cover three popular methods: PHPMailer with app password authentication, PHPMailer with OAuth 2.0 authentication, and PHP's native mail() function configured for Gmail.
So, without further ado, let's get started!
What is PHPMailer?
PHPMailer is a popular open-source library in PHP for sending emails. Unlike PHP's built-in mail() function, PHPMailer offers a more robust and reliable approach to sending emails via SMTP. It allows for greater flexibility, providing a simple interface to configure mail servers, handle authentication, and attach files. The possibilities are endless.
One of the main advantages of PHPMailer is its ability to send emails via external SMTP servers like Gmail, Microsoft Outlook, and more. It also supports HTML emails, attachments, and multi-part messages, allowing developers to send elegant and formatted emails easily.
Contents
1. Getting Started
Before we proceed to implement the various methods, let's grab the dependencies we shall utilize in this tutorial.
To get started with PHPMailer, we can either install it using composer or download the source code from the Github repository.
With composer, we can install it with the following command:
composer require phpmailer/phpmailerAnd then we can include the PHPMailer library with PHP using the following code snippet:
require 'vendor/autoload.php';If you prefer to install it without composer, please follow the below instructions.
- Go to the Github repository.
- Navigate to the Releases page and download the latest stable version.
- Once downloaded, extract the contents to your project directory.
- Include the essential files in your PHP project with the following code:
require 'project/PHPMailer/src/Exception.php';
require 'project/PHPMailer/src/PHPMailer.php';
require 'project/PHPMailer/src/SMTP.php';
In addition to installing PHPMailer, make sure you're running PHP >= 5.5 (8+ is recommended), as it's required for the library to function properly.
2. Send Emails using PHPMailer and Gmail SMTP
One of the most common methods to send emails with PHPMailer is by using Gmail's SMTP server, which requires you to generate an app password from your Google account — it will be used to authenticate your PHP application when sending emails.
2.1. Generating an App Password
Before sending emails using Gmail's SMTP server, we must generate an app password from our Google account. Please follow the below instructions.
- Go to your Google account's App Passwords page. You should be able to access it from Security > Signing in to Google > App Passwords.
- Enter your App Name (e.g. PHPMailer) and select Create.
- If prompted to select the app and device, choose Mail and Other (Custom name), respectively.
- Copy the generated app password and store it securely.
Please note that you may need to enable 2-step verification on your Google account to generate an app password.
Now that we have our app password let's proceed to send emails using PHPMailer and Gmail's SMTP server.
2.2. Configure PHPMailer
With PHPMailer and our app password ready, we can now configure PHPMailer to send emails using Gmail's SMTP server.
First, let's create a new PHP file and include the PHPMailer library:
<?php
// Import PHPMailer classes into the global namespace
use PHPMailer\PHPMailer\PHPMailer;
use PHPMailer\PHPMailer\Exception;

// Load Composer's autoloader
require 'vendor/autoload.php';

/* Or without Composer
require 'project/PHPMailer/src/Exception.php';
require 'project/PHPMailer/src/PHPMailer.php';
require 'project/PHPMailer/src/SMTP.php';
*/

// Create a new PHPMailer instance
$mail = new PHPMailer(true);

try {
    // SMTP Server settings
    $mail->isSMTP();
    $mail->Host = 'smtp.gmail.com';
    $mail->SMTPAuth = true;
    // Your Gmail address
    $mail->Username = 'your_email@gmail.com';
    // App password or Gmail password
    $mail->Password = 'your_app_password';
    $mail->SMTPSecure = PHPMailer::ENCRYPTION_SMTPS;
    // TCP port to connect to (465 or 587)
    $mail->Port = 587;

    // Your Gmail address and name
    $mail->setFrom('your_email@gmail.com', 'Your Name');

    // Recipients
    $mail->addAddress('recipient@example.com', 'Recipient Name');

    // Change the charset to UTF-8
    $mail->CharSet = 'UTF-8';

    // Content
    $mail->isHTML(false);
    $mail->Subject = 'Here is the subject';
    $mail->Body = 'Here is the message';

    // Send the email
    $mail->send();
    echo 'Message has been sent!';
} catch (Exception $e) {
    echo "Message could not be sent! Mailer Error: {$mail->ErrorInfo}";
}
?>
The above code snippet demonstrates how to send a basic email using PHPMailer and Gmail's SMTP server. Let's break down the key components:
- SMTP Server settings — We configure PHPMailer to use Gmail's SMTP server by setting the host field to smtp.gmail.com. We enable SMTP authentication (SMTPAuth) and set the Gmail address and app password in the username and password fields, respectively. The SMTPSecure is set to ENCRYPTION_SMTPS for secure communication, and the port is set to 587 for TLS encryption.
- Sender and Recipient — We set the sender's email address and name using the setFrom() method. The recipient's email address and name are added using the addAddress() method.
- Email Content — We specify the email's content by setting the subject and body fields. In this example, we're sending a plain text email, but you can set isHTML(true) to send HTML emails.
- Send Email — Finally, we execute the send() method to send the email. If successful, we display a success message; otherwise, we catch any exceptions and display the error message.
If you aren't using composer, make sure to include the PHPMailer files in your project directory and uncomment the require statements accordingly.
Tip The try-catch block helps prevent fatal errors when sending emails, allowing you to display user-friendly error messages and log issues for troubleshooting.
2.3. Send to Multiple Recipients
To send emails to multiple recipients using PHPMailer, you can use the addAddress() method numerous times. Here's an example:
// Add multiple recipients
$mail->addAddress('recipient1@example.com', 'Recipient 1 Name');
$mail->addAddress('recipient2@example.com', 'Recipient 2 Name');
$mail->addAddress('recipient3@example.com', 'Recipient 3 Name');
And if you want to add CC addresses, you can simply add:
// Add BCC recipients
$mail->addCC('bcc_recipient1@example.com', 'CC Recipient 1 Name');
$mail->addCC('bcc_recipient2@example.com', 'CC Recipient 2 Name');
$mail->addCC('bcc_recipient3@example.com', 'CC Recipient 3 Name');
Similarly, you can use the addBCC() method to add BCC recipients. Here's how:
// Add BCC recipients
$mail->addBCC('bcc_recipient1@example.com', 'BCC Recipient 1 Name');
$mail->addBCC('bcc_recipient2@example.com', 'BCC Recipient 2 Name');
$mail->addBCC('bcc_recipient3@example.com', 'BCC Recipient 3 Name');
But what if we have an array of recipients? We can loop through the array and add each recipient using the addAddress() method. Here's an example:
// Recipients associative array
$recipients = [
    [
        'email' => 'recipient1@example.com',
        'name' => 'Recipient 1'
    ],
    [
        'email' => 'recipient2@example.com',
        'name' => 'Recipient 2'
    ],
    [
        'email' => 'recipient2@example.com',
        'name' => 'Recipient 2'
    ]
];

// Loop through recipients
foreach ($recipients as $recipient) {
    // Add recipient
    $mail->addAddress($recipient['email'], $recipient['name']);
}
We could implement the same logic to add addresses from a database or any other source.
Now that we've covered sending emails to multiple recipients let's move on to file attachments.
2.4. File Attachments
The PHPMailer library allows you to attach files to your emails, making it relatively easy to send documents, images, or any other files along with your email. To attach files, you can simply use the addAttachment() method.
Here's an example:
$mail->addAttachment('/path/to/document.pdf', 'document.pdf');
$mail->addAttachment('/path/to/image.jpg', 'new.jpg');
As you can see, we execute the addAttachment() method multiple times to attach various files to the email. The first parameter is the file path, while the second is the file name displayed to the recipient. Pretty simple, right?
2.5. Send HTML Templates
Sending emails in HTML format is a breeze because all we essentially have to do is set the isHTML() method to true and then add our HTML code to the body property.
Here's an example:
$mail->isHTML(true);
$mail->Subject = 'HTML Email';

$template = '<h1>Hello, World!</h1><p>This is an HTML email.</p>';

$mail->Body = $template;
$mail->AltBody = strip_tags($template);
In the above example, we set the isHTML() method to true to enable HTML emails. We then specify the email content as an HTML template, which includes a heading and a paragraph.
The AltBody property is set to the stripped version of the template to ensure compatibility with email clients that don't support HTML.
If we want to take a more complex approach and read external templates, we can use the file_get_contents() function to read the template file and set it as the email content. Here's an example:
$mail->isHTML(true);
$mail->Subject = 'HTML Email';

$template = file_get_contents('path/to/template.html');
// $template = str_replace(['{name}', '{message}'], ['John Doe', 'Hello, World!'], $template);

$mail->Body = $template;
$mail->AltBody = strip_tags($template);
Uncomment the str_replace() function if you want to replace placeholders in the template with dynamic content.
3. OAuth 2.0 Authentication
Another method to send emails using PHPMailer is by utilizing OAuth 2.0 authentication, which enables users to grant access to their own resources without sharing their credentials. It's more secure than using app passwords, as it doesn't require storing sensitive information in your app.
To start, we must create a new project in the Google Cloud Console and enable the Gmail API in the dashboard. Please follow the below instructions:
- Go to Google Cloud Console.
- Create a new project and enable the Gmail API.
- Generate OAuth 2.0 credentials (Client ID and Client Secret).
- Edit the OAuth client and add the URI to the authorized redirect URIs section. It should reflect the URL of your PHP application.
The Google Provider for OAuth 2.0 Client library is required to authenticate with Google's OAuth 2.0 API. We'll need to install it using composer:
composer require league/oauth2-googleThis approach is a little more complicated as we need to retrieve and refresh the tokens periodically. However, it provides a more secure and reliable way to send emails using Gmail's SMTP server.
Let's get started with the following code:
<?php
// Import PHPMailer classes into the global namespace
use PHPMailer\PHPMailer\PHPMailer;
use PHPMailer\PHPMailer\Exception;
use PHPMailer\PHPMailer\OAuth;

// Import Google OAuth 2.0 provider
use League\OAuth2\Client\Provider\Google;

// Start the session
session_start();

// Load Composer's autoloader
require 'vendor/autoload.php';

// Gmail API credentials
$clientId = 'YOUR_GOOGLE_CLIENT_ID';
$clientSecret = 'YOUR_GOOGLE_CLIENT_SECRET';
$redirectUri = 'YOUR_REDIRECT_URI';

// Create a new Google OAuth 2.0 provider
$provider = new Google([
    'clientId'     => $clientId,
    'clientSecret' => $clientSecret,
    'redirectUri'  => $redirectUri,
    'accessType' => 'offline'
]);

// If we don't have an authorization code, then get one
if (!isset($_GET['code'])) {
    // Get authorization URL
    $authUrl = $provider->getAuthorizationUrl([
        'scope' => [ 'https://mail.google.com/' ]
    ]);
    // Get the generated state and store it in session
    $_SESSION['oauth2state'] = $provider->getState();
    // Redirect the user to Google's OAuth consent page
    header('Location: ' . $authUrl);
    exit;
}

// Check if the authorization code exists
if (isset($_GET['code']) && !empty($_GET['code'])) {
    try {
        // Verify the state to protect against CSRF attacks
        if (empty($_GET['state']) || ($_GET['state'] !== $_SESSION['oauth2state'])) {
            unset($_SESSION['oauth2state']);
            exit('Invalid state!');
        }

        // Get the access token with the refresh token
        $token = $provider->getAccessToken('authorization_code', [
            'code' => $_GET['code'],
        ]);

        // Retrieve the refresh token
        $refreshToken = $token->getRefreshToken();

    } catch (Exception $e) {
        exit('Failed to get access token: ' . $e->getMessage());
    }

    // Add PHPMailer code here

}
?>
The above code retrieves the refresh token securely and stores the active state in session to mitigate CSRF attacks. Remember to update the client variables to reflect your own.
Once we've successfully authenticated with Google and retrieved the access token and refresh token, we can proceed to send emails using PHPMailer.
Find the following:
// Add PHPMailer code hereReplace it with:
// Create a new PHPMailer instance
$mail = new PHPMailer(true);

try {
    // SMTP Server settings
    $mail->isSMTP();
    $mail->Host = 'smtp.gmail.com';
    $mail->SMTPAuth = true;
    $mail->SMTPSecure = PHPMailer::ENCRYPTION_SMTPS;
    // TCP port to connect to (465 or 587)
    $mail->Port = 465;
    // OAuth 2.0 authentication
    $mail->AuthType = 'XOAUTH2';

    // OAuth settings
    $mail->setOAuth(new OAuth([
        'provider' => $provider,
        'clientId' => $clientId,
        'clientSecret' => $clientSecret,
        'refreshToken' => $refreshToken,
        'userName' => 'your_email@gmail.com' // Your Gmail address
    ]));

    // Your Gmail address and name
    $mail->setFrom('your_email@gmail.com', 'Your Name');

    // Recipients
    $mail->addAddress('recipient@example.com', 'Recipient Name');

    // Change the charset to UTF-8
    $mail->CharSet = 'UTF-8';

    // Content
    $mail->isHTML(true);
    $mail->Subject = 'Here is the subject';
    $mail->Body = 'Here is the message with <strong>HTML content</strong>';
    $mail->AltBody = 'Here is the message with HTML content';

    // Send the email
    $mail->send();
    echo 'Message has been sent!';
} catch (Exception $e) {
    echo "Message could not be sent! Mailer Error: {$mail->ErrorInfo}";
}
In the above code, we configure PHPMailer to use Gmail's SMTP server, set the OAuth 2.0 authentication type, and provide the necessary OAuth settings, including the provider, client ID, client secret, refresh token, and Gmail address.
Once we've set up the OAuth settings, we should be able to send an email like we did in the previous example. The code will output an error if there are any issues, etc.
4. Native mail() Implementation
Sending mail with the native mail function is relatively straightforward, but it requires configuring the php.ini file to use Gmail's SMTP server.
First, we need to update the php.ini file to configure the SMTP settings. Locate the php.ini file on your server and update the following settings:
[mail function]
SMTP=smtp.gmail.com
smtp_port=587
sendmail_from = yourname@gmail.com
auth_username = yourname@gmail.com
auth_password = your_app_password
The above will only work if your server allows you to send emails using the mail() function. If you're using a local server like XAMPP or WAMP, you may need to configure the sendmail_path directive in the php.ini file to point to the sendmail executable.
And finally, the PHP script to send the email:
<?php
// Define the email details
$to = 'recipient@example.com';
$subject = 'Your Subject';
$message = 'Your Message';
$headers = 'From: yourname@example.com' . "\r\n" . 'Reply-To: yourname@example.com' . "\r\n" . 'X-Mailer: PHP/' . phpversion();

// Send the email
if (mail($to, $subject, $message, $headers)) {
    echo 'Email sent successfully!';
} else {
    echo 'Failed to send email!';
}
?>
This method is less secure than using PHPMailer with app password or OAuth 2.0 authentication, but it's still a viable option for sending emails using Gmail.
In some cases, hosting providers may restrict access to this function. Therefore, the ideal solution would be to use the PHPMailer library instead.
5. Simple Email Form with HTML
Now that we've covered the various methods to send emails using PHPMailer and Gmail, let's create a simple email form with HTML to send emails from a web page. We'll use PHPMailer with app password authentication to send the emails.
Create a new PHP file and add the following:
<?php
// Import PHPMailer classes into the global namespace
use PHPMailer\PHPMailer\PHPMailer;
use PHPMailer\PHPMailer\Exception;

// Load Composer's autoloader
require 'vendor/autoload.php';

/* Or without Composer
require 'project/PHPMailer/src/Exception.php';
require 'project/PHPMailer/src/PHPMailer.php';
require 'project/PHPMailer/src/SMTP.php';
*/

// Check if the form is submitted
if ($_SERVER['REQUEST_METHOD'] === 'POST') {

    // Create a new PHPMailer instance
    $mail = new PHPMailer(true);

    try {
        // SMTP Server settings
        $mail->isSMTP();
        $mail->Host = 'smtp.gmail.com';
        $mail->SMTPAuth = true;
        // Your Gmail address
        $mail->Username = 'your_email@gmail.com';
        // App password or Gmail password
        $mail->Password = 'your_app_password';
        $mail->SMTPSecure = PHPMailer::ENCRYPTION_SMTPS;
        // TCP port to connect to (465 or 587)
        $mail->Port = 587;

        // Your Gmail address and name
        $mail->setFrom('your_email@gmail.com', 'Your Name');

        // Recipients
        $mail->addAddress($_POST['email']);

        // Change the charset to UTF-8
        $mail->CharSet = 'UTF-8';

        // Content
        $mail->isHTML(true);
        $mail->Subject = $_POST['subject'];
        $mail->Body = $_POST['message'];
        $mail->AltBody = strip_tags($_POST['message']);

        // Send the email
        $mail->send();
        $msg = 'Message has been sent!';
    } catch (Exception $e) {
        $msg = "Message could not be sent! Mailer Error: {$mail->ErrorInfo}";
    }

}
?>
<!DOCTYPE html>
<html>
    <head>
        <meta charset="utf-8">
        <meta name="viewport" content="width=device-width,minimum-scale=1">
        <title>Send Email</title>
        <style>
        * {
            box-sizing: border-box;
            font-family: system-ui, "Segoe UI", Roboto, Helvetica, Arial, sans-serif, "Apple Color Emoji", "Segoe UI Emoji", "Segoe UI Symbol";
        }
        body {
            margin: 0;
            padding: 15px;
            background-color: #f3f4f7;
        }
        .email-form  {
            display: flex;
            flex-flow: column;
            background-color: #fff;
            width: 100%;
            max-width: 500px;
            margin: 60px auto;
            border-radius: 10px;
            padding: 45px;
            box-shadow: 0px 0px 6px 1px rgba(45, 54, 68, 0.05);
        }
        .email-form h1 {
            font-size: 20px;
            font-weight: 600;
            color: #666b72;
            margin: 0;
            padding: 15px 0;
        }
        .email-form p {
            font-size: 14px;
            font-weight: 500;
            color: #6b6f75;
            margin: 0;
            padding: 10px 0;
        }
        .email-form label {
            font-size: 14px;
            font-weight: 500;
            color: #6b6f75;
            margin: 15px 0 5px 0;
        }
        .email-form input, .email-form textarea {
            padding: 15px;
            border: 1px solid #dfe0e0;
            width: 100%;
            margin: 10px 0 5px 0;
            border-radius: 4px;
        }
        .email-form textarea {
            resize: none;
            height: 150px;
        }
        .email-form textarea::placeholder, .email-form input::placeholder {
            color: #8e939b;
        }
        .email-form button {
            padding: 12px;
            border: 0;
            background-color: #cb5f51;
            font-weight: 500;
            border-radius: 4px;
            color: #fff;
            cursor: pointer;
            width: 100px;
            font-size: 14px;
            margin: 25px 0 10px 0;
            box-shadow: 0px 0px 6px 1px rgba(45, 54, 68, 0.1);
        }
        .email-form button:hover {
            background-color: #c15b4d;
        }
        </style>
    </head>
    <body>
        <form class="email-form" method="post">

            <h1>Send Email</h1>

            <label for="email">Recipient Email</label>
            <input type="email" id="email" name="email" placeholder="Enter the recipient email" required>

            <label for="subject">Subject</label>
            <input type="text" id="subject" name="subject" placeholder="Enter your subject" required>

            <label for="message">Message</label>
            <textarea id="message" name="message" placeholder="Enter your message" required></textarea>

            <button type="submit">Send</button>

            <?php if (isset($msg) && !empty($msg)): ?>
            <p><?=$msg?></p>
            <?php endif; ?>

        </div>
    </body>
</html>
If we navigate to the PHP file in our web browser, we should see the following form:
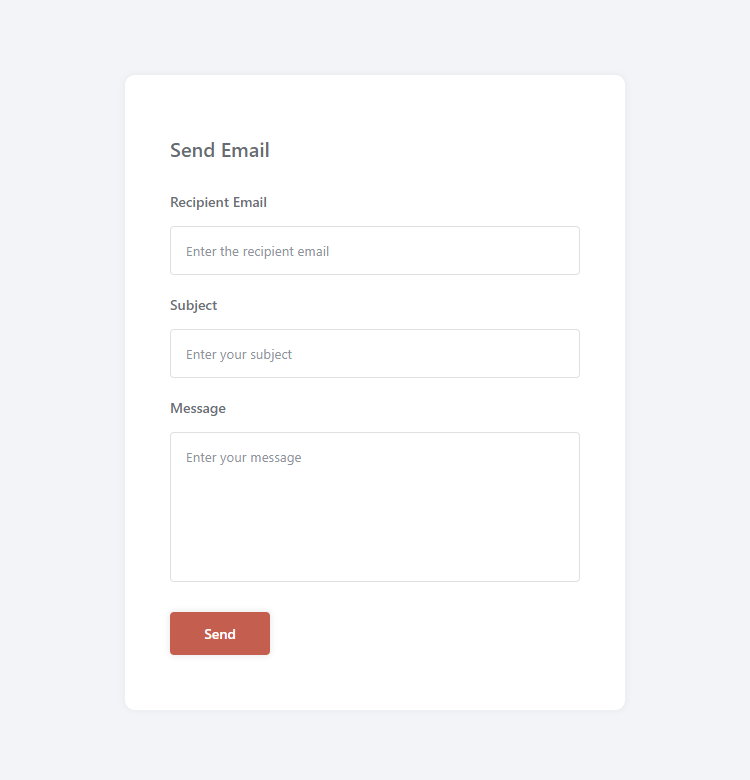
The form includes fields for the recipient's email, subject, and message. When the form is submitted, the PHP script processes the form data and sends an email using PHPMailer with app password authentication. If there is an error, it will output it to the form.
Conclusion
With these practical examples, you should now be able to send emails directly from your PHP project using Gmail's SMTP server.
If you've enjoyed reading this tutorial, please share it to social media as it will help us create more quality content. If you have any questions or feedback, feel free to drop a comment below.
Thanks for reading, and enjoy coding!